
Włączanie SSL w MikroTik Hotspot
Ten przewodnik wyjaśnia, jak włączyć SSL (HTTPS) na stronie logowania MikroTik Hotspot przy użyciu darmowego certyfikatu ACME wydanego przez IP Cloud. Wykonaj poniższe kroki, korzystając z interfejsu graficznego lub wiersza poleceń (CLI) systemu RouterOS.
Kompatybilność
Platforma Social WiFi została przetestowana i działa poprawnie na następujących wersjach:
- RouterOS w wersji 7.19 i nowszych
Wymagania
Instalacja
-
Włącz IP Cloud
Przejdź do IP -> Cloud i ustaw DDNS Enabled na
yes.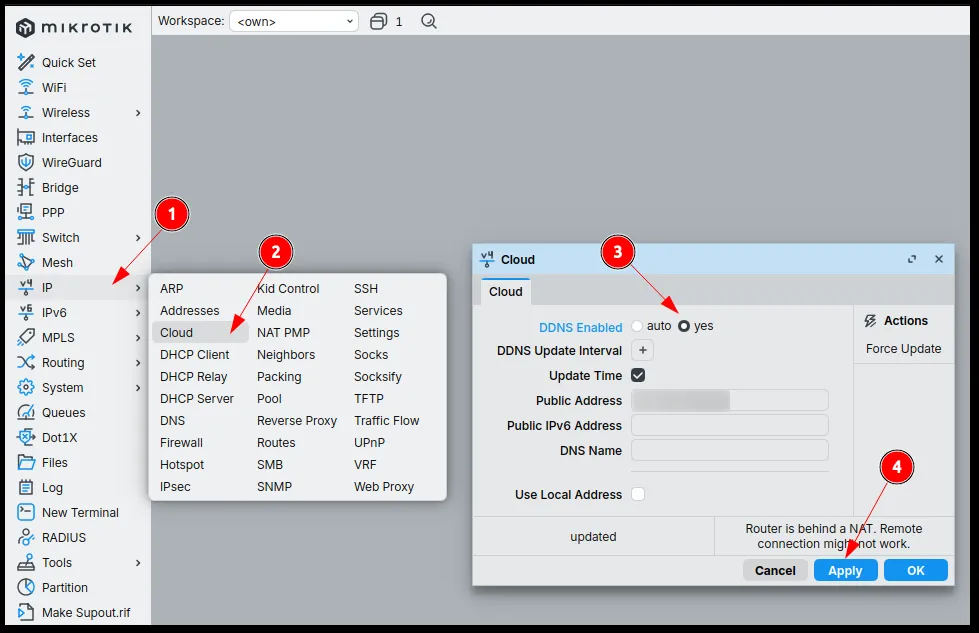
Poczekaj, aż pojawi się DNS Name.
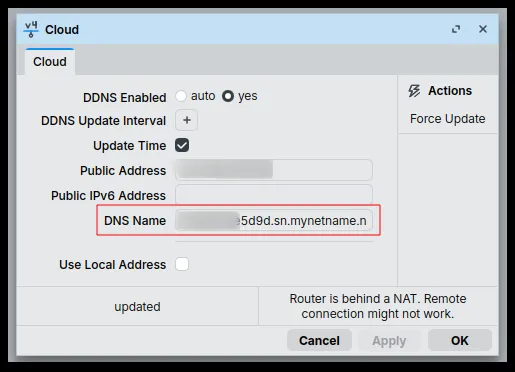
-
Poproś o certyfikat ACME
Przejdź do System (1) -> Certificates (2), a następnie kliknij Add ACME (3). Wpisz dowolną nazwę w polu Name, na przykład
mt_cert, i wprowadź domenę podaną w IP -> Cloud -> DNS Name.Po wypełnieniu pól kliknij Add ACME Certificate (4).
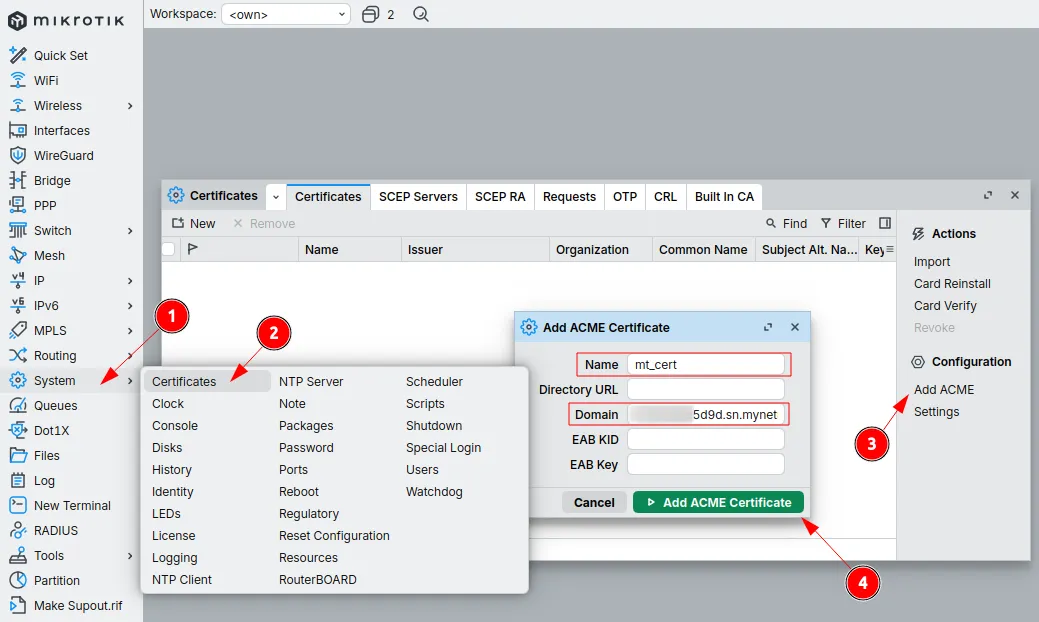
Po dodaniu certyfikatu odczekaj około minutę, aż status zmieni się z Ea na Ka.
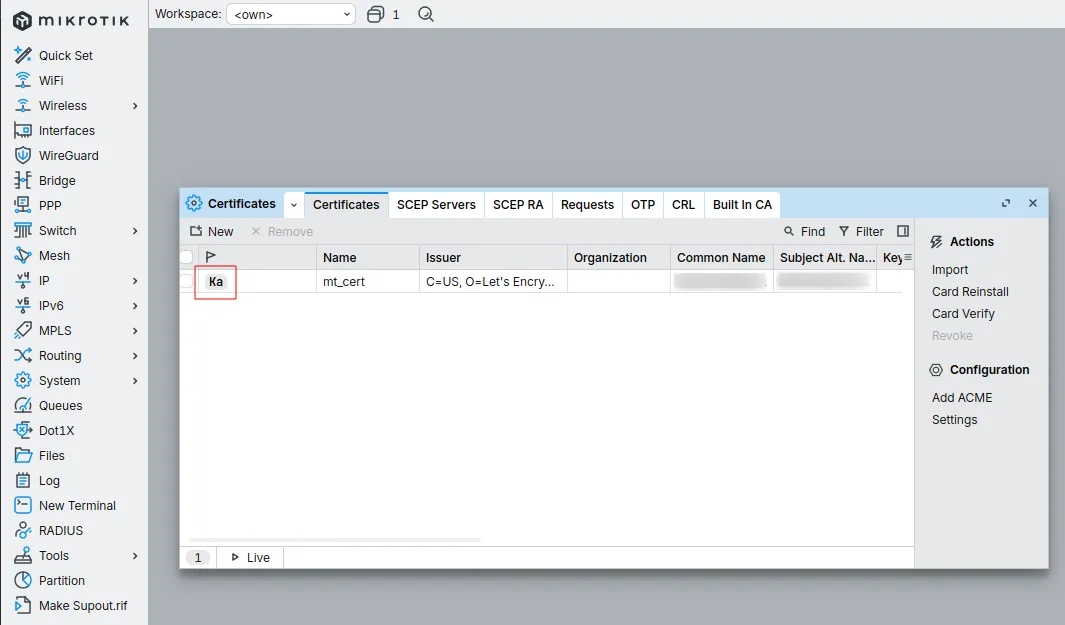
-
Dodaj certyfikat do Hotspotu
Przejdź do IP (1) -> Hotspot (2) -> Server Profiles (3), a następnie kliknij dwukrotnie domyślny profil (4). W zakładce General zmień DNS Name z
logging.sw.comna domenę podaną w IP -> Cloud -> DNS Name.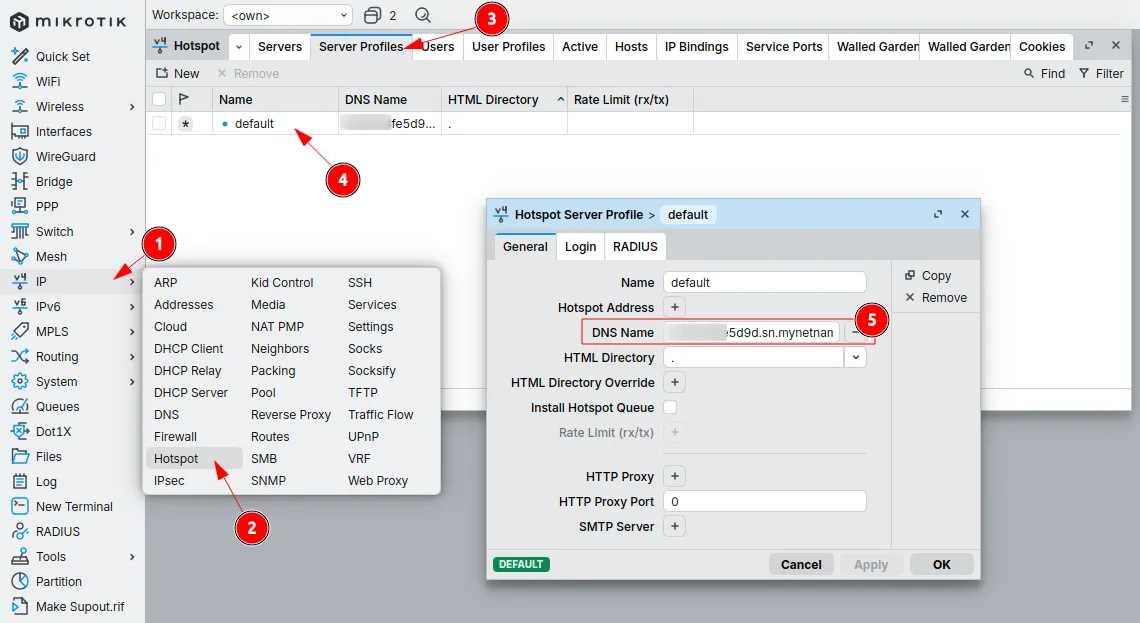
Przejdź do zakładki Login. W sekcji Login By wybierz tylko HTTPS, a następnie poniżej, w polu SSL Certificate, wybierz certyfikat wygenerowany w poprzednim kroku.
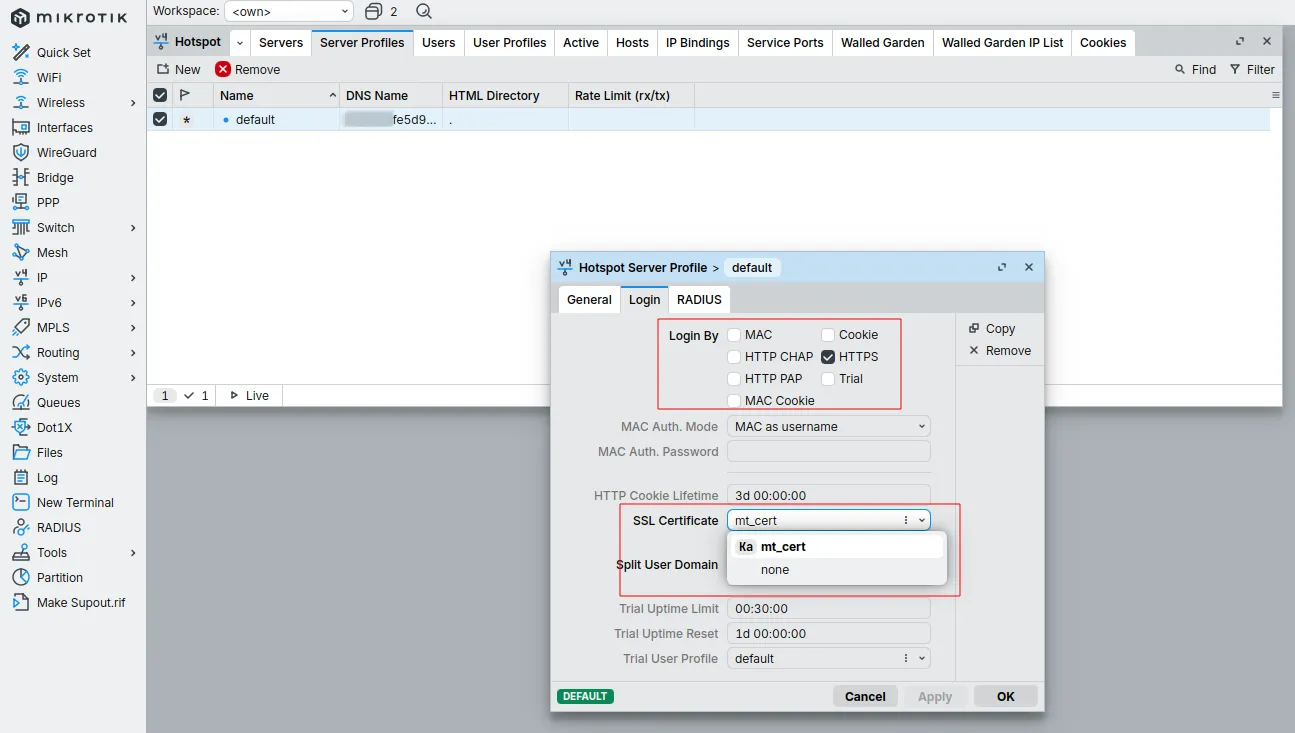
Po wykonaniu kroków kliknij Apply.
Otwórz terminal i wprowadź poniższe polecenia (skopiuj je wraz z nawiasami klamrowymi).
{:local minMajor 7:local minMinor 19:local pollInterval 5s:local maxPollAttempts 24:local acmeDirectoryUrl "https://acme-v02.api.letsencrypt.org/directory":local hotspotProfileName "default"
:local verStr [/system resource get version]:local verNum [:pick $verStr 0 [:find $verStr " "]]:local dot1 [:find $verNum "."]:local major [:tonum [:pick $verNum 0 $dot1]]:local rest [:pick $verNum ($dot1 + 1) [:len $verNum]]:local dot2 [:find $rest "."]:local minor 0:if ([:typeof $dot2] = "nil") do={    :set minor [:tonum $rest]} else={    :set minor [:tonum [:pick $rest 0 $dot2]]}
:if (($major < $minMajor) || (($major = $minMajor) && ($minor < $minMinor))) do={    :error "Unsupported RouterOS version: $verStr is below the required $minMajor.$minMinor"}
/ip cloud set ddns-enabled=yes update-time=yes:put "Waiting for DDNS domain assignment...":delay 15s
:local dnsName [/ip cloud get dns-name]:put "DDNS name: $dnsName"
:if ([:len $dnsName] = 0) do={    :error "No dns-name assigned in IP Cloud"}
/certificate add-acme directory-url=$acmeDirectoryUrl domain-names=$dnsName:put "Waiting for ACME certificate issuance..."
:local certId "":local i 0:while ([:len $certId] = 0 && $i < $maxPollAttempts) do={    :delay $pollInterval    :set certId [/certificate find where common-name=$dnsName]    :set i ($i + 1)}
:if ([:len $certId] = 0) do={    :error "ACME certificate request timed out"}
:local certName [/certificate get $certId name]:put "Certificate name: $certName"
/ip hotspot profile set [find name=$hotspotProfileName] dns-name=$dnsName ssl-certificate=$certName login-by=https
:put "SSL setup complete for domain: $dnsName"}
Ponowne pobranie plików hotspotu
Uruchom poniższe polecenie w terminalu, aby pobrać nowe wersje plików hotspotu i nadpisać stare.
{ :local downloadEndpoint "https://login.socialwifi.com/installation/mikrotik/download"; :local fileNames {"login.html"; "rlogin.html"; "alogin.html"; "flogin.html"; "md5.js"} :local destinationDirectory ""; :if ([:len [/file find name="flash" type="disk"]] > 0) do={ :set destinationDirectory "/flash/"; } :local ether1Mac ([/interface get [find name="ether1"]]->"mac-address"); :foreach fileName in=$fileNames do={ :put "Downloading file: $downloadEndpoint/$fileName\?mac=$ether1Mac" /tool fetch url="$downloadEndpoint/$fileName\?mac=$ether1Mac" dst-path="$destinationDirectory$fileName" }}Przetestuj rozwiązanie
Połącz się z siecią WiFi i otwórz stronę logowania. Przeglądarka powinna wyświetlić poprawny certyfikat dla skonfigurowanej domeny zamiast ostrzeżenia o bezpieczeństwie.