
Winbox
Requisitos previos
Esta guía asume que Winbox 4.0 ya está descargado. Si no es así, descárguelo desde el sitio web del fabricante.
El dispositivo debe estar conectado como se muestra en la guía de conexión.
Compatibilidad
Social WiFi es compatible con las siguientes versiones:
Versiones de RouterOS:
- 6.x
- 7.5 y posteriores, probado hasta la 7.19.4 (el hotspot no funciona en RouterOS 7 en versiones anteriores a la 7.5)
Acceso al router
Para acceder al router:
- Inicie Winbox.
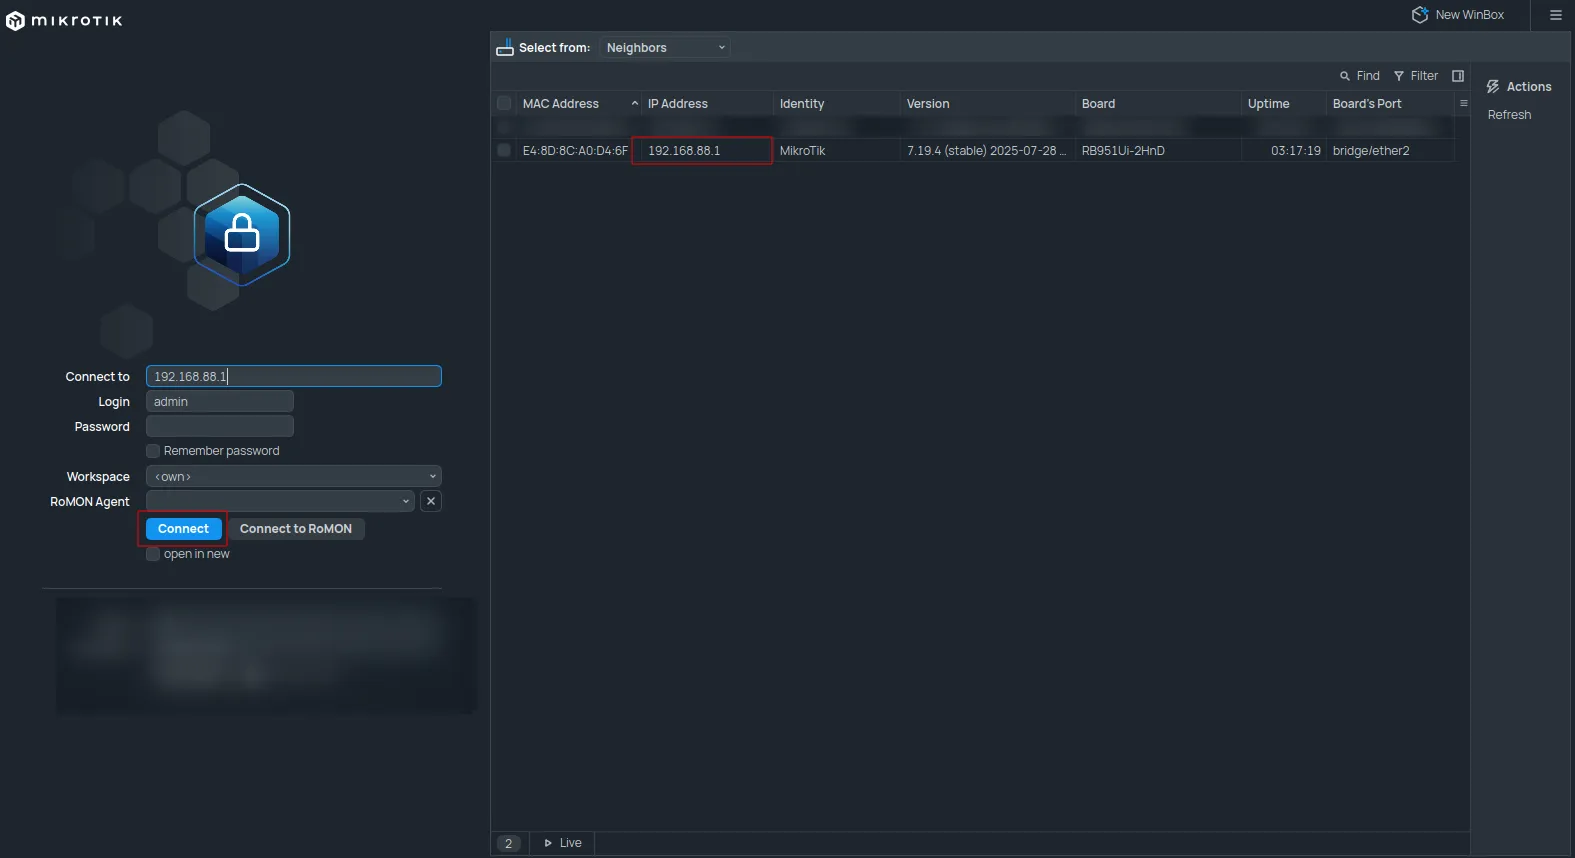
- En la parte superior, configure “Connect To” con la dirección MAC del router que se encuentra en la pestaña “Neighbors”.
- El router debería aparecer en la lista; haga doble clic sobre él.
- Haga clic en el botón azul “Connect”.
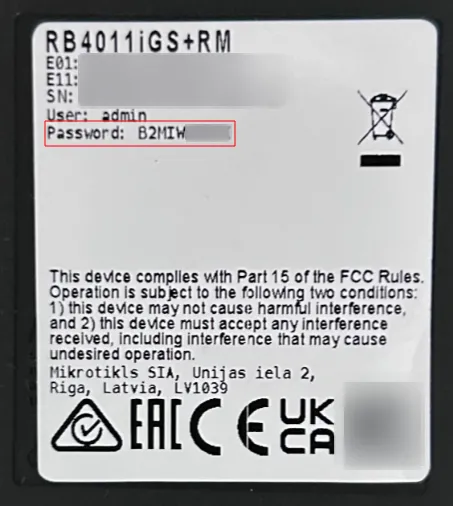
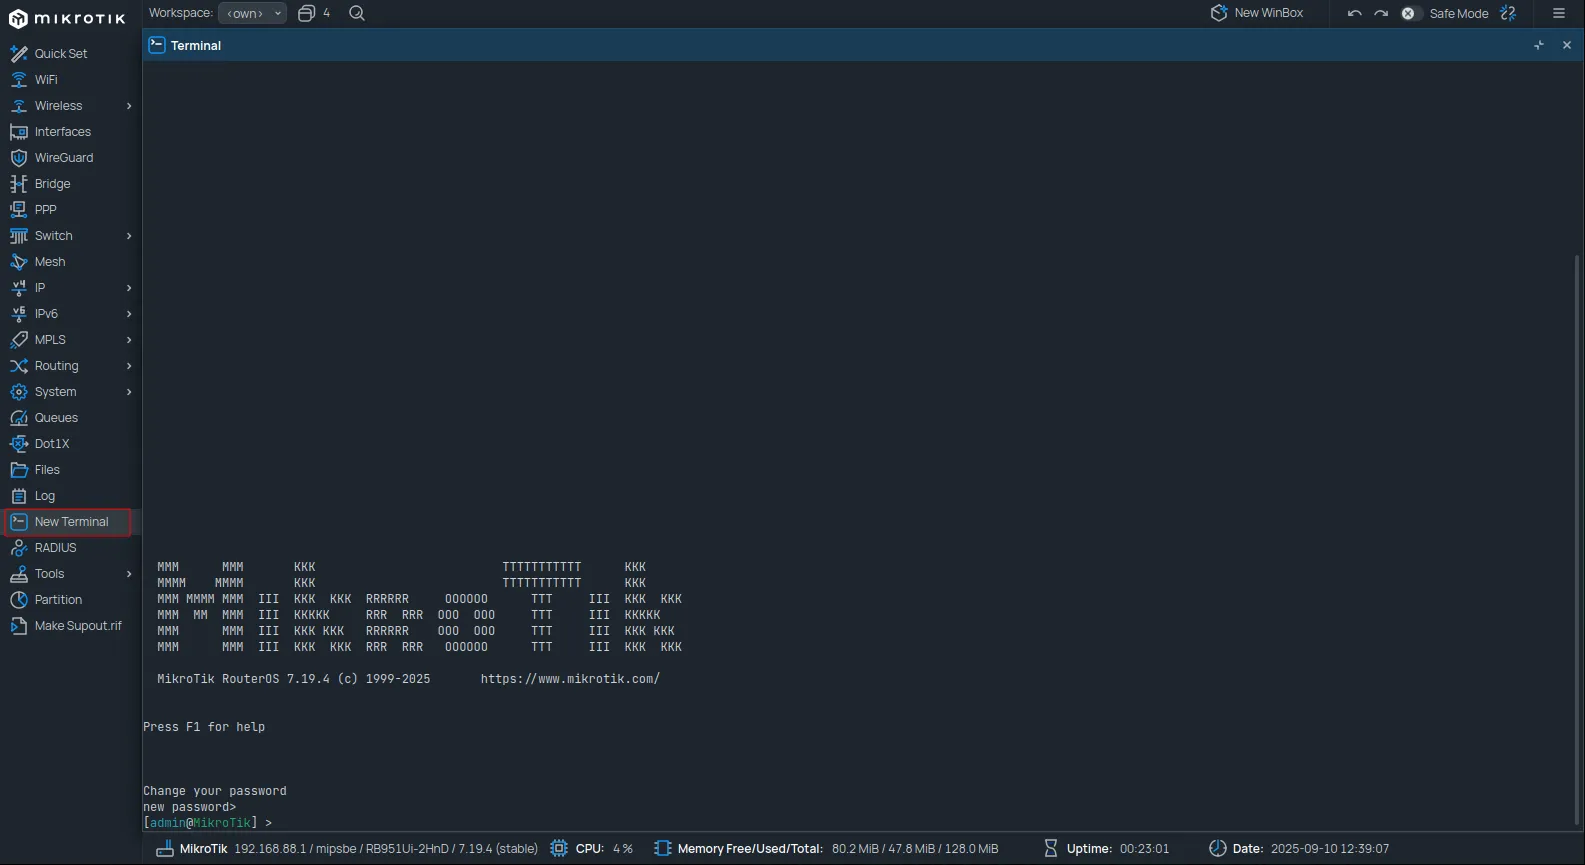
Presione CTRL+C para omitir el cambio de contraseña. Deje la ventana de terminal abierta.
Configuración de Social WiFi
Descarga de archivos de Hotspot
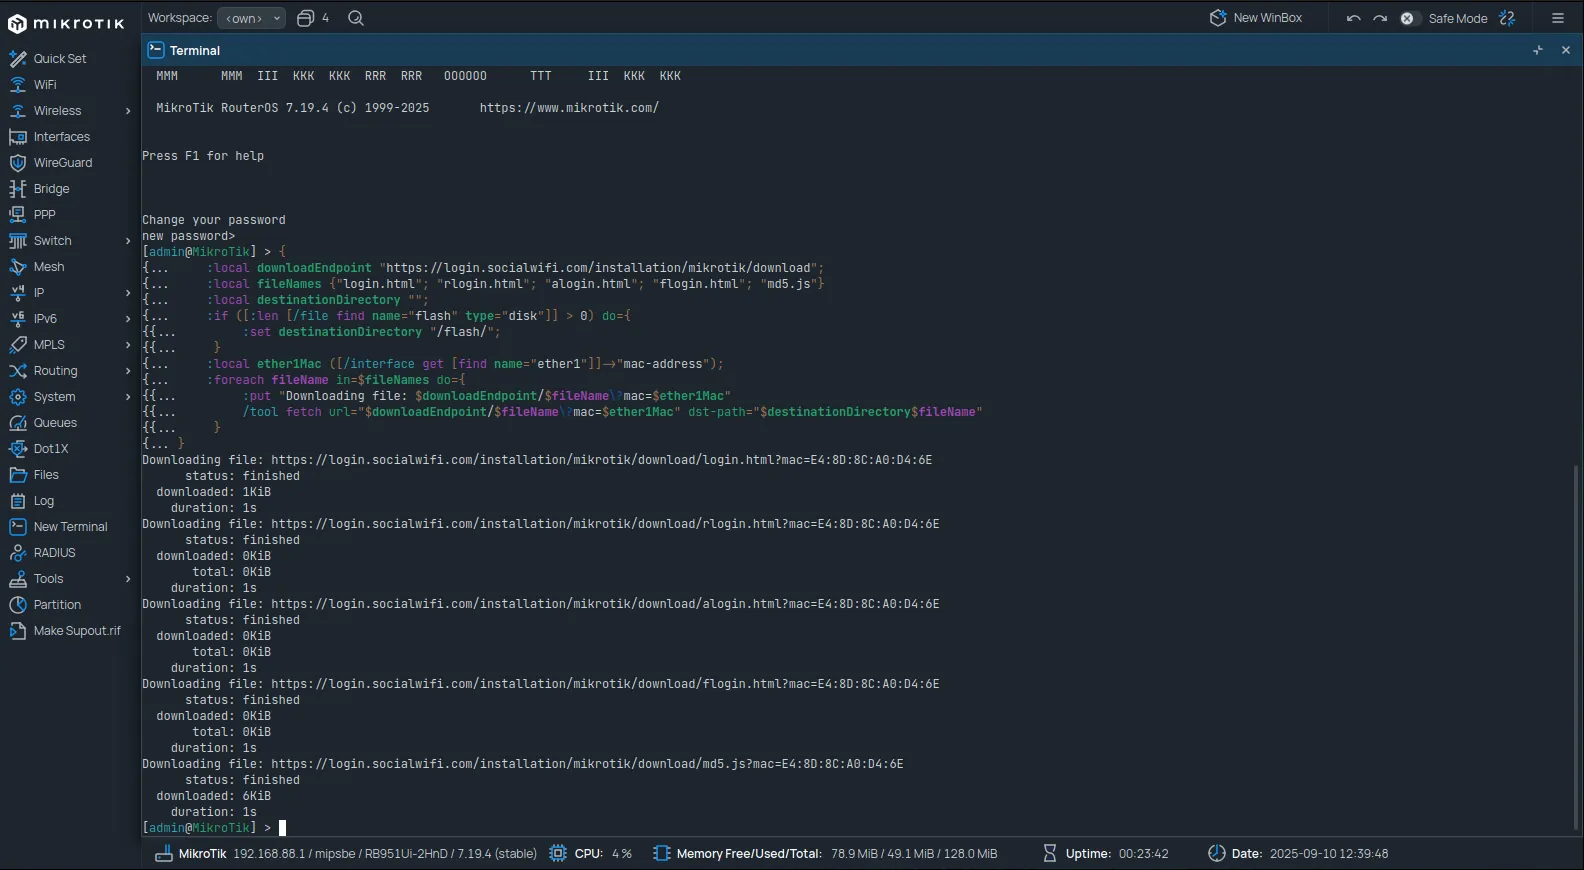
Copie y pegue el siguiente script en la terminal:
{ :local downloadEndpoint "https://login.socialwifi.com/installation/mikrotik/download"; :local fileNames {"login.html"; "rlogin.html"; "alogin.html"; "flogin.html"; "md5.js"} :local destinationDirectory ""; :if ([:len [/file find name="flash" type="disk"]] > 0) do={ :set destinationDirectory "/flash/"; } :local ether1Mac ([/interface get [find name="ether1"]]->"mac-address"); :foreach fileName in=$fileNames do={ :put "Downloading file: $downloadEndpoint/$fileName\?mac=$ether1Mac" /tool fetch url="$downloadEndpoint/$fileName\?mac=$ether1Mac" dst-path="$destinationDirectory$fileName" }}Los archivos se descargarán automáticamente después de ejecutar el script.
Configuración de Walled Garden
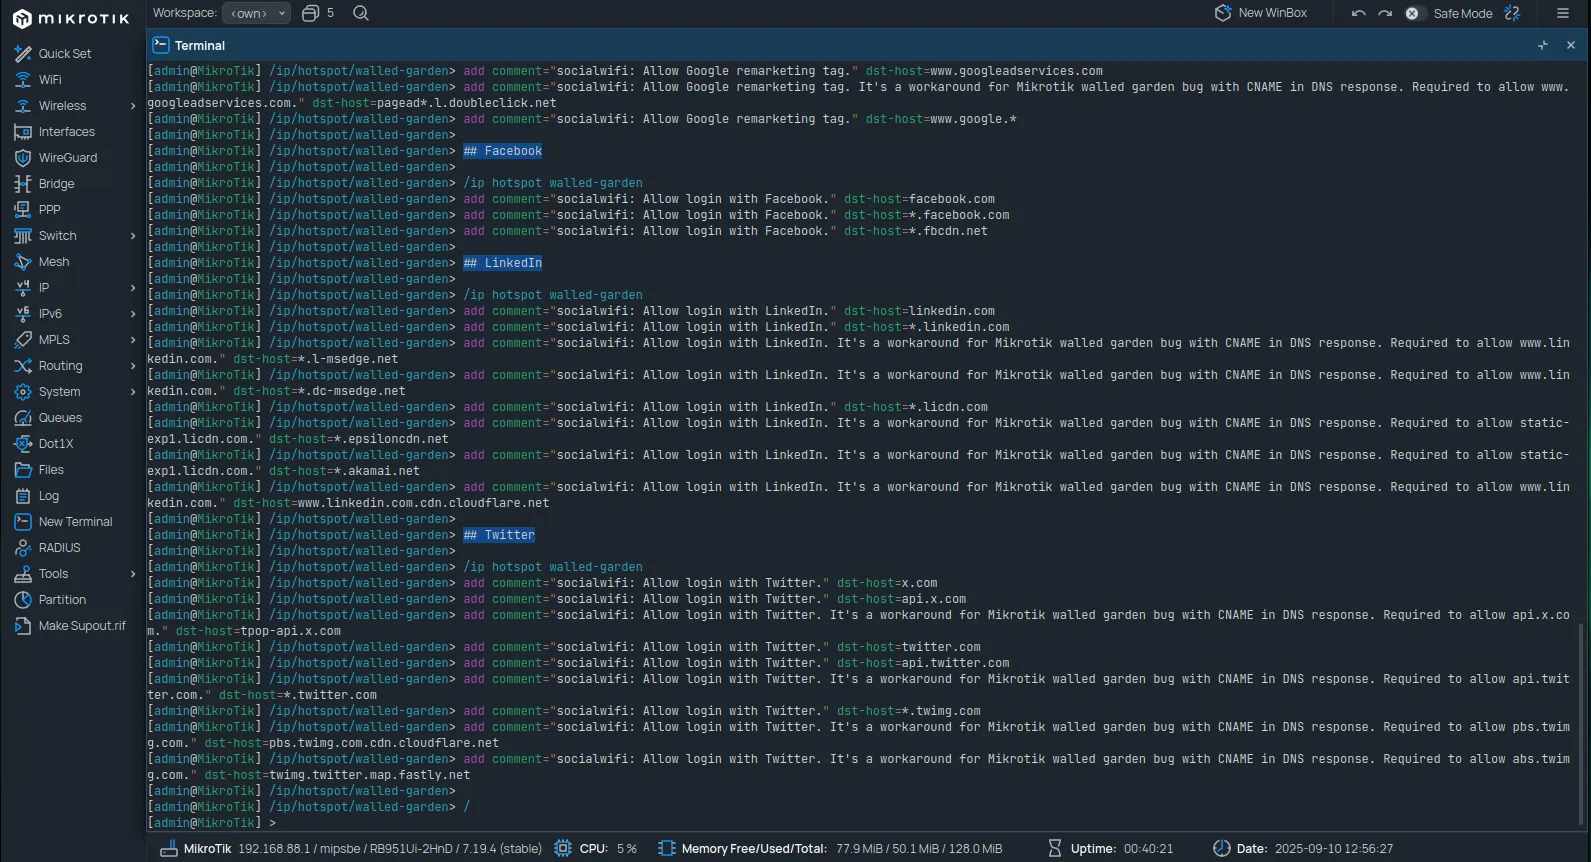
Copie y pegue los siguientes comandos en la terminal. Todos los comandos se pueden pegar a la vez.
## Social WiFi
/ip hotspot walled-gardenadd comment="socialwifi: Allow captive portal main service." dst-host=*.socialwifi.comadd comment="socialwifi: Allow captive portal main service." dst-host=sw-login.com
## YouTube widget
/ip hotspot walled-gardenadd comment="socialwifi: Allow YouTube widget." dst-host=*.youtube.comadd comment="socialwifi: Allow YouTube widget. It's a workaround for Mikrotik walled garden bug with CNAME in DNS response. Required to allow www.youtube.com." dst-host=youtube-ui.l.google.comadd comment="socialwifi: Allow YouTube widget. It's a workaround for Mikrotik walled garden bug with CNAME in DNS response. Required to allow img.youtube.com." dst-host=ytimg.l.google.comadd comment="socialwifi: Allow YouTube widget." dst-host=*.ytimg.comadd comment="socialwifi: Allow YouTube widget." dst-host=*.googlevideo.comadd comment="socialwifi: Allow YouTube widget." dst-host=yt3.ggpht.comadd comment="socialwifi: Allow YouTube widget. It's a workaround for Mikrotik walled garden bug with CNAME in DNS response. Required to allow yt3.ggpht.com." dst-host=*.l.googleusercontent.com
## Facebook remarketing pixel
/ip hotspot walled-gardenadd comment="socialwifi: Allow Facebook remarketing pixel." dst-host=*.facebook.comadd comment="socialwifi: Allow Facebook remarketing pixel." dst-host=connect.facebook.netadd comment="socialwifi: Allow Facebook remarketing pixel. It's a workaround for Mikrotik walled garden bug with CNAME in DNS response. Required to allow connect.facebook.net." dst-host=*.fbcdn.net
## Google remarketing tag
/ip hotspot walled-gardenadd comment="socialwifi: Allow Google remarketing tag." dst-host=www.googletagmanager.comadd comment="socialwifi: Allow Google remarketing tag. It's a workaround for Mikrotik walled garden bug with CNAME in DNS response. Required to allow www.googletagmanager.com." dst-host=www-googletagmanager.l.google.comadd comment="socialwifi: Allow Google remarketing tag." dst-host=www.googleadservices.comadd comment="socialwifi: Allow Google remarketing tag. It's a workaround for Mikrotik walled garden bug with CNAME in DNS response. Required to allow www.googleadservices.com." dst-host=pagead*.l.doubleclick.netadd comment="socialwifi: Allow Google remarketing tag." dst-host=www.google.*
## Facebook
/ip hotspot walled-gardenadd comment="socialwifi: Allow login with Facebook." dst-host=facebook.comadd comment="socialwifi: Allow login with Facebook." dst-host=*.facebook.comadd comment="socialwifi: Allow login with Facebook." dst-host=*.fbcdn.net
## LinkedIn
/ip hotspot walled-gardenadd comment="socialwifi: Allow login with LinkedIn." dst-host=linkedin.comadd comment="socialwifi: Allow login with LinkedIn." dst-host=*.linkedin.comadd comment="socialwifi: Allow login with LinkedIn. It's a workaround for Mikrotik walled garden bug with CNAME in DNS response. Required to allow www.linkedin.com." dst-host=*.l-msedge.netadd comment="socialwifi: Allow login with LinkedIn. It's a workaround for Mikrotik walled garden bug with CNAME in DNS response. Required to allow www.linkedin.com." dst-host=*.dc-msedge.netadd comment="socialwifi: Allow login with LinkedIn." dst-host=*.licdn.comadd comment="socialwifi: Allow login with LinkedIn. It's a workaround for Mikrotik walled garden bug with CNAME in DNS response. Required to allow static-exp1.licdn.com." dst-host=*.epsiloncdn.netadd comment="socialwifi: Allow login with LinkedIn. It's a workaround for Mikrotik walled garden bug with CNAME in DNS response. Required to allow static-exp1.licdn.com." dst-host=*.akamai.netadd comment="socialwifi: Allow login with LinkedIn. It's a workaround for Mikrotik walled garden bug with CNAME in DNS response. Required to allow www.linkedin.com." dst-host=www.linkedin.com.cdn.cloudflare.net
## Twitter
/ip hotspot walled-gardenadd comment="socialwifi: Allow login with Twitter." dst-host=x.comadd comment="socialwifi: Allow login with Twitter." dst-host=api.x.comadd comment="socialwifi: Allow login with Twitter. It's a workaround for Mikrotik walled garden bug with CNAME in DNS response. Required to allow api.x.com." dst-host=api.x.com.cdn.cloudflare.netadd comment="socialwifi: Allow login with Twitter. It's a workaround for Mikrotik walled garden bug with CNAME in DNS response. Required to allow api.x.com." dst-host=tpop-api.x.comadd comment="socialwifi: Allow login with Twitter. It's a workaround for Mikrotik walled garden bug with CNAME in DNS response. Required to allow abs.twimg.com." dst-host=dynamic.x.com.cdn.cloudflare.netadd comment="socialwifi: Allow login with Twitter." dst-host=twitter.comadd comment="socialwifi: Allow login with Twitter." dst-host=api.twitter.comadd comment="socialwifi: Allow login with Twitter. It's a workaround for Mikrotik walled garden bug with CNAME in DNS response. Required to allow api.api.com." dst-host=api.twitter.com.cdn.cloudflare.netadd comment="socialwifi: Allow login with Twitter. It's a workaround for Mikrotik walled garden bug with CNAME in DNS response. Required to allow api.twitter.com." dst-host=*.twitter.comadd comment="socialwifi: Allow login with Twitter." dst-host=*.twimg.comadd comment="socialwifi: Allow login with Twitter. It's a workaround for Mikrotik walled garden bug with CNAME in DNS response. Required to allow pbs.twimg.com." dst-host=pbs.twimg.com.cdn.cloudflare.netadd comment="socialwifi: Allow login with Twitter. It's a workaround for Mikrotik walled garden bug with CNAME in DNS response. Required to allow abs.twimg.com." dst-host=twimg.twitter.map.fastly.net
## WhatsApp
/ip hotspot walled-gardenadd comment="socialwifi: Allow login with WhatsApp." dst-host=whatsapp.comadd comment="socialwifi: Allow login with WhatsApp." dst-host=*.whatsapp.comadd comment="socialwifi: Allow login with WhatsApp." dst-host=*.whatsapp.net
/
Añadir nuevo bridge
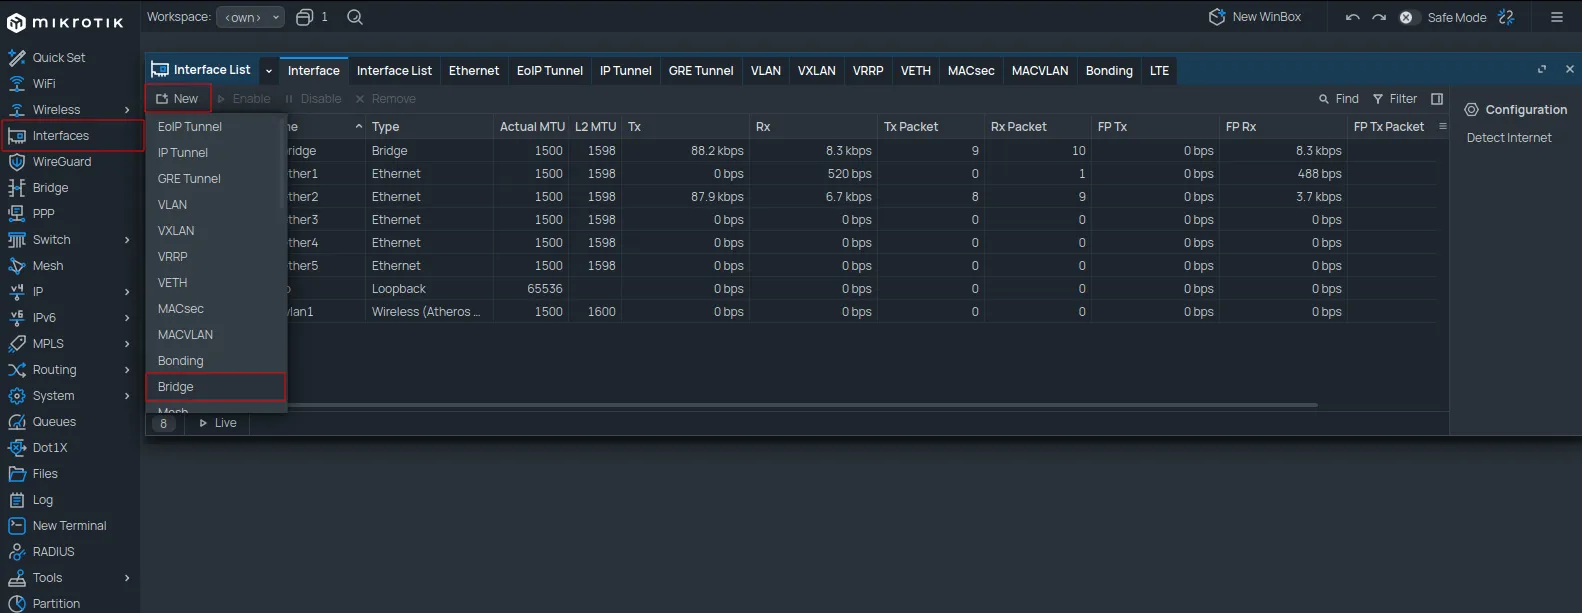
Navegue a Interfaces desde el menú de la izquierda. En la pestaña Interface, haga clic en New y seleccione Bridge.
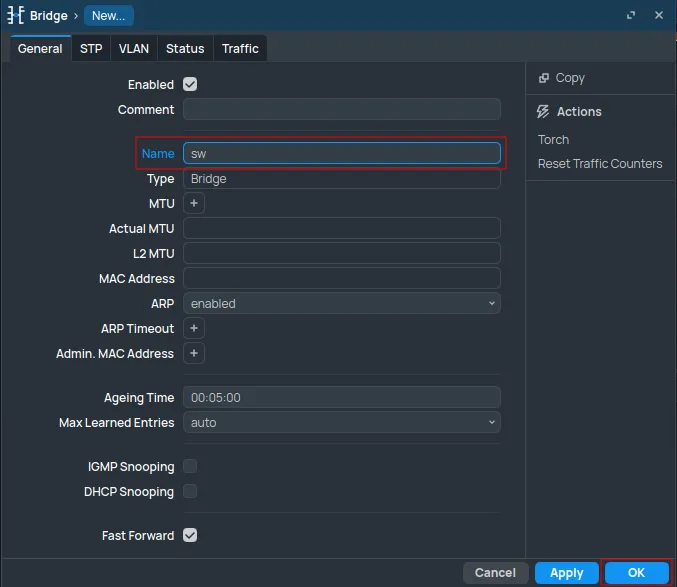
Establezca el campo Name en sw y haga clic en OK.
Añadir nueva red de invitados
Navegue a IP -> Addresses y haga clic en New.
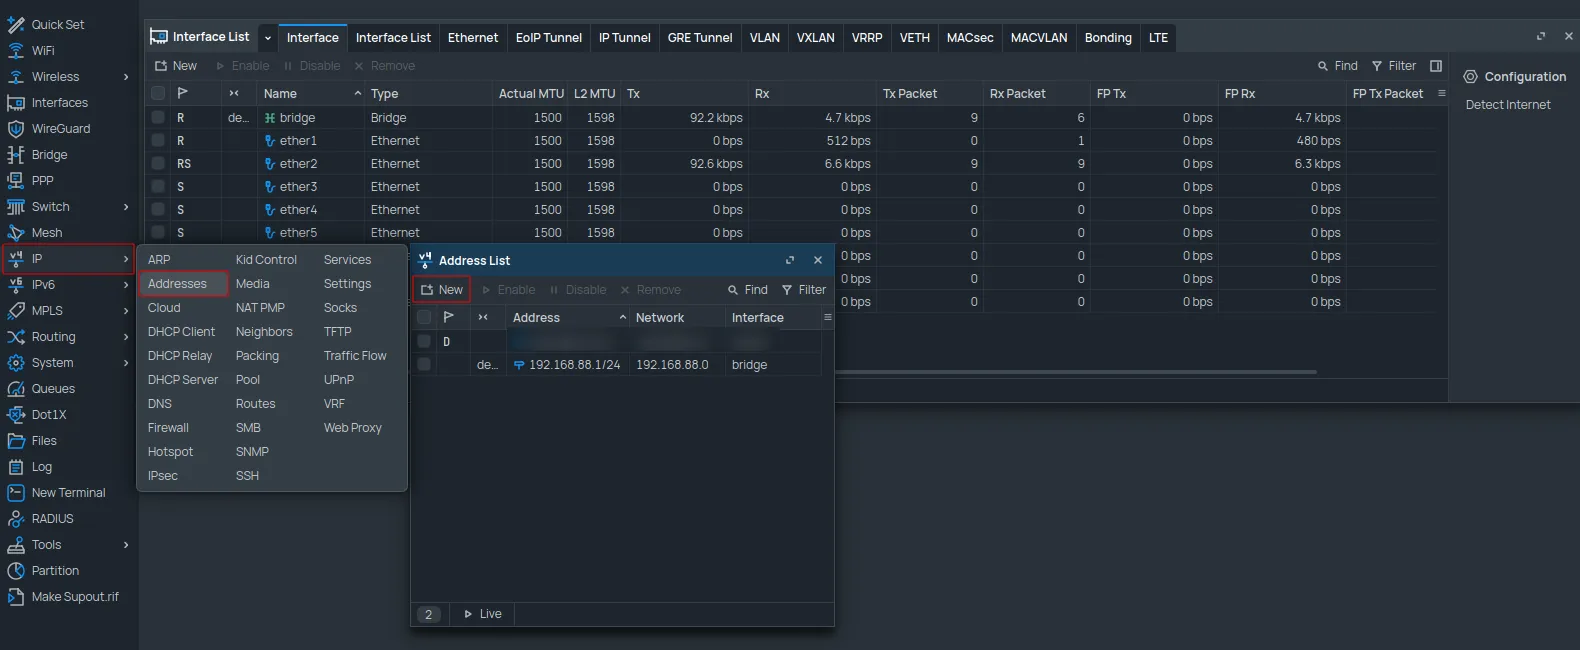
Configure de la siguiente manera:
| Address | 10.8.0.1/16 |
|---|---|
| Network | 10.8.0.0 |
| Interface | sw |
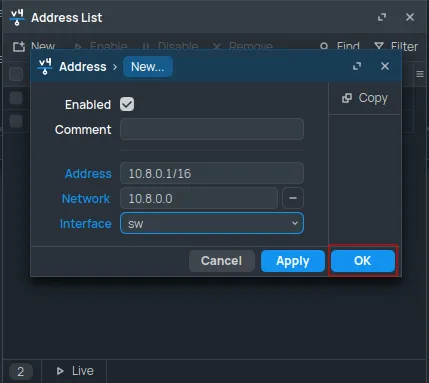
Haga clic en OK.
A continuación, navegue a IP -> Pool y haga clic en New.
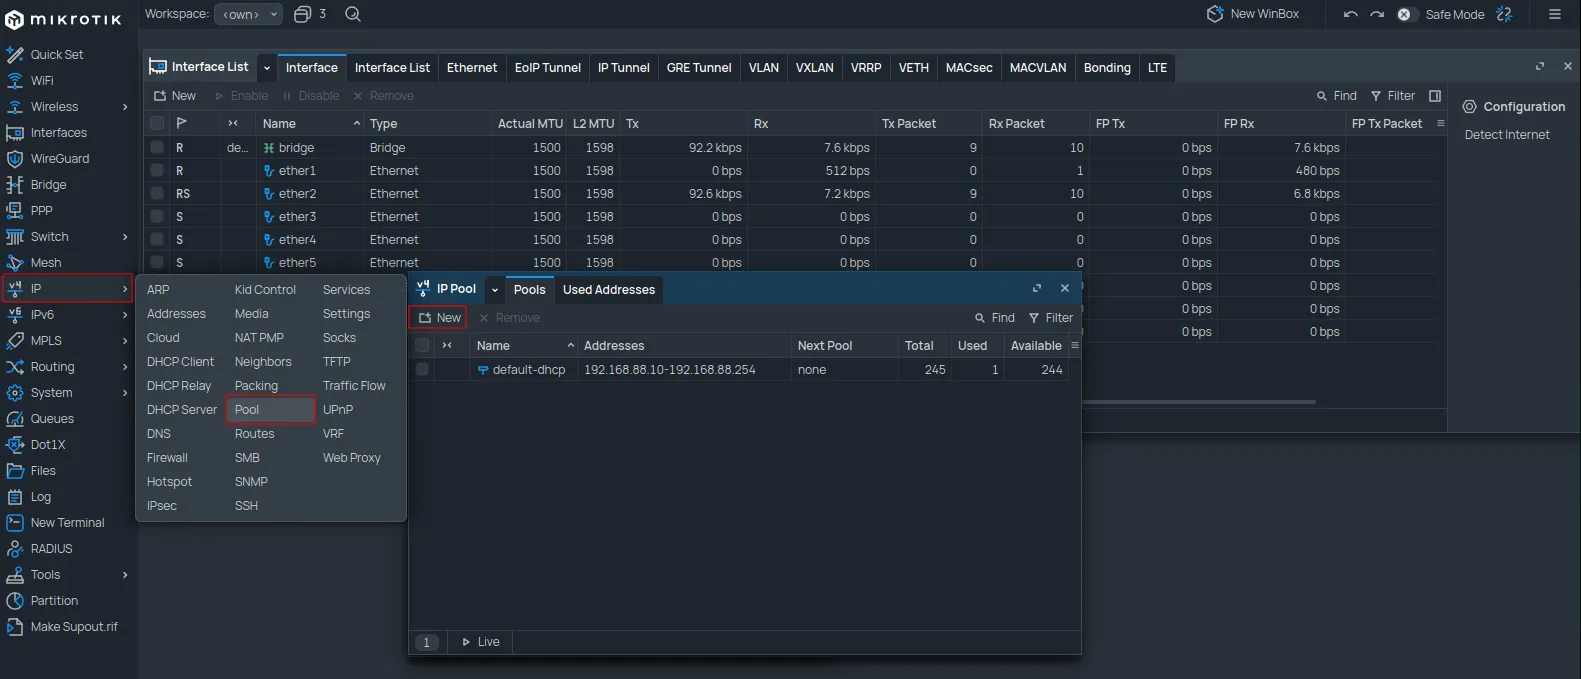
Configure de la siguiente manera:
| Name | dhcp_pool_sw |
|---|---|
| Addresses | 10.8.0.2-10.8.255.254 |
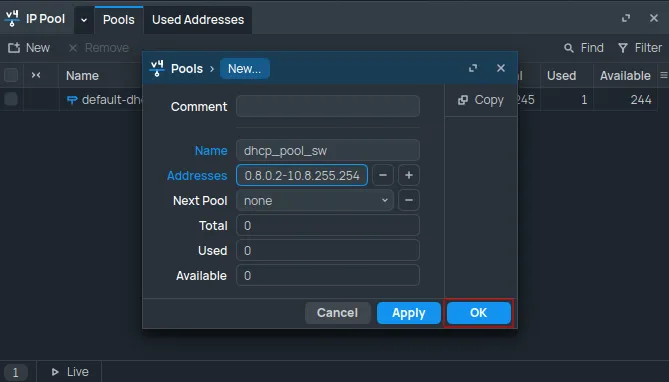
Haga clic en OK.
Navegue a IP -> DHCP Server. En la pestaña DHCP, haga clic en New.
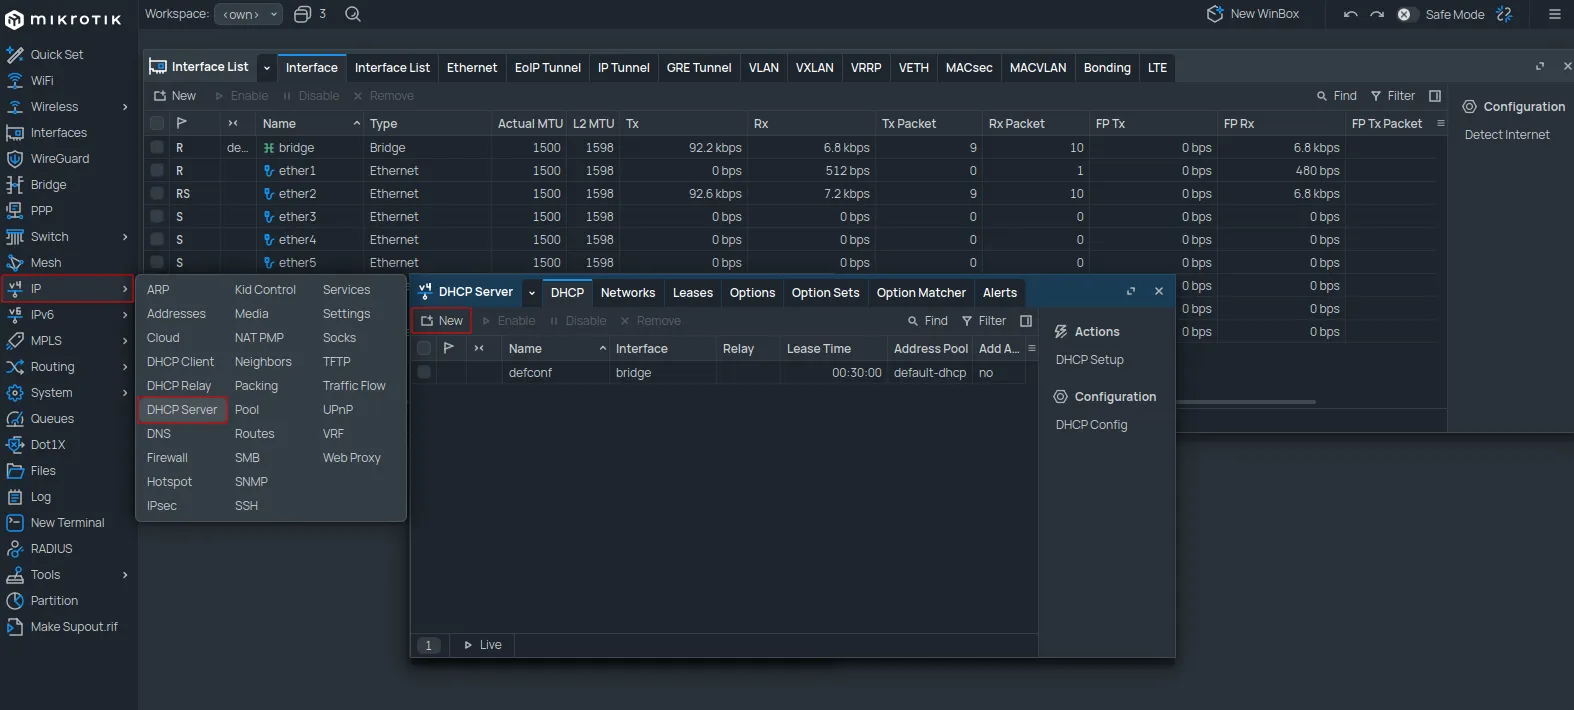
Configure de la siguiente manera:
| Name | dhcp_sw |
|---|---|
| Interface | sw |
| Lease Time | 2d 00:00:00 |
| Address Pool | dhcp_pool_sw |
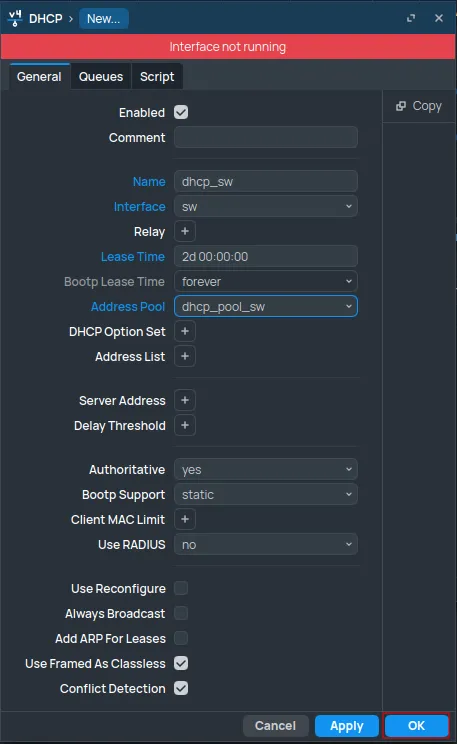
Haga clic en OK.
Cambie a la pestaña Networks y haga clic en New.
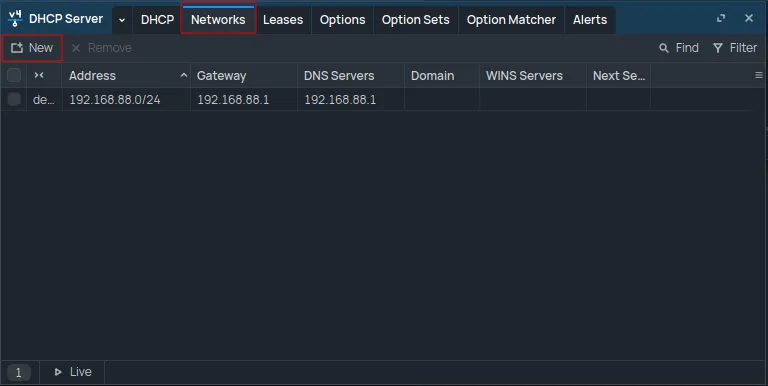
Configure de la siguiente manera:
| Address | 10.8.0.0/16 |
|---|---|
| Gateway | 10.8.0.1 |
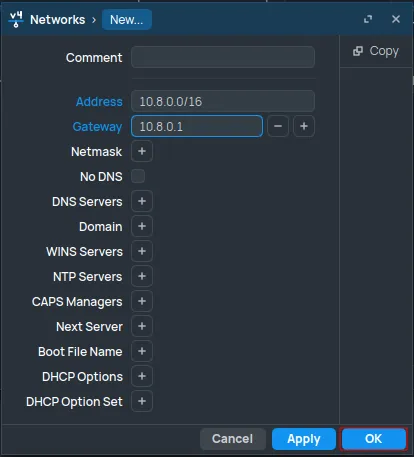
Haga clic en OK.
Configuración de RADIUS
Navegue a la sección RADIUS y haga clic en New.
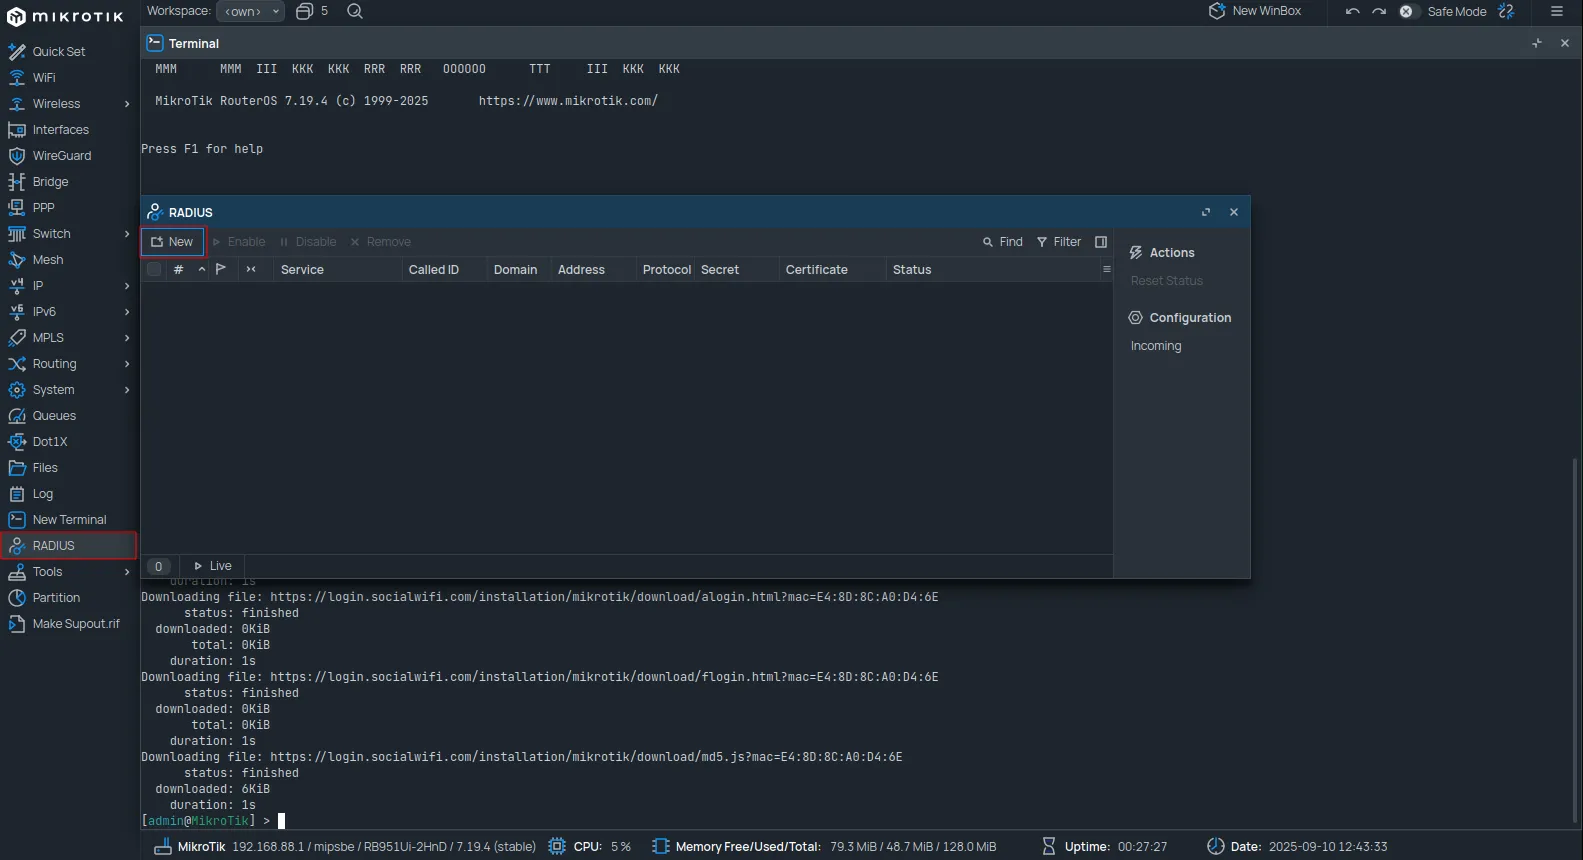
Configure de la siguiente manera:
| Service | hotspot |
|---|---|
| Address | 35.205.62.147 |
| Secret | El RADIUS Secret está disponible en la pestaña Puntos de acceso del Panel de Social WiFi. |
| Authentication Port | 31812 |
| Accounting Port | 31813 |
| Timeout | 1000 |
| Accounting Backup | Unchecked |
| Require Message Auth | yes for request resp (Este campo solo está disponible en RouterOS 7.13 y posteriores.) |
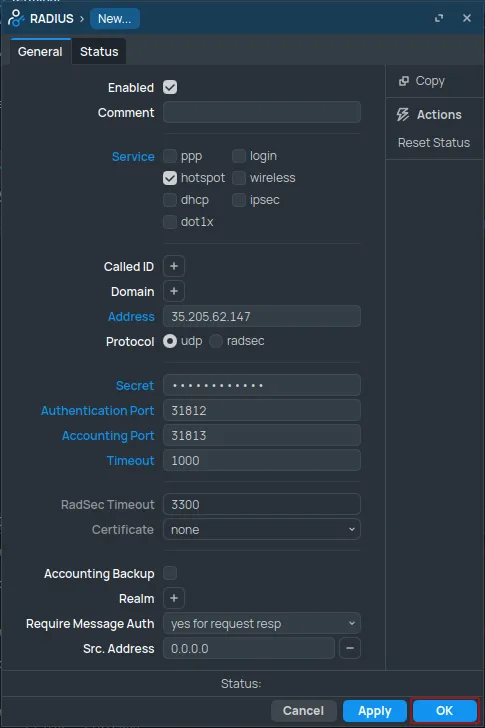
Haga clic en OK.
Configuración de Hotspot
Navegue a IP -> Hotspot. En la pestaña Servers, haga clic en New.
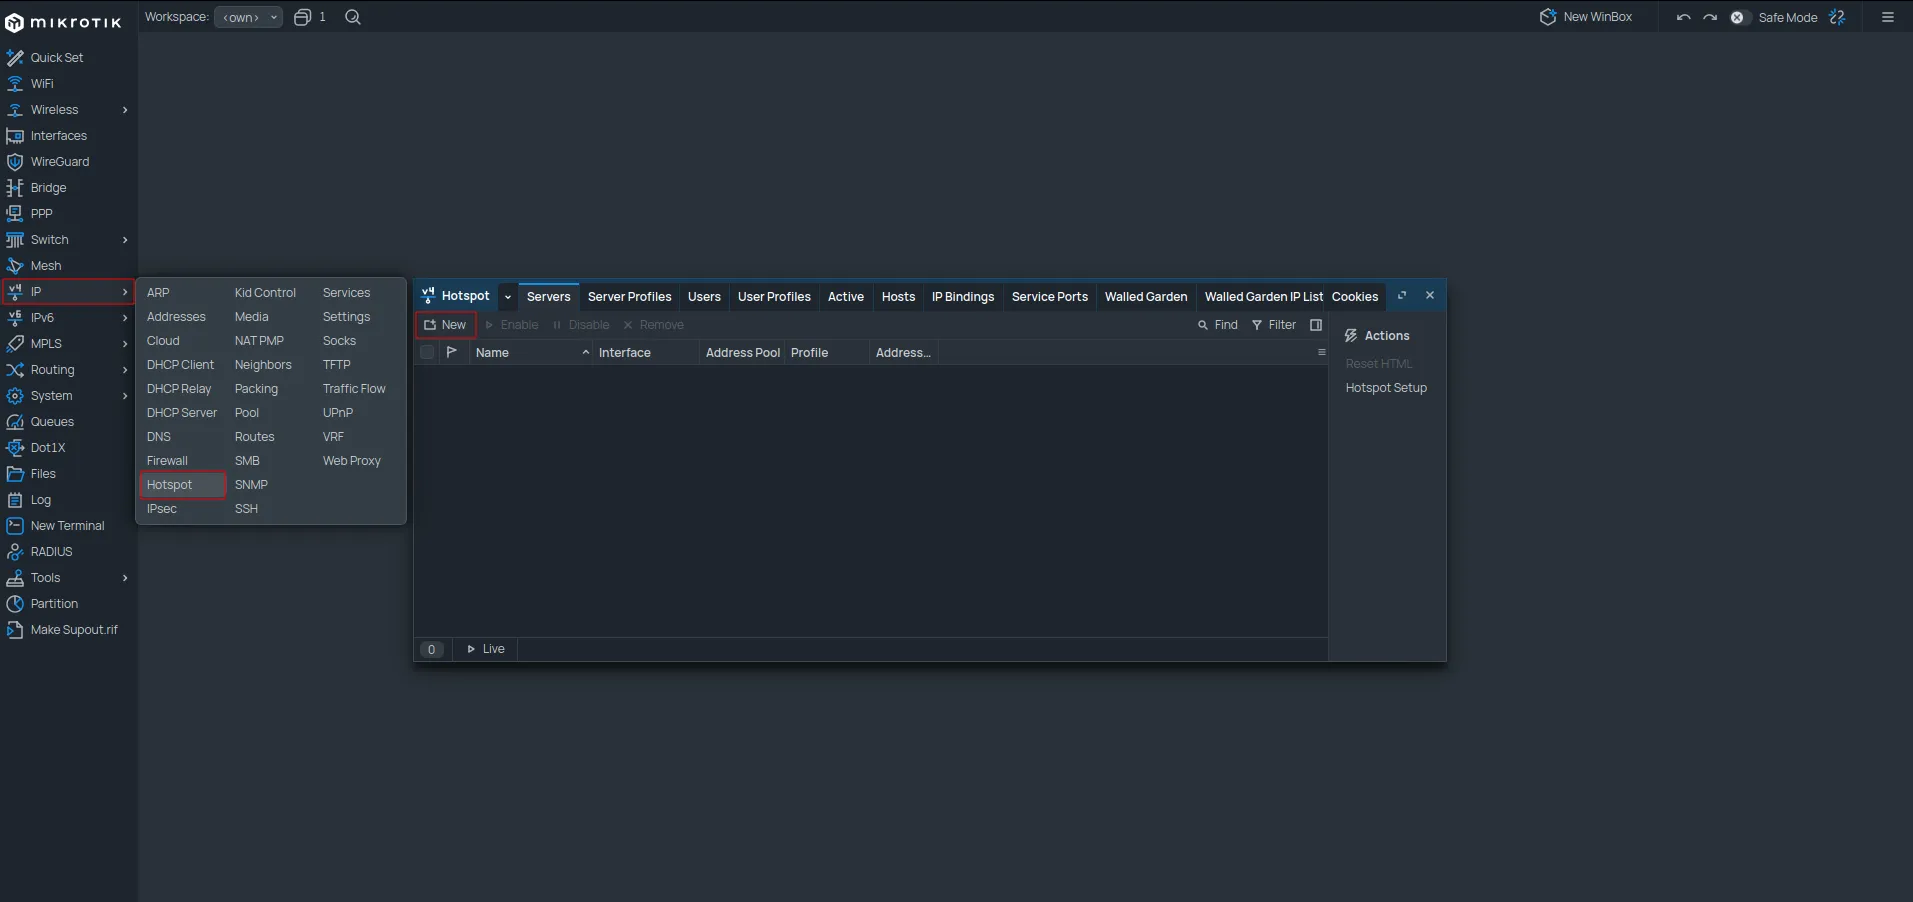
Configure de la siguiente manera:
| Name | socialwifi |
|---|---|
| Interface | sw |
| Address Pool | none |
| Profile | default |
| Idle Timeout | 00:05:00 |
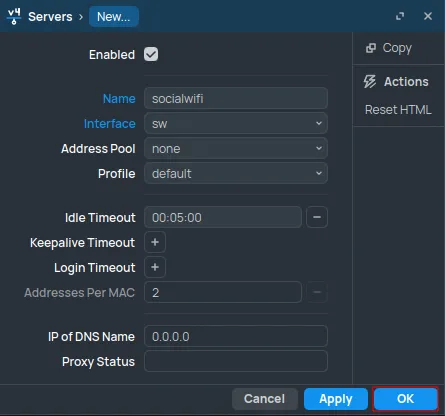
Haga clic en OK.
Cambie a la pestaña Server Profiles. Haga doble clic en el perfil default.
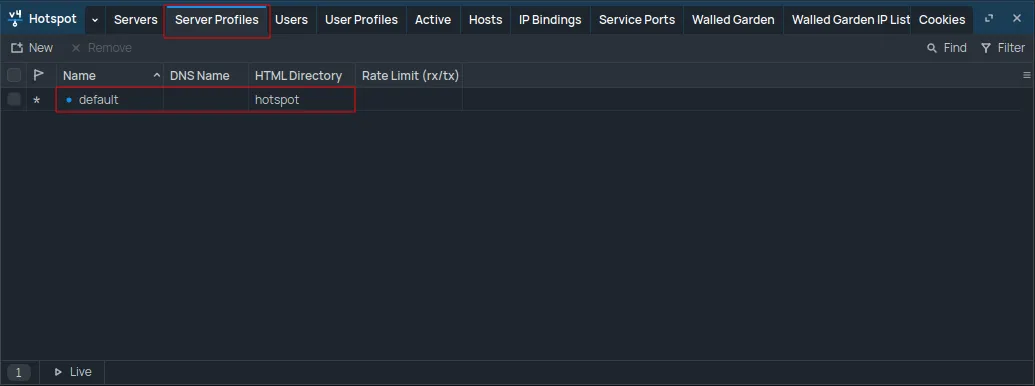
Configure de la siguiente manera:
-
En la pestaña General:
DNS Name logging.sw.com HTML Directory Cambie el nombre a .(un punto). Si la sección Files contiene una carpeta “flash”, establezca este campo en flash/.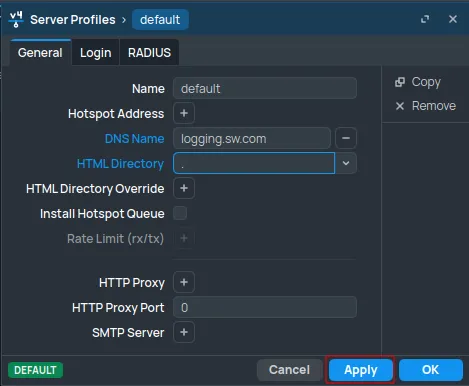
-
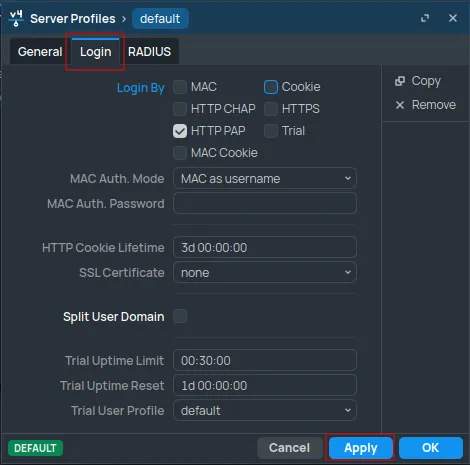
En la pestaña Login:
Establezca Login By en HTTP PAP (desmarque todas las demás opciones).
-
En la pestaña RADIUS:
Use RADIUS yes Interim Update 00:10:00 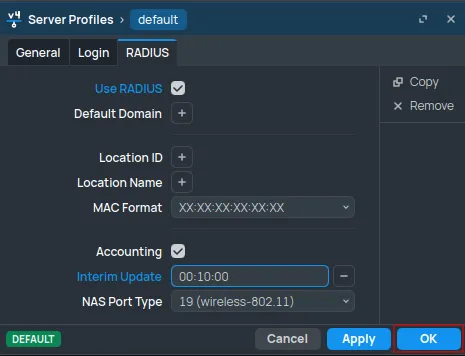
Haga clic en OK.
Cambie a User Profiles. Haga doble clic en el perfil default.
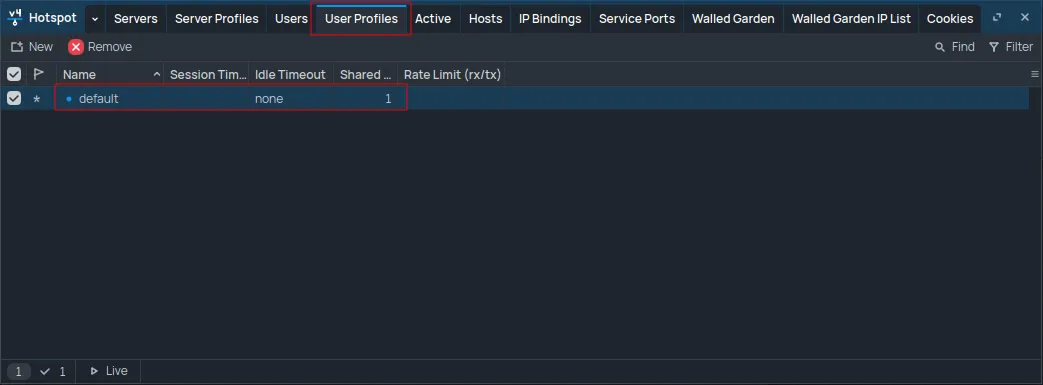
Establezca el valor de Keepalive Timeout en 2d 00:00:00.
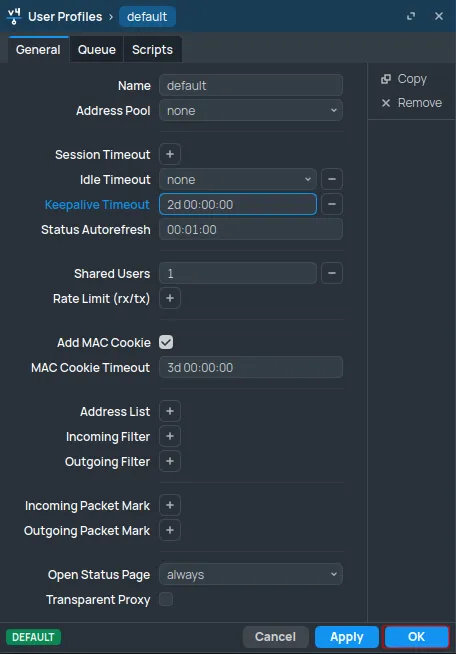
Haga clic en OK.
Configuración de Interfaces
Navegue a la sección Bridge y abra la pestaña Ports.
Haga doble clic en la interfaz que se utilizará para Social WiFi.
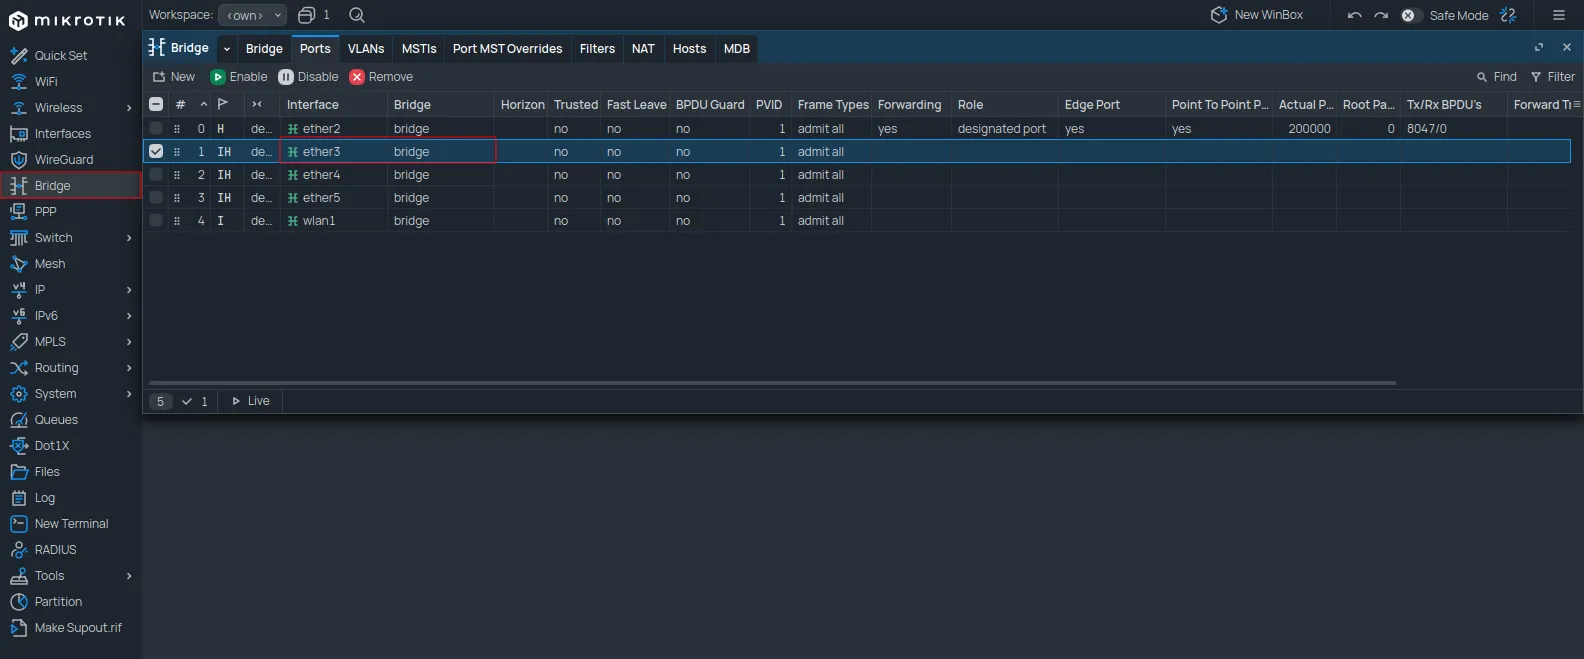
Cambie el valor de Bridge a sw.
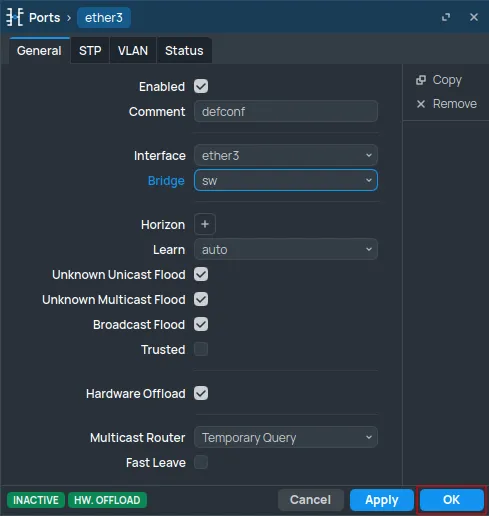
Haga clic en OK.
Para configuraciones de VLAN, consulte la guía de VLANs y APs adicionales después de completar estos pasos.
Navegue a la sección Bridge y abra la pestaña Ports.
Haga doble clic en la interfaz inalámbrica que se utilizará para Social WiFi.
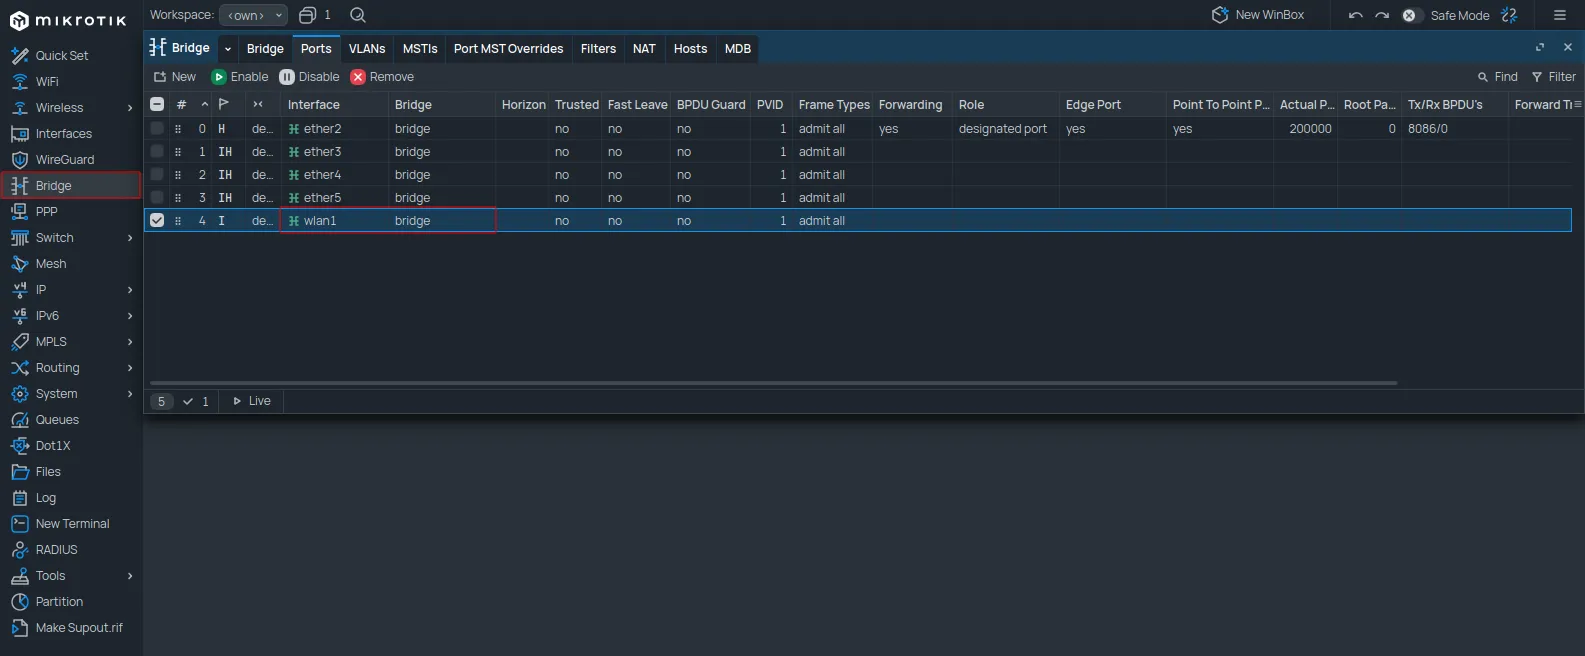
Cambie el valor de Bridge a sw.
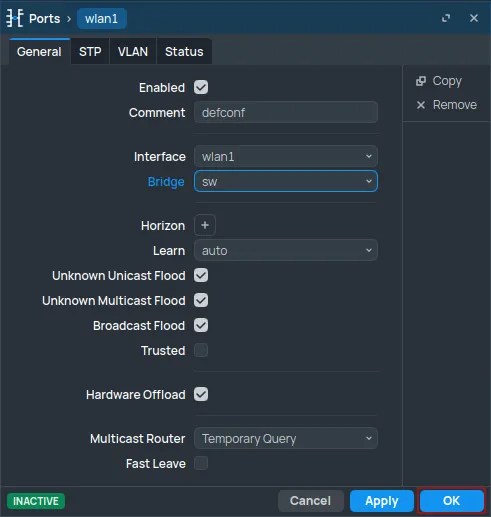
Haga clic en OK.
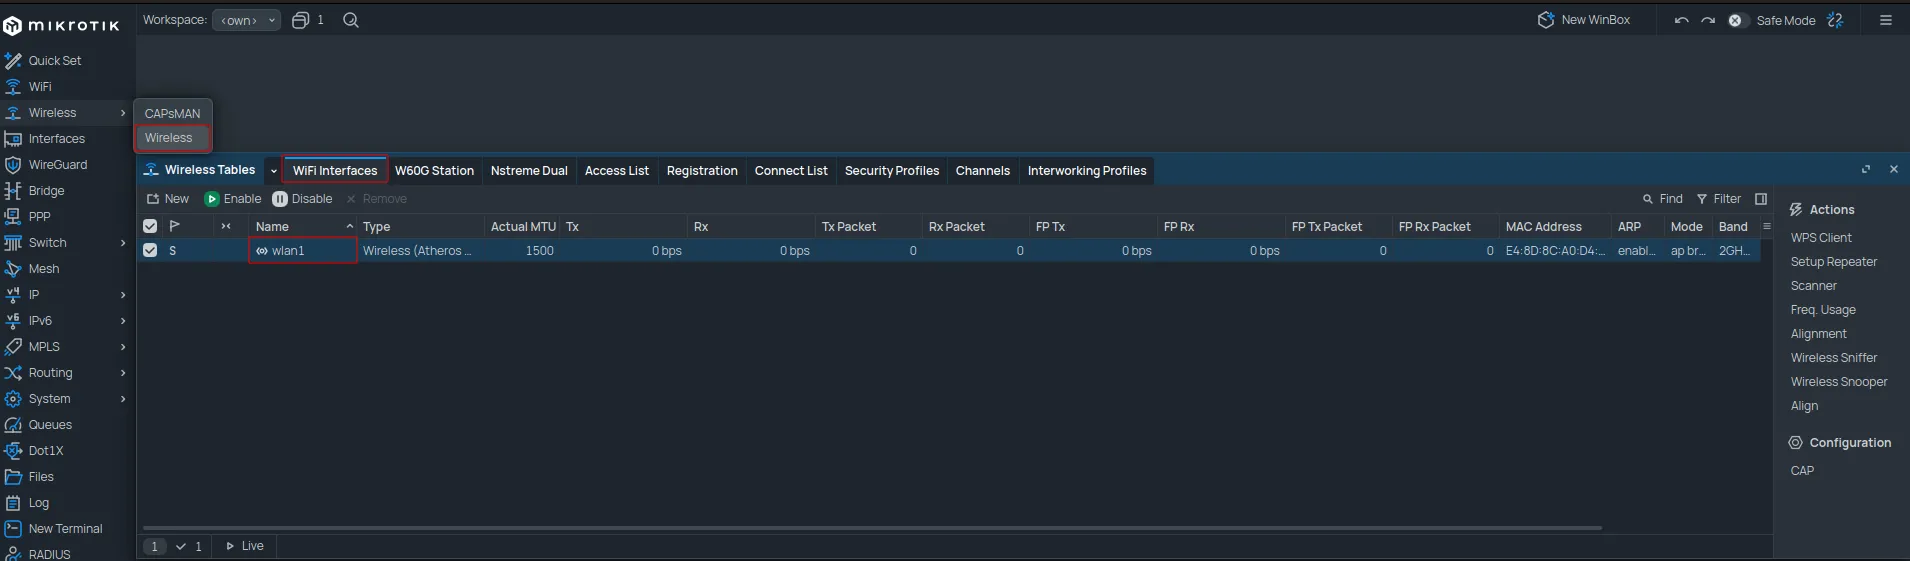
Para cambiar el nombre de la red WiFi, navegue a WiFi (o Wireless -> Wireless). En la pestaña WiFi Interfaces, haga doble clic en la interfaz WiFi correspondiente.
Abra la pestaña Wireless y cambie el SSID por el nombre de red deseado.
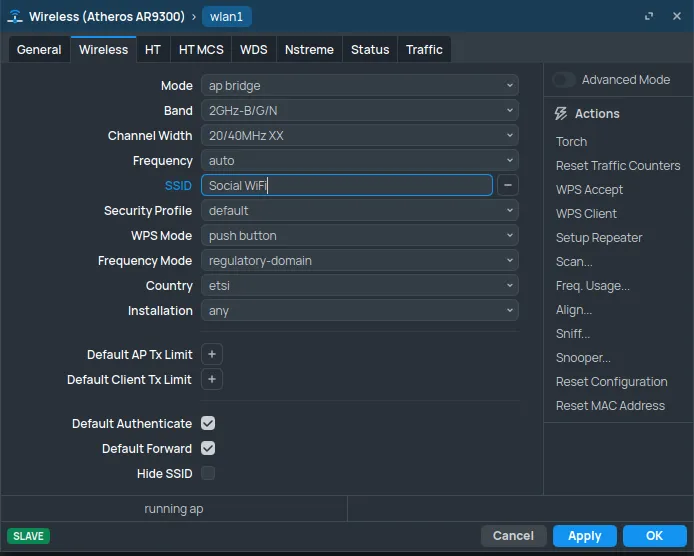
Haga clic en OK.
Para eliminar la contraseña de la red WiFi, abra la pestaña Security Profiles y haga doble clic en el perfil default.
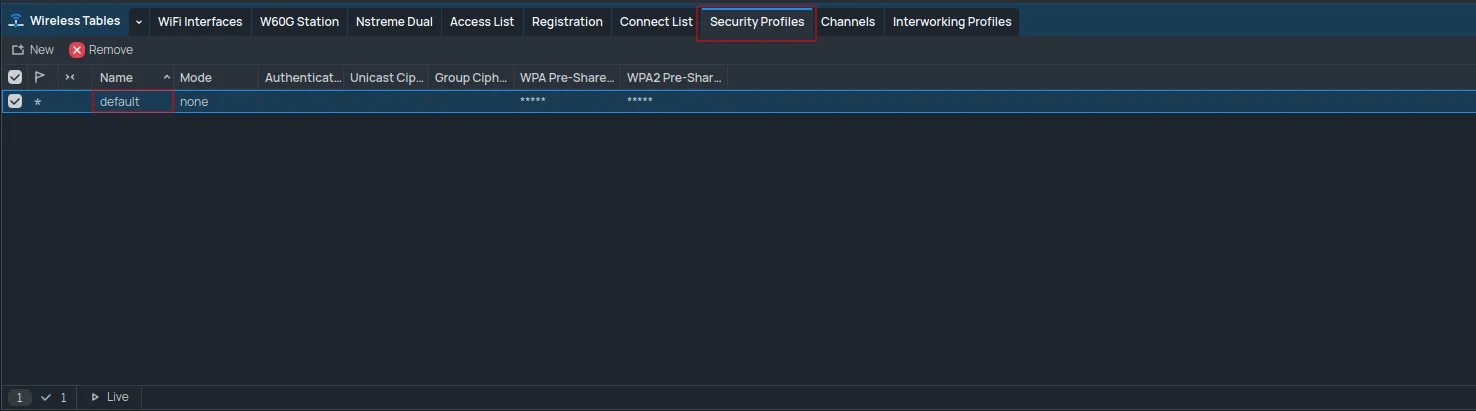
Establezca el Mode en none.
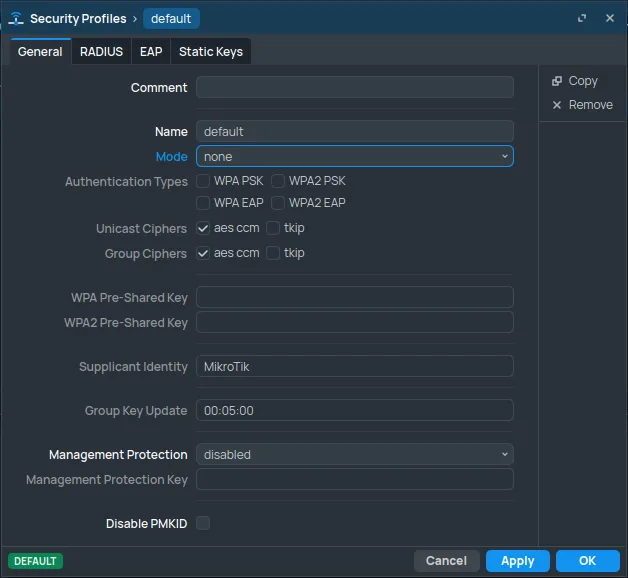
Haga clic en OK.
Panel de Social WiFi
Añadir la dirección MAC del router al panel
Navegue a Interfaces, haga doble clic en ether1 y busque la MAC Address.
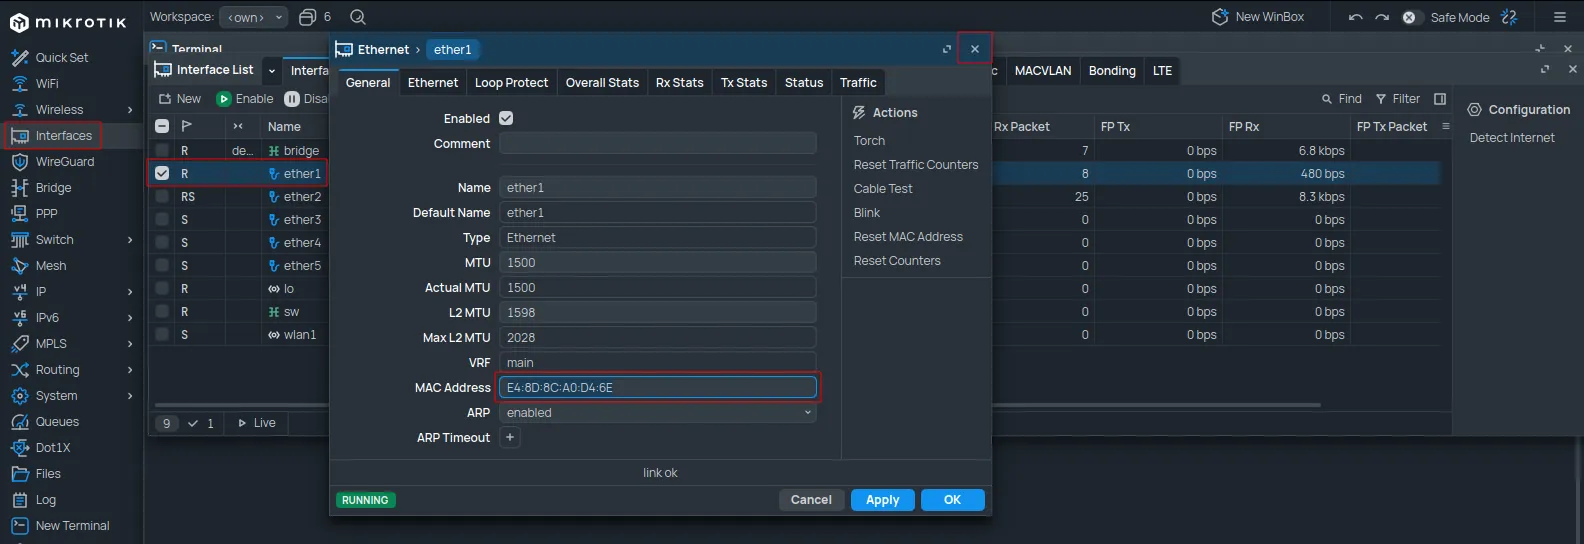
Copie el valor del campo MAC Address.
Inicie sesión en el panel de Social WiFi, navegue a la sección Puntos de acceso y haga clic en +Agregar.
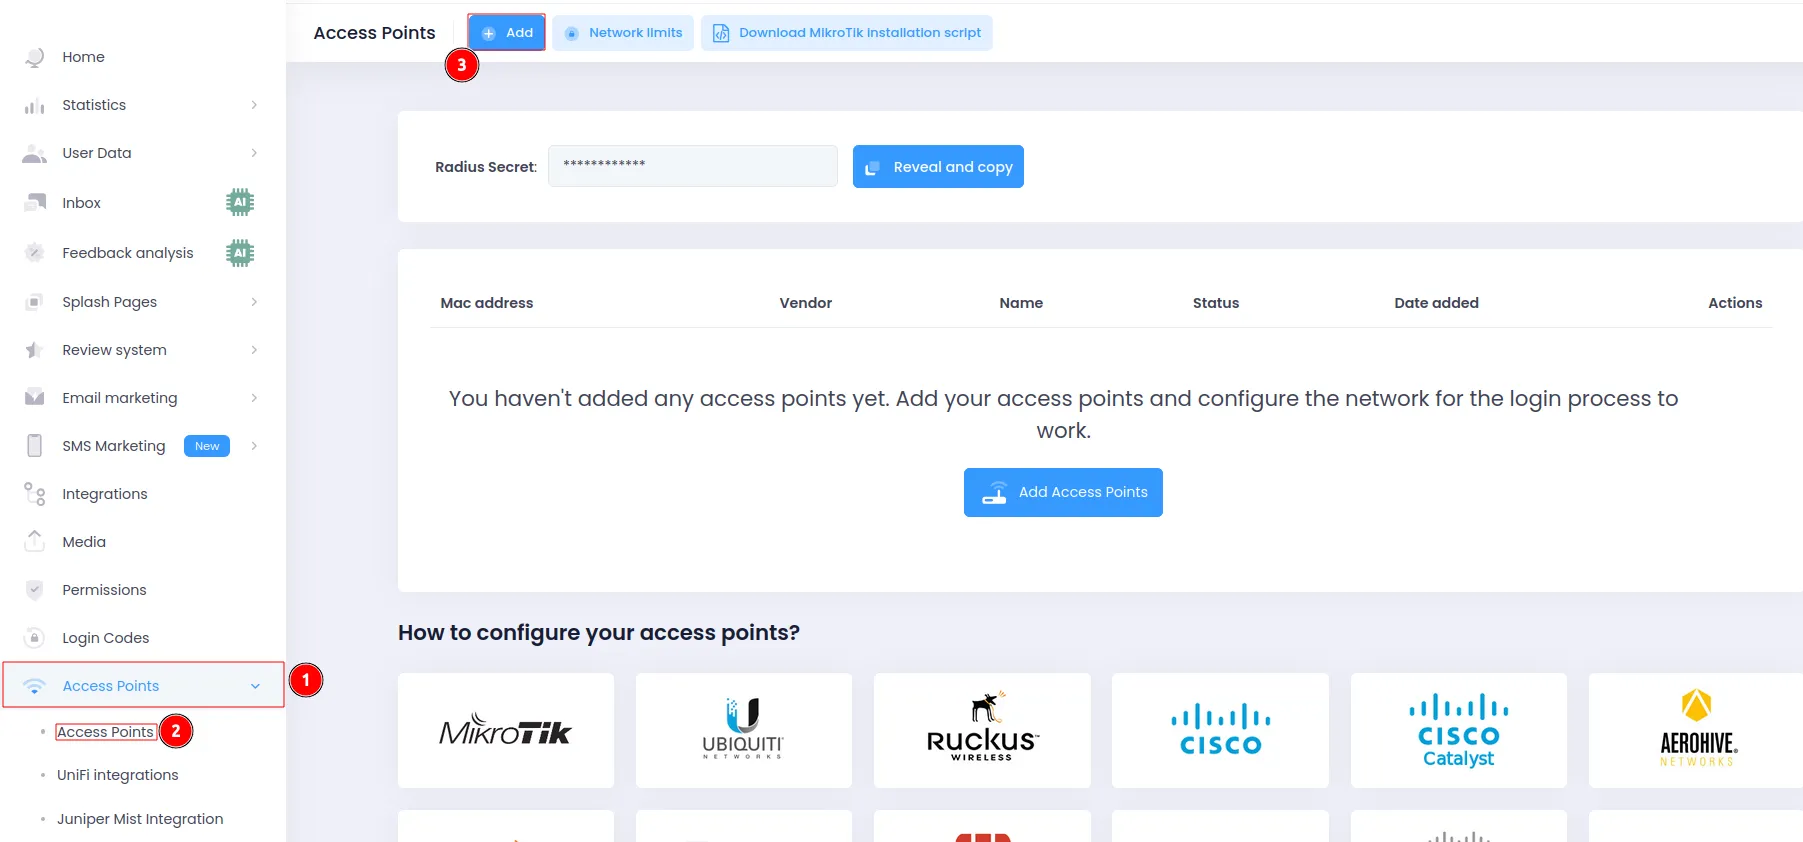
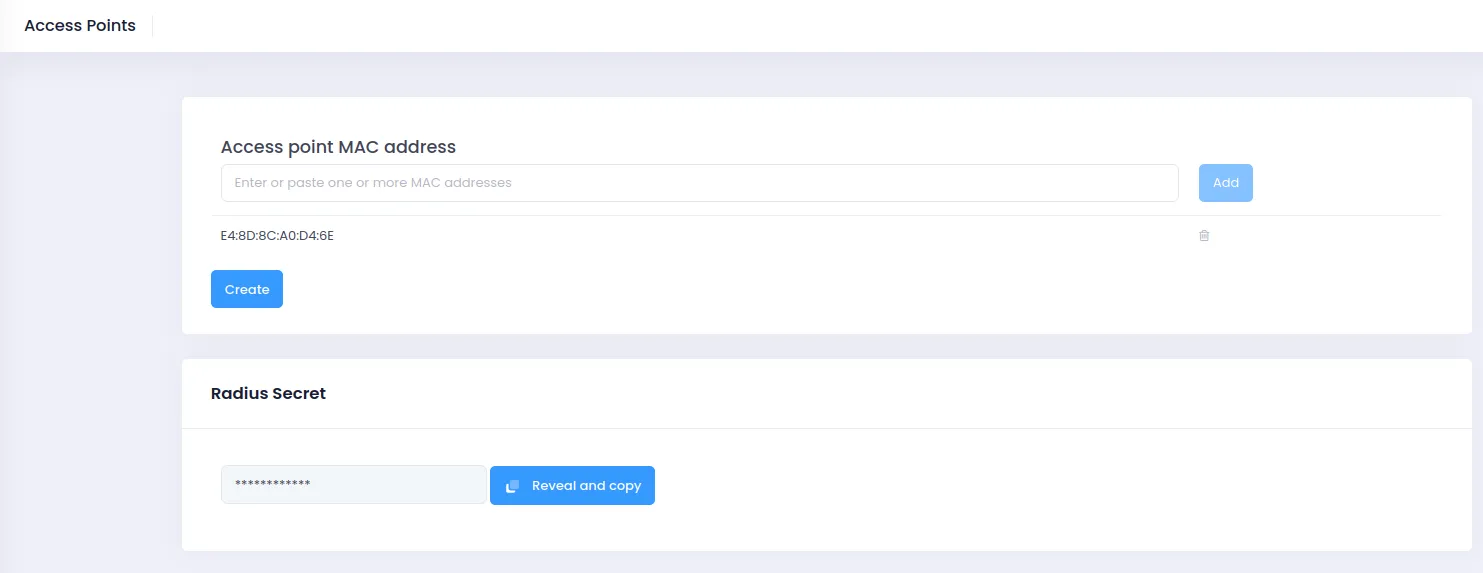
Pegue la dirección MAC copiada en el formulario. Nombrar el dispositivo es opcional. Haga clic en Crear.
Probar la solución
Conéctese a la red WiFi. Debería aparecer una página de inicio de sesión. Complete el proceso de inicio de sesión para obtener acceso a Internet. Las conexiones y autorizaciones aparecerán en la sección Estadísticas del panel de Social WiFi.