
Cisco Catalyst
Compatibilidad
La siguiente guía pertenece al controlador inalámbrico Cisco Catalyst 9800-CL
Social WiFi ha sido probado y se ha comprobado que funciona en las siguientes versiones:
Cisco Catalyst 9800-CL configurado en KVM
- versiones hasta 17.3.4c
Cisco AIR-CAP3702I-E-K9
- versiones compatibles con el controlador (se instala a medida que el AP se aprovisiona)
Acceder al panel de administración del dispositivo
- Inicie sesión en el panel de administración con permisos de root y vaya a Network.
Configurar el controlador
Vaya a Configuration -> Security -> Web Auth.
Haga clic en el perfil global y asegúrese de que “Virtual IPv4 Address” esté configurado como 192.0.2.1.
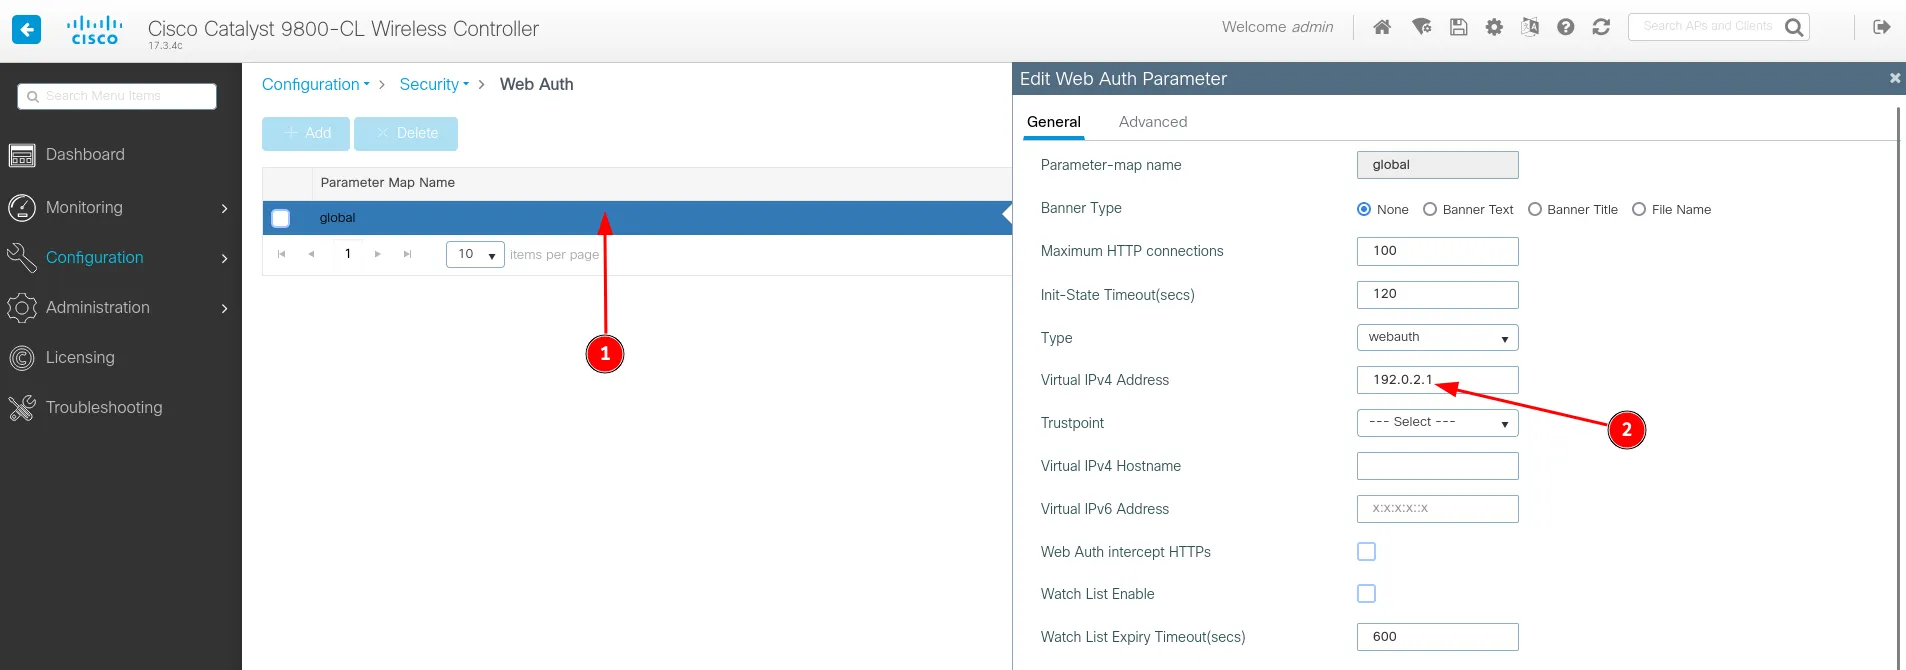
Pulse Apply.
Ahora, añada un nuevo perfil haciendo clic en el botón Add.
| Parameter-map name | sw_webauth |
|---|---|
| Maximum HTTP connections | 200 |
| Init-State Timeout | 3600 |
| Type | webauth |
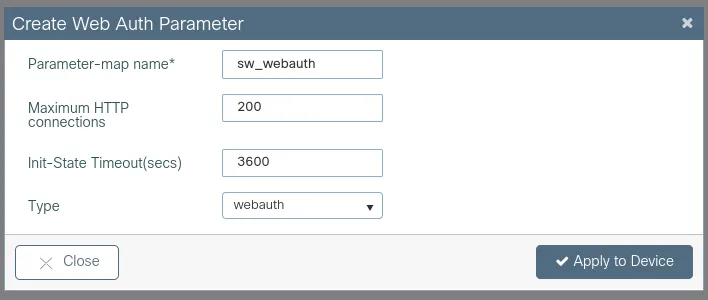
Pulse Apply to Device.
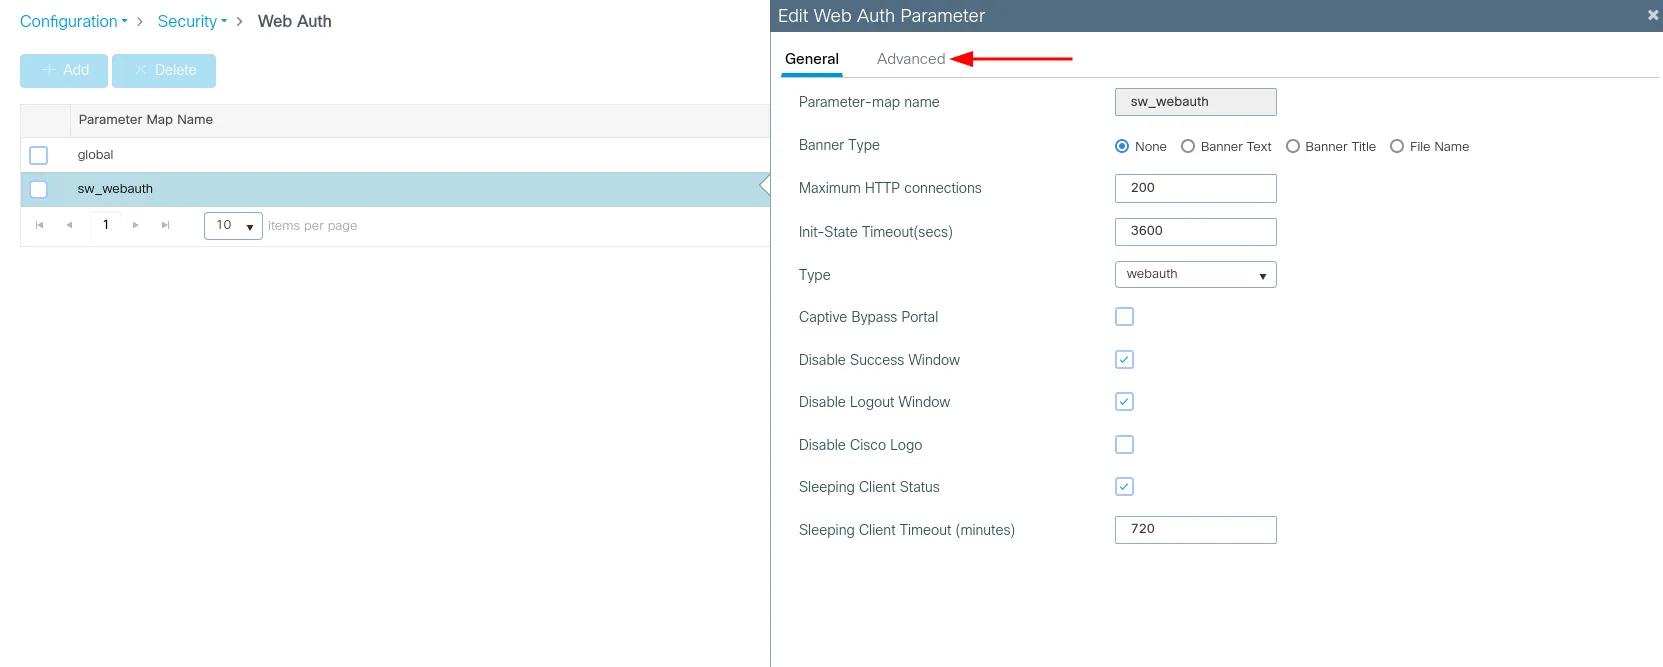
Una vez creado el perfil, haga clic en él y configúrelo de la siguiente manera:
En la pestaña General:
| Banner Type | None |
|---|---|
| Captive Bypass Portal | Dejar sin marcar |
| Disable Success Window | Enabled |
| Disable Logout Window | Enabled |
| Sleeping Client Status | Enabled |
| Sleeping Client Timeout | 720 |
En la pestaña Advanced:
| Redirect for log-in | https://login.socialwifi.com/ |
|---|---|
| Redirect On-Success | https://login.socialwifi.com/redirect/ |
| Redirect On-Failure | https://login.socialwifi.com/ |
| Redirect Append for AP MAC Address | ap_mac |
| Redirect Append for Client MAC Address | client_mac |
| Redirect Append for WLAN SSID | wlan_ssid |
| Portal IPV4 Address | 35.190.70.141 |
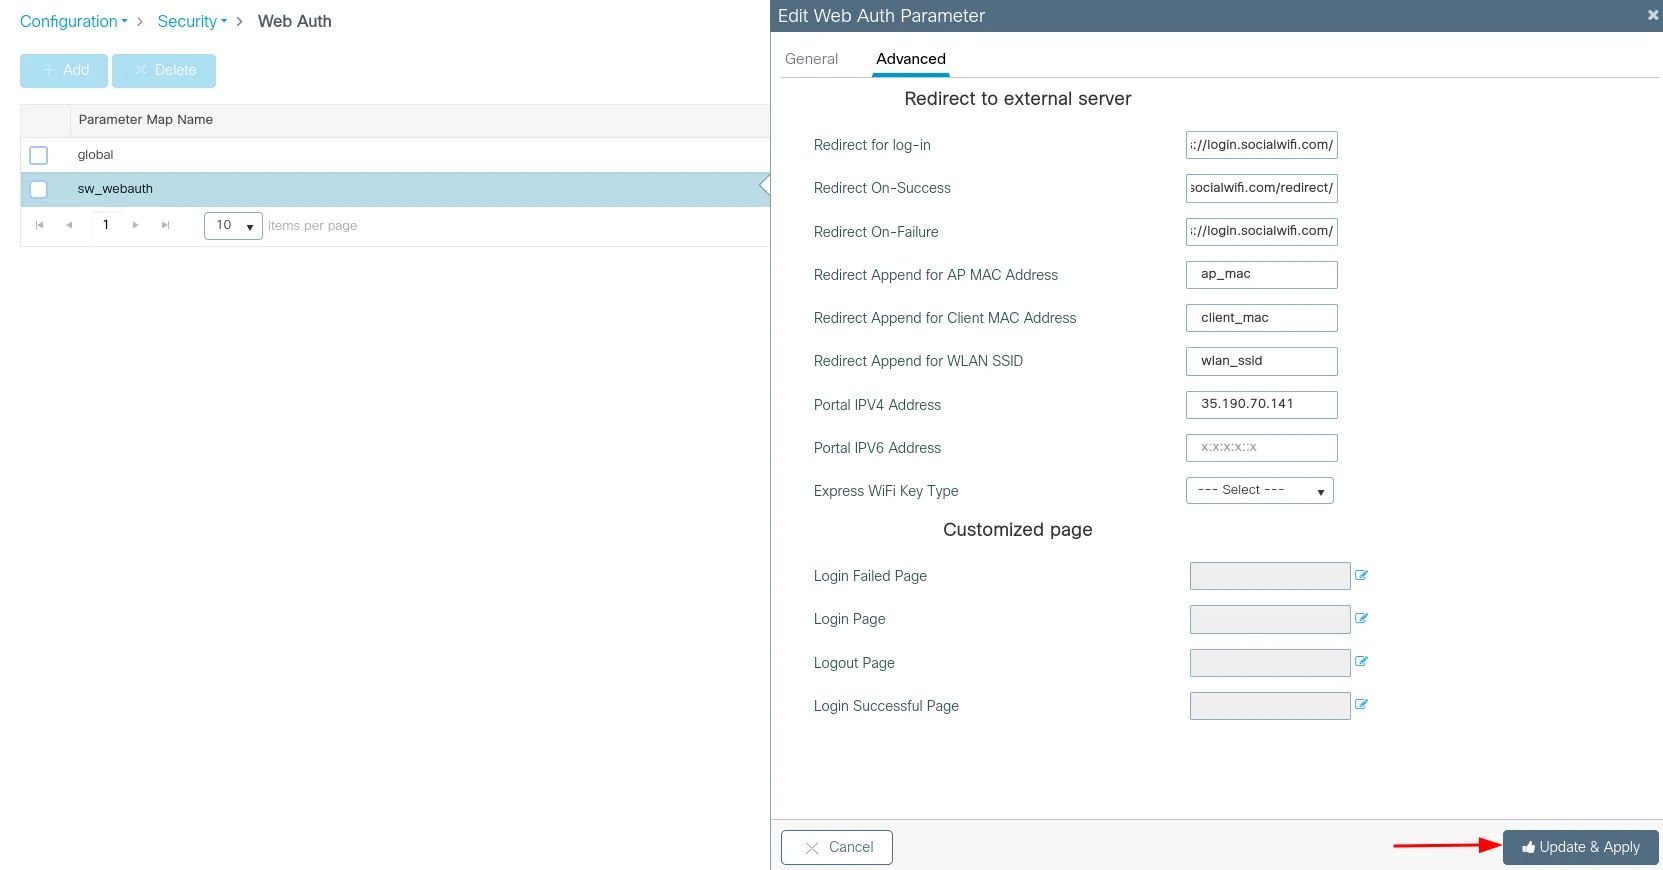
Haga clic en Update & Apply.
Vaya a Configuration -> Security -> AAA.
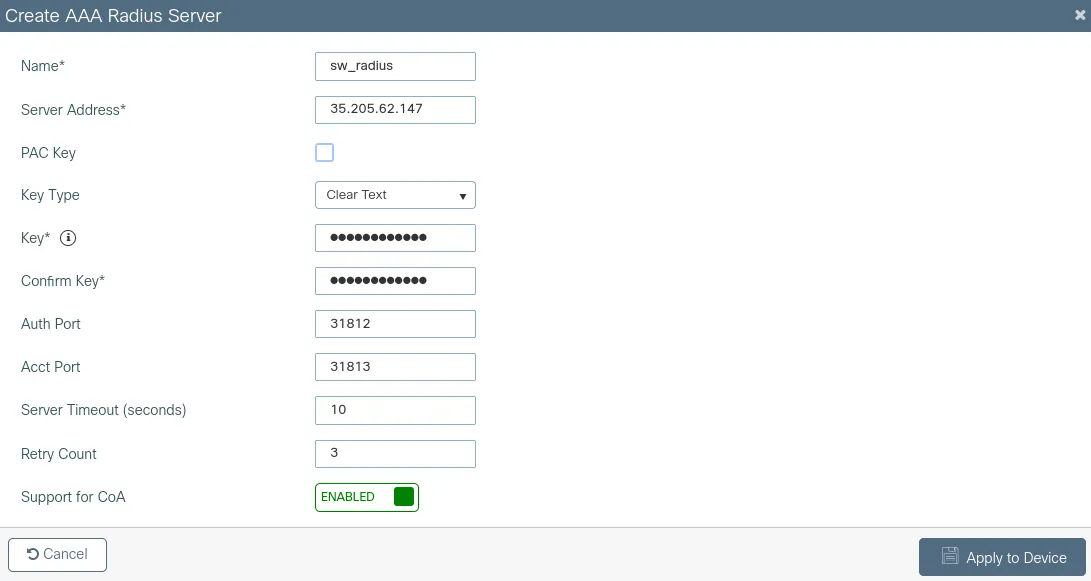
En las pestañas Servers / Groups y luego Servers, haga clic en +Add.
| Name* | sw_radius |
|---|---|
| Server Address* | 35.205.62.147 |
| PAC Key | Dejar sin marcar |
| Key Type | Clear Text |
| Key | *Radius Secret disponible en la pestaña Puntos de acceso del Panel Social WiFi* |
| Confirm Key | igual que arriba |
| Auth Port | 31812 |
| Acct Port | 31813 |
| Server Timeout | 10 |
| Retry Count | 3 |
| Support for CoA | Enabled |
Pulse Apply to Device.
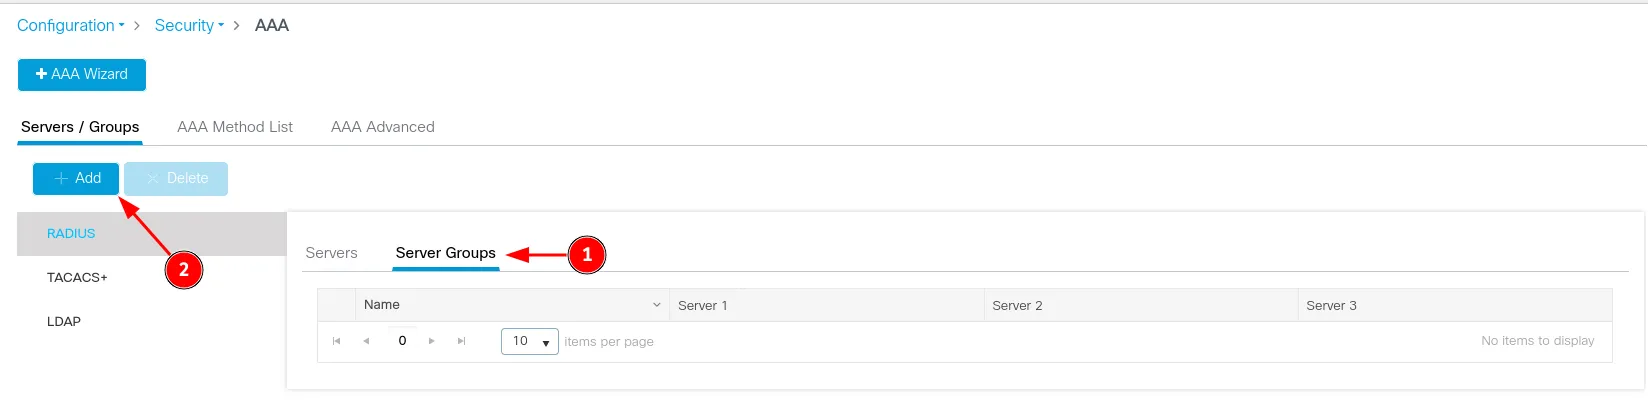
Vaya a la pestaña Server Groups y pulse +Add.
| Name | guest_radius |
| Group Type | RADIUS |
| MAC-Delimiter | hyphen |
| MAC-Filtering | none |
| Dead-Time (mins) | Dejar predeterminado (5) |
| Assigned Servers | sw_radius |
| Source Interface VLAN ID | none |
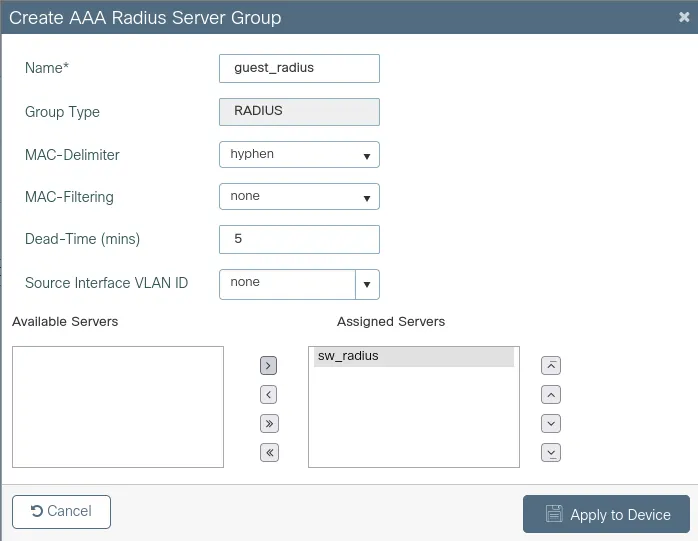
Pulse Apply to Device.
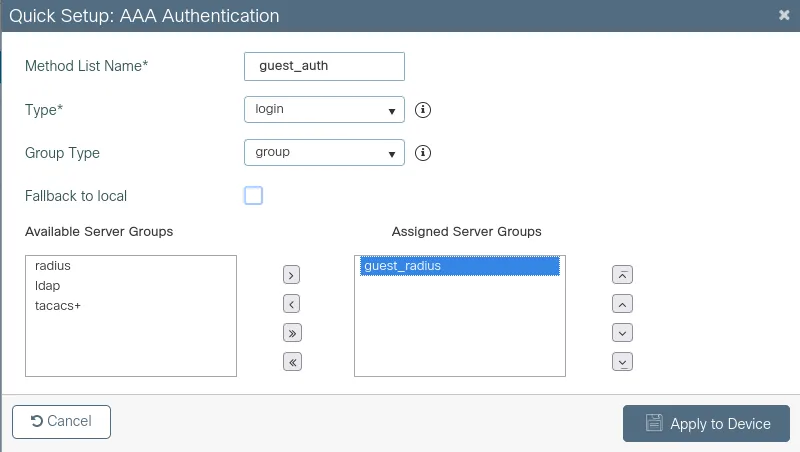
A continuación, vaya a la pestaña AAA Method List. Asegúrese de que Authentication esté seleccionado y pulse +Add. En la pestaña General:
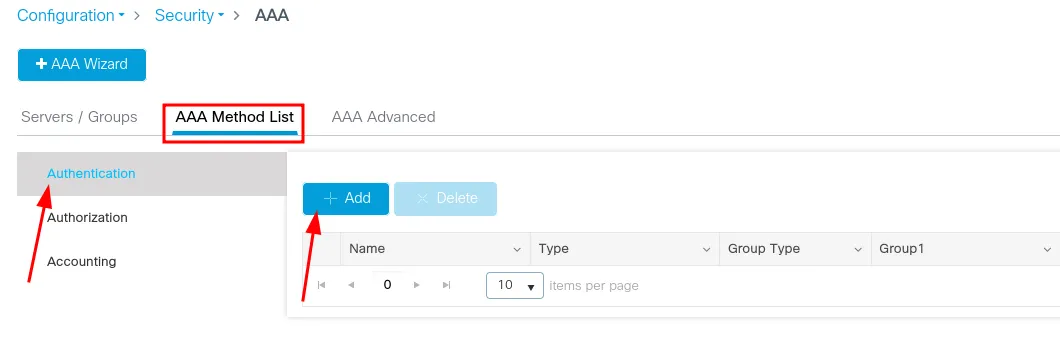
| Method List Name | guest_auth |
|---|---|
| Type | login |
| Group Type | group |
| Assigned Server Groups | guest_radius |
Pulse Apply to Device.
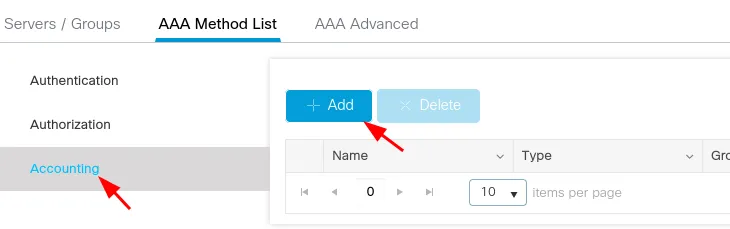
Cambie a la pestaña Accounting a la izquierda y haga clic en +Add.
| Method List Name | guest_acct |
|---|---|
| Type | identity |
| Assigned Server Groups | guest_radius |
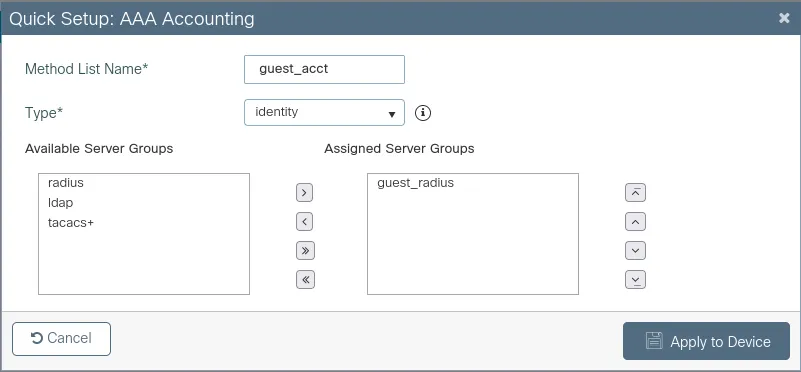
Pulse Apply to Device.
Ahora, vaya a la pestaña AAA Advanced. Asegúrese de estar en “Global Config” y pulse Show Advanced Settings >>>. Debería ver el menú desplegable “Radius Attributes”. Configure de la siguiente manera:
Accounting
| Call Station ID | ap-macaddress-ssid |
|---|---|
| Call Station ID Case | upper |
| MAC-Delimiter | hyphen |
| Username Case | lower |
| Username Delimiter | none |
Authentication
| Call Station ID | ap-macaddress-ssid |
|---|---|
| Call Station ID Case | upper |
| MAC-Delimiter | hyphen |
Pulse Apply to Device.
Ahora, vaya a Configuration -> Security -> URL Filters. Haga clic en +Add.
| List Name | guest_url_filter |
|---|---|
| Type | PRE_AUTH |
| Action | PERMIT |
URLs
*.socialwifi.comsw-login.comfacebook.com*.facebook.com*.fbcdn.netlinkedin.com*.linkedin.com*.licdn.comtwitter.comapi.twitter.comx.comapi.x.com*.twimg.comwhatsapp.com*.whatsapp.net*.whatsapp.comconnect.facebook.netwww.facebook.comwww.googletagmanager.comwww.googleadservices.comgoogleads.g.doubleclick.net*.youtube.com*.ytimg.com*.googlevideo.comyt3.ggpht.com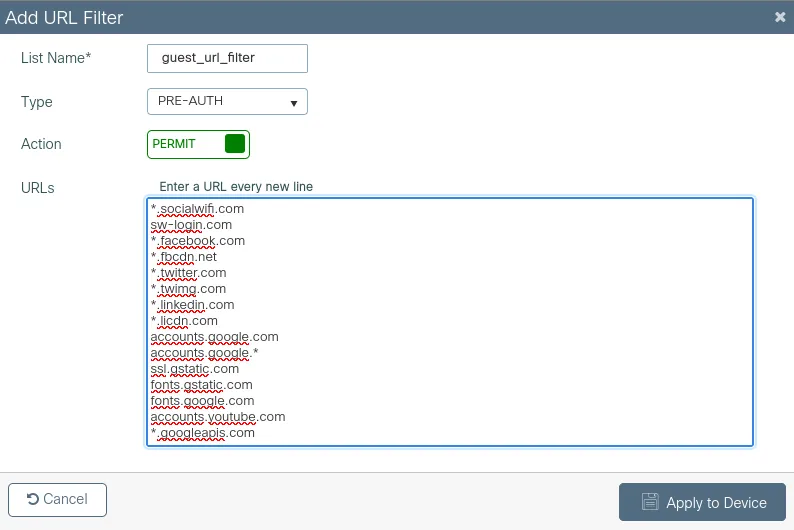
Pulse Apply to Device.
Vaya a Configuration -> Tags & Policies -> WLANs. Haga clic en +Add o edite una WLAN existente.
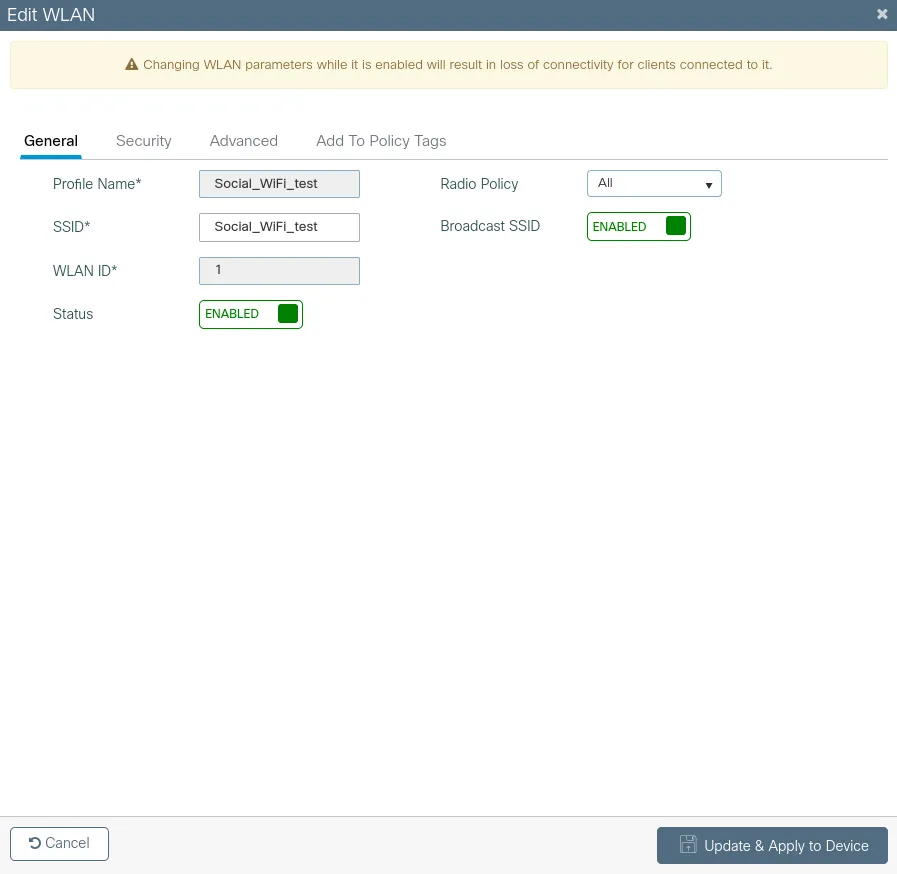
En la pestaña General:
| Profile Name | *nombre de su perfil* |
| SSID | *nombre de su SSID* |
| Status | Enabled |
| Radio Policy | All |
| Broadcast SSID | Enabled |
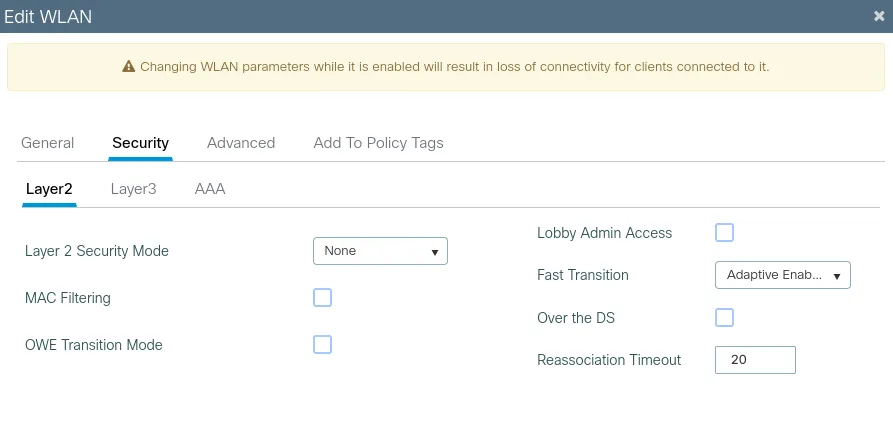
Vaya a la pestaña Security - Layer2 y establezca el Layer 2 Security Mode como “None” y MAC Filtering como Disabled. Deje el resto como predeterminado.
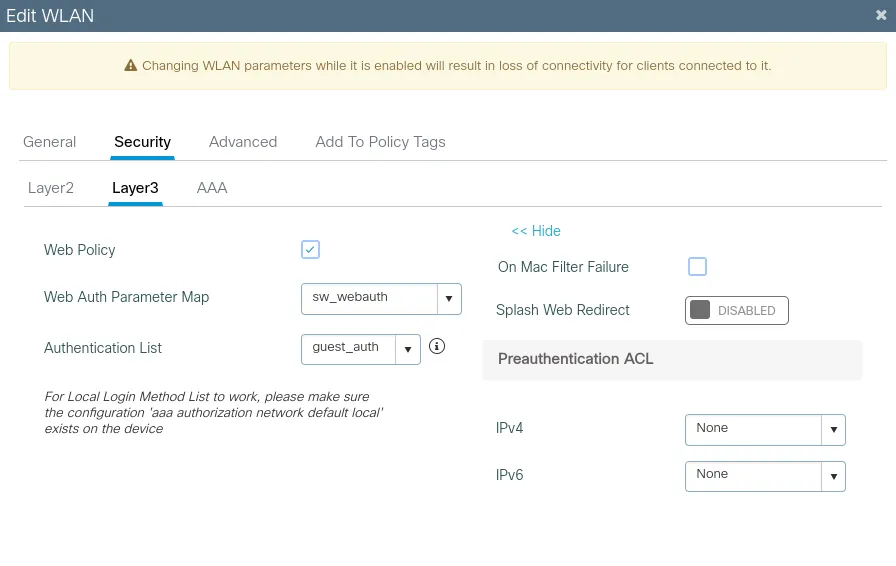
En la pestaña Security - Layer 3, haga clic en Show Advanced Settings >>> y configure de la siguiente manera:
| Web Policy | Enabled |
| Web Auth Parameter Map | sw_webauth |
| Authentication List | guest_auth |
| On Mac Filter Failure | Disabled |
| Splash Web Redirect | Disabled |
Pulse Apply to Device o Update & Apply to Device.
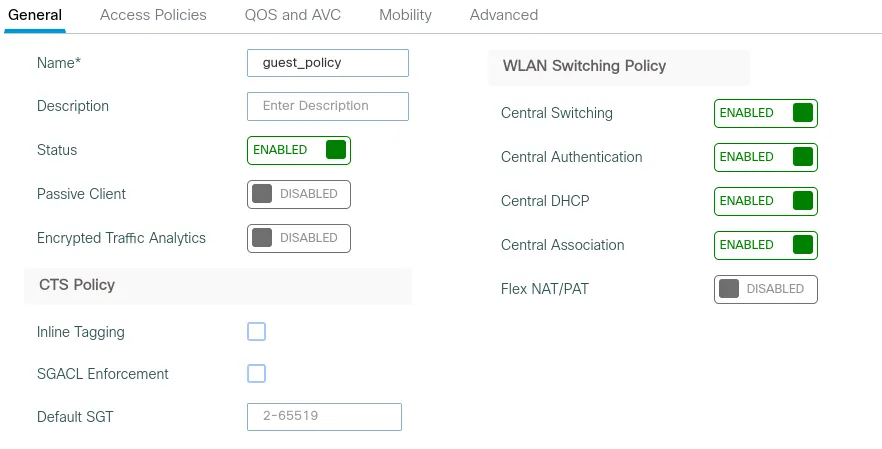
Ahora, vaya a Configuration -> Tags & Profiles -> Policy y pulse +Add. Deje todos los ajustes predeterminados a excepción de los siguientes:
En la pestaña General:
| Name* | guest_policy |
|---|---|
| Status | Enabled |
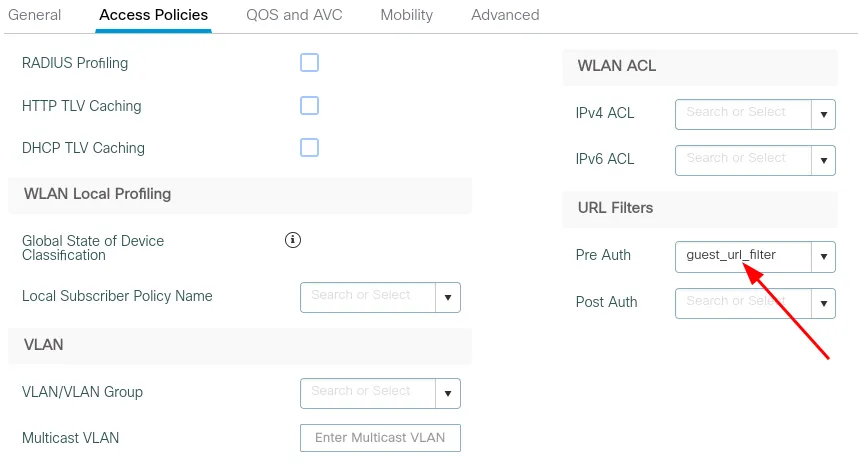
En la pestaña Access Policies:
**URL Filters - “**guest_url_filter”
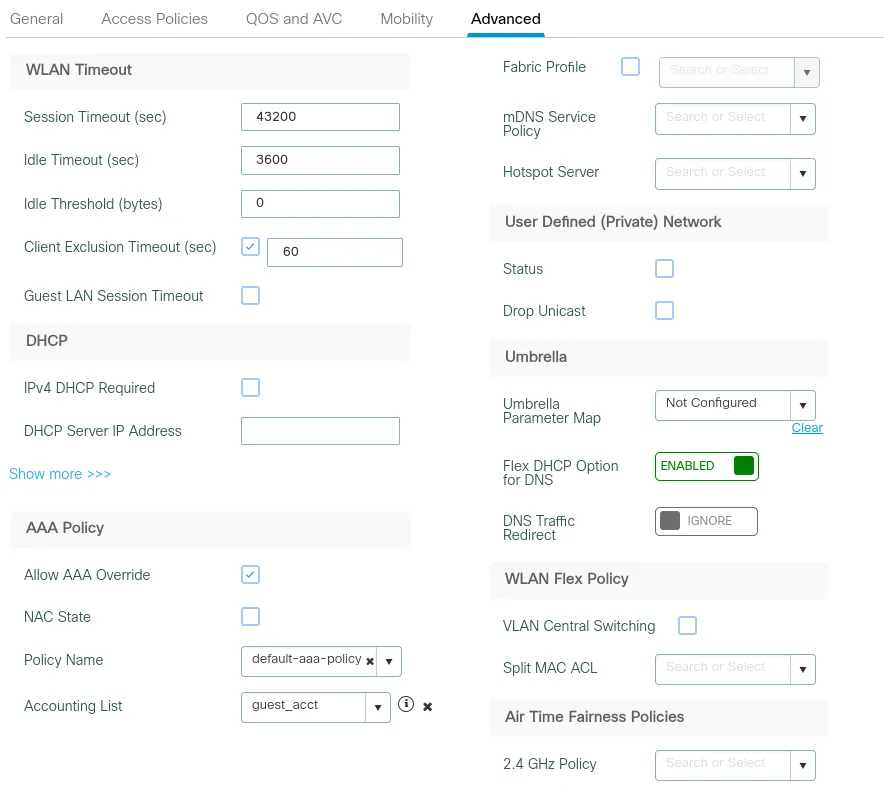
En la pestaña Advanced:
| Session Timeout | 43200 |
|---|---|
| Idle Timeout | 3600 |
| Allow AAA Override | Enabled |
| Accounting List | guest_acct |
Haga clic en Apply to Device para guardar.
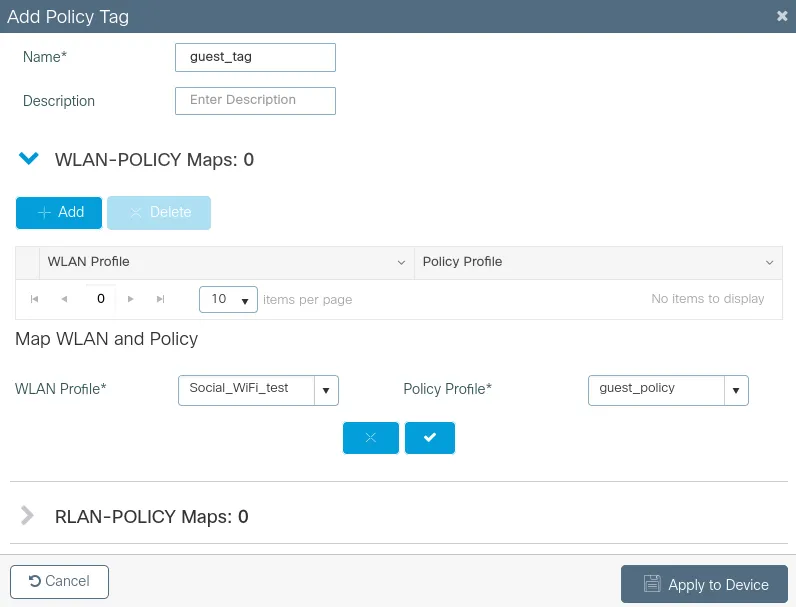
A continuación, vaya a Configuration > Tags & Profiles > Tags. Haga clic en +Add.
| Name | admi |
|---|---|
| WLAN Profile | *nombre de su WiFi* |
| Policy Profile | guest_policy |
Haga clic en Apply to Device para guardar.
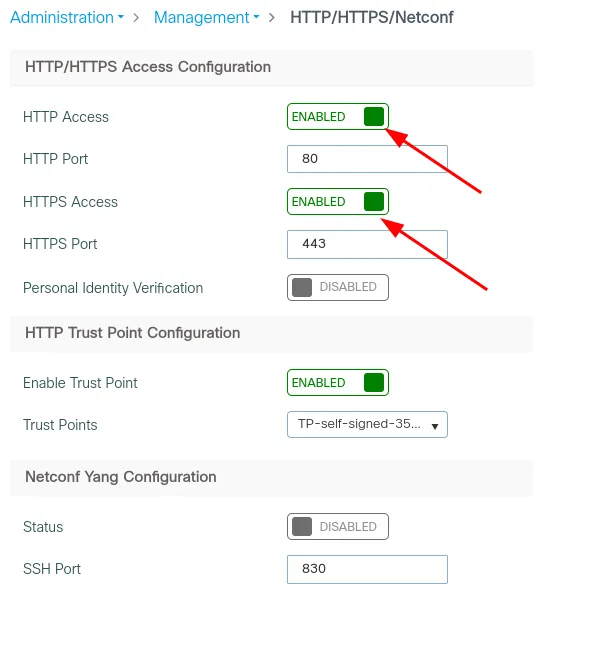
Vaya a Administration > Management > HTTP/HTTPS/Netconf y asegúrese de que HTTP y HTTPS Access estén Enabled.
Ahora debe desactivar la autenticación web segura. Puede hacerlo desde la CLI del controlador. Por favor, ejecute estos comandos:
enableconfigure terminalparameter-map type webauth globalwebauth-http-enablesecure-webauth-disable
Añadir el dispositivo a la plataforma de Social Wifi
- Vaya a Configuration -> Wireless → Access Points.
- Copie las direcciones MAC de los puntos de acceso que desea añadir a la plataforma de Social Wifi. Tendrá que cambiar el formato (de “xxxx.xxxx.xxxx” a “xx:xx:xx:xx:xx:xx”)
- Vaya al Panel de Social WiFi.
- Elija el lugar al que desea añadir el dispositivo.
- En la pestaña “Puntos de acceso”, pulse “Agregar” (esquina superior derecha), pegue la dirección MAC que copió en el formulario (añadir un nombre es opcional) y haga clic en “Crear”.