FortiGate / FortiWiFi
Compatibility
Social WiFi has been tested and is proven to work on the following configurations:
FortiWiFi - wireless interfaces
- FortiOS version 5.6.0 and above (tested up to 7.6.3)
FortiGate hardware or virtual machine - wired interfaces
- recommended: FortiOS version 6.2.4 and above (tested up to 7.6.3)
- FortiOS version 5.6.0 and above work if the captive portal is enabled on a physical interface, VLAN interfaces are not supported below FortiOS 6.2.4
Access the device’s configuration panel
This guide assumes using the web based UI of the controller, which you can access by entering the IP address of the device in your browser. The screenshots are based on firmware v5.6.2.
Alternatively, if your device is managed from FortiCloud, you can access the management UI from there.
RADIUS configuration
Go to User & Authentication → RADIUS Servers → Create New and use the following settings:
| Name | Social WiFi |
|---|---|
| Authentication Method | Specify |
| Method | PAP |
| NAS IP | Leave empty |
| Include in every user group | Unchecked |
| Primary Server IP/Name | 35.205.62.147 |
| Primary Server Secret | Radius Secret is available in Access Points tab of the Social WiFi Panel |
| Secondary Server IP/Name | Leave empty |
| Secondary Server Secret | Leave empty |
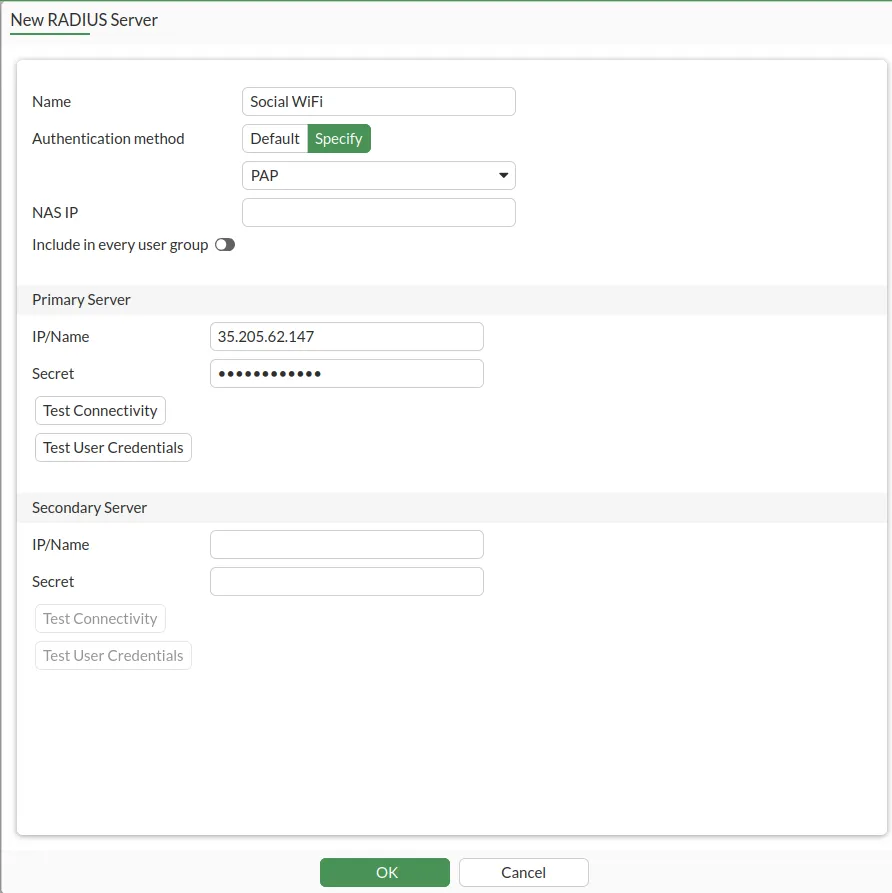
Click OK.
Now you need to change the RADIUS port to 31812. Open the CLI Console (top right corner, between “help” and username).

You will see the terminal pop up. Please copy (ctrl+C) and paste (ctrl+V) or type in the following commands:
config user radius edit "Social WiFi" set radius-port 31812 nextendClick enter, then copy and paste the below.
config user radius edit "Social WiFi" config accounting-server edit 1 set status enable set server 35.205.62.147 set secret [*your radius secret from the panel*] set port 31813 next end end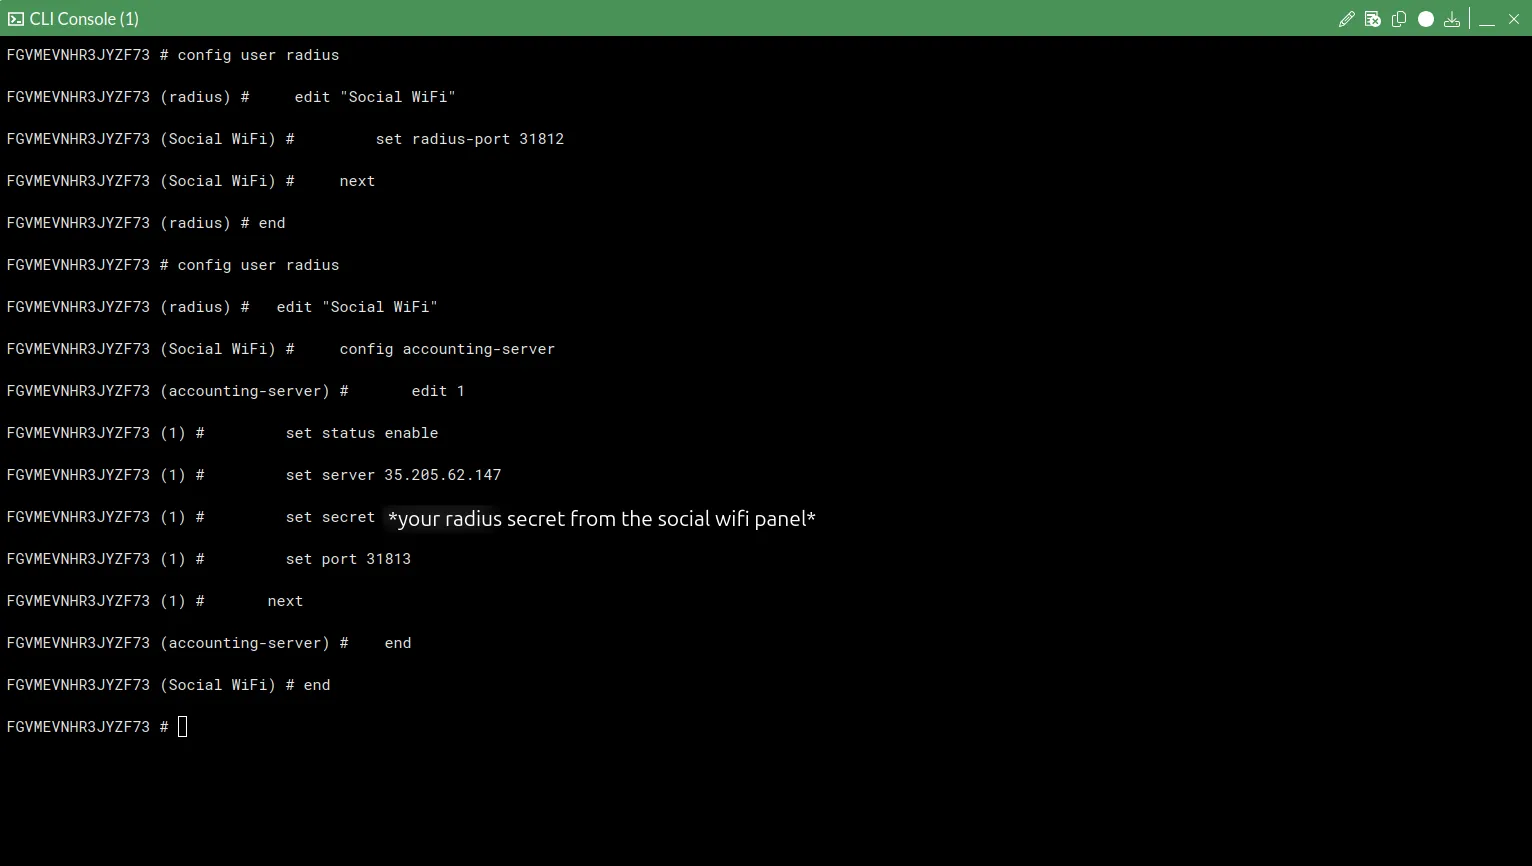
Then close the CLI console by clicking the “x” button in the top right corner.
Remote Group configuration
Go to User & Authentication → User Groups → Create New
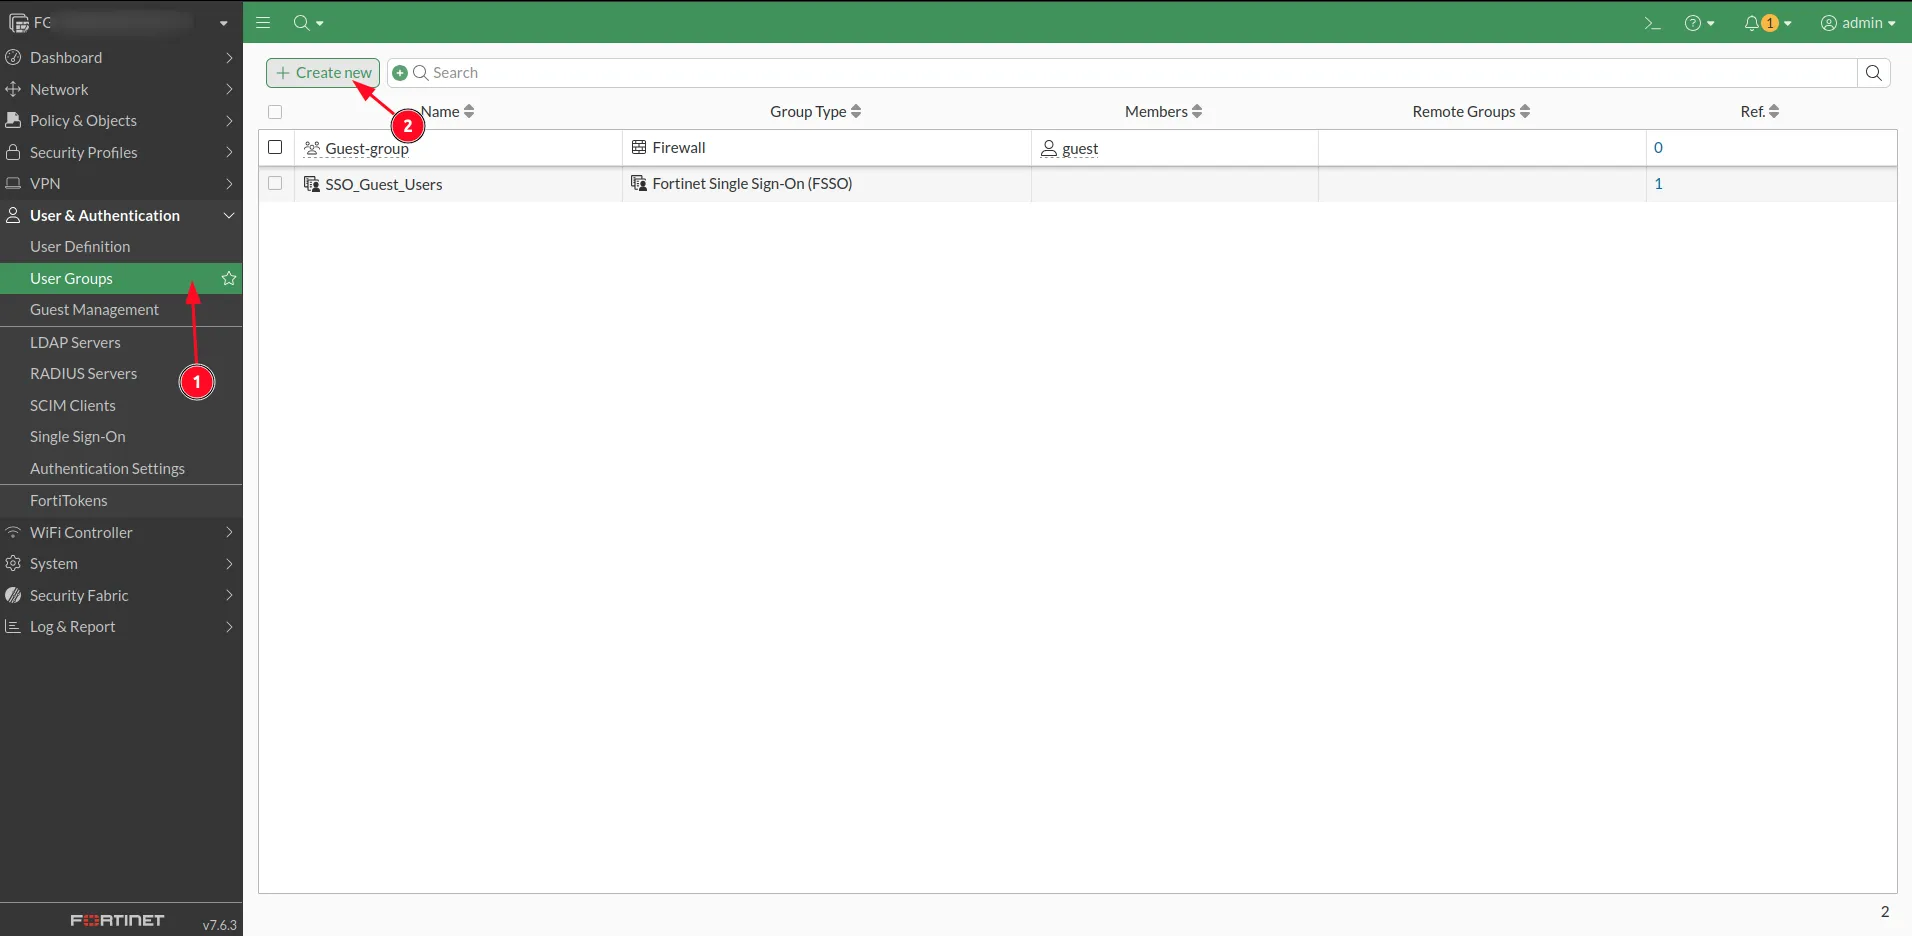
and use the following settings:
| Name | Social WiFi - Guest |
|---|---|
| Type | Firewall |
| Members | Leave empty |
Under Remote Groups, click +Add.
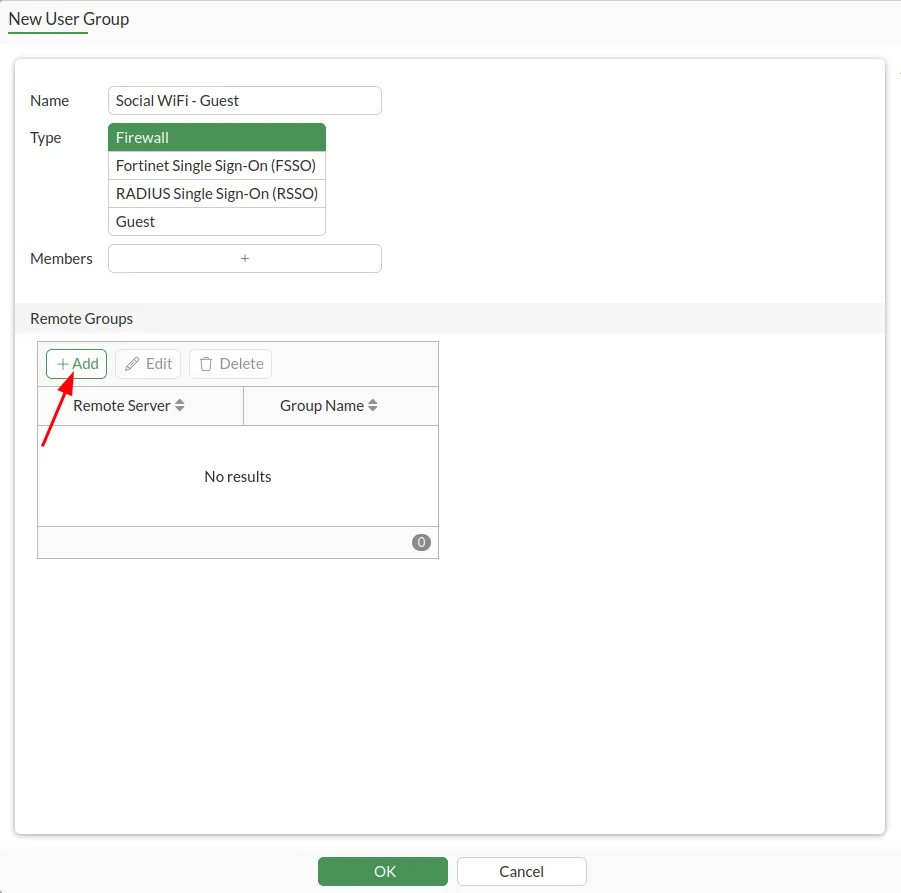
Select Social WiFi from the Remote Server dropdown list. Make sure that Grups are set to Any. Click OK to proceed.
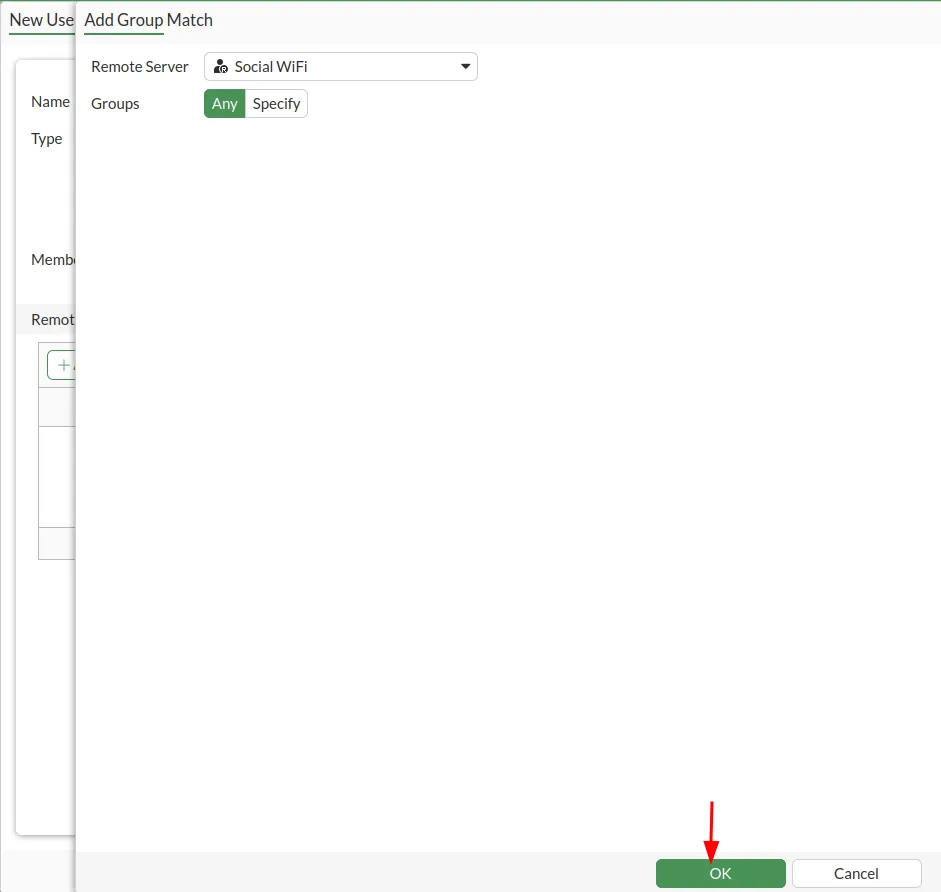

Click OK.
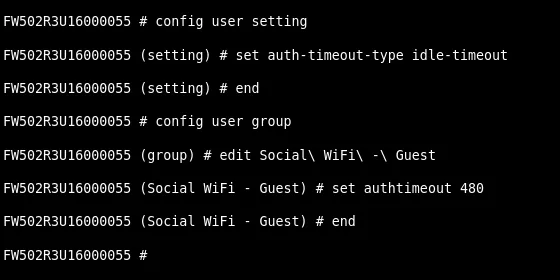
Setting the auth-timeout
Open up the console again and enter the following commands:
config user settingset auth-timeout-type idle-timeoutendconfig user groupedit Social\ WiFi\ -\ Guestset authtimeout 480endWhere the “set authtimeout 480” is in minutes and you can adjust the value freely. This will make your users have to relogin after not being active in the network for 8 hours.
Walled Garden configuration
Now we need to add all the services that will be available without logging in. This list includes Social WiFi login page and third-party social login services (like Facebook).
The following guide assumes firmware version 6.2.2 and higher, which supports domains with wildcard (e.g. “*.facebook.com”). If you have a lower version, please reach out to our support at support@socialwifi.com .
The suggested way to add all required entries, is to use the console again to copy (ctrl+C) and paste (ctrl+V) the following scripts.
Part 1:
# Social WiFi main serviceconfig firewall address    edit "Social WiFi - main 1"        set type fqdn        set fqdn "login.socialwifi.com"    next    edit "Social WiFi - main 2"        set type fqdn        set fqdn "sw-login.com"    nextendconfig firewall addrgrp    edit "Social WiFI - main"        set member "Social WiFi - main 1" "Social WiFi - main 2"    nextend
# Facebook remarketing pixelconfig firewall address    edit "Social WiFi - Facebook pixel 1"        set type fqdn        set fqdn "connect.facebook.net"    next    edit "Social WiFi - Facebook pixel 2"        set type fqdn        set fqdn "www.facebook.com"    nextendconfig firewall addrgrp    edit "Social WiFI - Facebook pixel"        set member "Social WiFi - Facebook pixel 1" "Social WiFi - Facebook pixel 2"    nextend
# Google remarketing tagconfig firewall address    edit "Social WiFi - Google tag 1"        set type fqdn        set fqdn "www.googletagmanager.com"    next    edit "Social WiFi - Google tag 2"        set type fqdn        set fqdn "www.googleadservices.com"    next    edit "Social WiFi - Google tag 3"        set type fqdn        set fqdn "googleads.g.doubleclick.net"    nextendconfig firewall addrgrp    edit "Social WiFI - Google tag"        set member "Social WiFi - Google tag 1" "Social WiFi - Google tag 2" "Social WiFi - Google tag 3"    nextend
# Facebook loginconfig firewall address    edit "Social WiFi - Facebook 1"        set type fqdn        set fqdn "facebook.com"    next    edit "Social WiFi - Facebook 2"        set type fqdn        set fqdn "*.facebook.com"    next    edit "Social WiFi - Facebook 3"        set type fqdn        set fqdn "*.fbcdn.net"    nextendconfig firewall addrgrp    edit "Social WiFi - Facebook"        set member "Social WiFi - Facebook 1" "Social WiFi - Facebook 2" "Social WiFi - Facebook 3"    nextend
Part 2:
# Twitter loginconfig firewall address    edit "Social WiFi - Twitter 1"        set type fqdn        set fqdn "twitter.com"    next    edit "Social WiFi - Twitter 2"        set type fqdn        set fqdn "api.twitter.com"    next    edit "Social WiFi - Twitter 3"        set type fqdn        set fqdn "x.com"    next    edit "Social WiFi - Twitter 4"        set type fqdn        set fqdn "api.x.com"    next    edit "Social WiFi - Twitter 5"        set type fqdn        set fqdn "*.twimg.com"    nextendconfig firewall addrgrp    edit "Social WiFi - Twitter"        set member "Social WiFi - Twitter 1" "Social WiFi - Twitter 2" "Social WiFi - Twitter 3" "Social WiFi - Twitter 4" "Social WiFi - Twitter 5"    nextend
# LinkedIn loginconfig firewall address    edit "Social WiFi - LinkedIn 1"        set type fqdn        set fqdn "linkedin.com"    next    edit "Social WiFi - LinkedIn 2"        set type fqdn        set fqdn "*.linkedin.com"    next    edit "Social WiFi - LinkedIn 3"        set type fqdn        set fqdn "*.licdn.com"    nextendconfig firewall addrgrp    edit "Social WiFi - LinkedIn"        set member "Social WiFi - LinkedIn 1" "Social WiFi - LinkedIn 2" "Social WiFi - LinkedIn 3"    nextend
# WhatsApp loginconfig firewall address    edit "Social WiFi - WhatsApp 1"        set type fqdn        set fqdn "whatsapp.com"    next    edit "Social WiFi - WhatsApp 2"        set type fqdn        set fqdn "*.whatsapp.com"    next    edit "Social WiFi - WhatsApp 3"        set type fqdn        set fqdn "*.whatsapp.net"    nextendconfig firewall addrgrp    edit "Social WiFi - WhatsApp"        set member "Social WiFi - WhatsApp 1" "Social WiFi - WhatsApp 2" "Social WiFi - WhatsApp 3"    nextend
# Group everything in one groupconfig firewall addrgrp    edit "Social WiFi"        set member "Social WiFI - main" "Social WiFI - Facebook pixel" "Social WiFI - Google tag" "Social WiFi - Facebook" "Social WiFi - Twitter" "Social WiFi - LinkedIn" "Social WiFi - WhatsApp"    nextend
Interface or WiFi interface configuration
Go to Network → Interfaces and edit the interface you want Social WiFi to work on. The below example uses a VLAN, but this works on a Physical interface as well.
Configure the “Network” section of the interface as follows:
| Security Mode | Enabled: Captive Portal |
|---|---|
| Authentication Portal | External: http://login.socialwifi.com/ |
| User Access | Restricted to Groups |
| User Groups | Social WiFi - Guest |
| Exempt Sources | Leave empty |
| Exempt Destinations/Services | Social WiFi |
| Redirect after Captive Portal | Original Request |
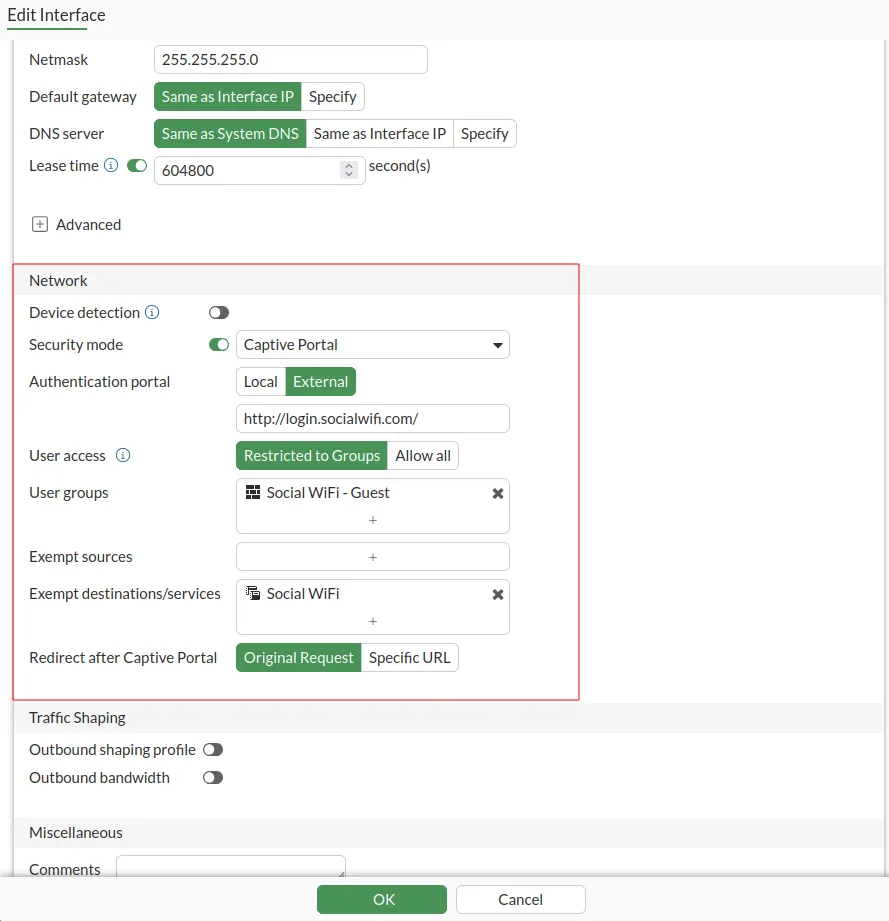
Click OK.
Go to WiFi Controller → SSIDs and edit your Guest SSID.
Configure as follows:
| SSID | Social WiFi (or any name that you prefer) |
|---|---|
| Security Mode | Open (Recommended, only available after enabling Captive Portal) |
| Captive Portal | Captive Portal |
| Portal Type | Authentication |
| Authentication Portal | External: http://login.socialwifi.com/ |
| User Groups | Social WiFi - Guest |
| Exempt Sources | Leave empty |
| Exempt Destinations/Services | Social WiFi |
| Redirect after Captive Portal | Original request |
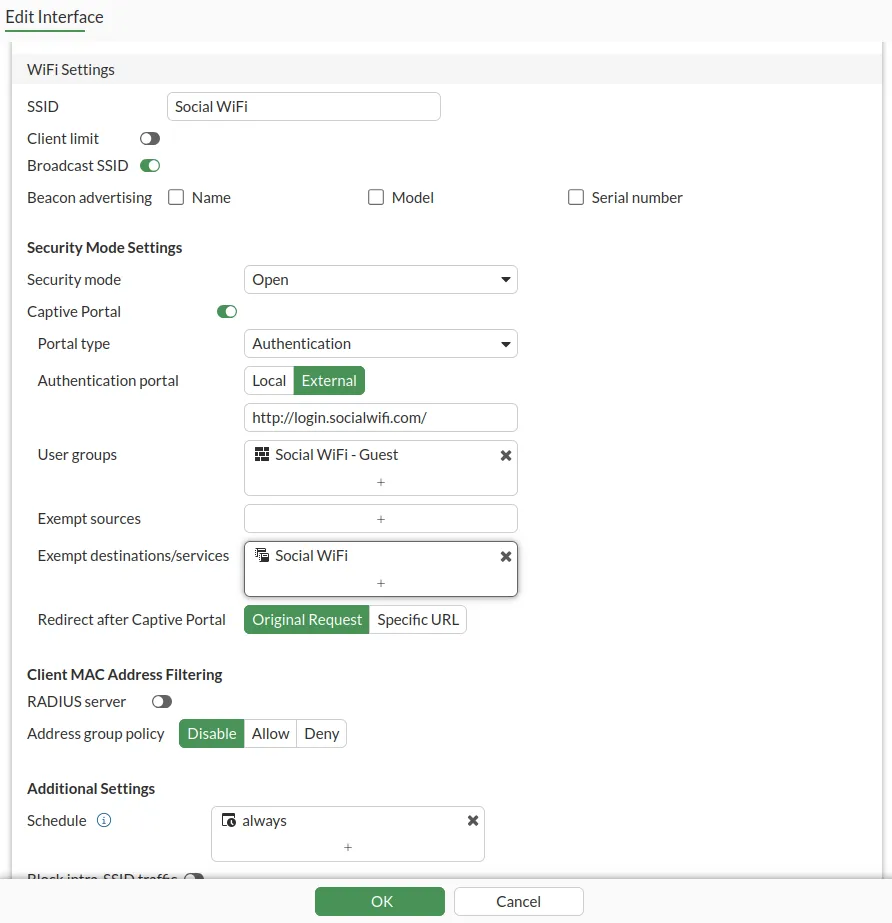
Click OK.
Firewall configuration
You need to allow for traffic from guests using Social WiFi, because the default policy is to deny all traffic.
Go to Policy & Objects → Firewall Policy → +Create New.
Configure as follows:
| Name | Social WiFi Allow Guests |
|---|---|
| Incoming Interface | The interface that has Social WiFi configured |
| Outgoing Interface | Your WAN interface |
| Source | all |
| User/group | Empty |
| Destination | all |
| Service | ALL |
| Action | ACCEPT |
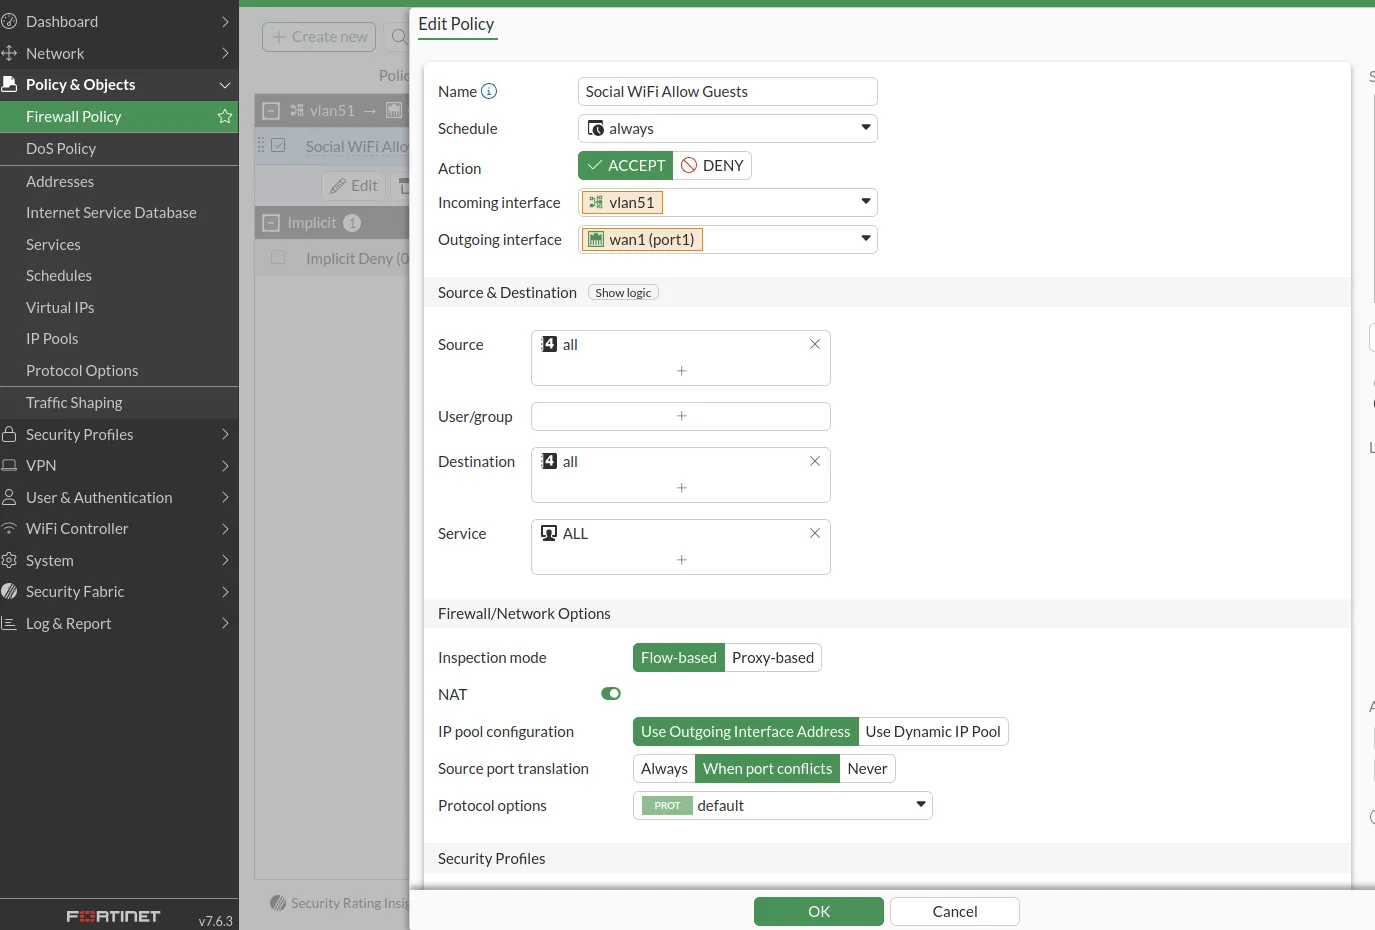
Click OK.
Add the device to Social WiFi Panel
The setup of FortiGate is now finished. The last step is to add the MAC address(es) to the Social WiFi platform.
If you configured Social WiFi on an interface, you only must add the one interface used.
If you configured Social WiFi on an SSID, you must add all the MAC addresses of the Access Points. Usually the MAC address will be printed on a label on the device itself. It should be visible in the GUI as well on the edit interface screen. If you don’t know the MAC address, please contact Social WiFi Support.
Now, switch to Social WiFi Panel, go to Access Points tab, click the Add button and paste the MAC address(es). Click Create.
Test the solution
Connect with the WiFi network. You should see a login page. Go through the login process and, once finished, you should have internet access. You should see first connections and authorisations in the Social WiFi Panel’s statistics section.
Troubleshooting
If you have any external firewall behind the FortiGate device, please make sure that you enable these ports:
- TCP/8080 (Captive Portal (http redirection))
- TCP/8081 (Captive Portal (https redirection)
- UDP/9177, 337008 (AP Communication (Capture Packets subsystem))