Huawei AC / FAT AP
Prerequisites
Huawei AC:
This guide assumes that you are using an external DHCP server for your access points as well as Access Controller and that your access point is already managed by the Access controller.
Huawei FAT AP:
This guide is created with an AP working as a Leader in bridge mode.
Compatibility
Social WiFi has been tested and proven to work for this setup, but should work with any other combination that supports the firmware listed below.
Access Point used for this guide: Huawei AirEngine5761-11
Access Point version number: V200R020C10SPC100
Controller used for this guide: Huawei AC 6005-8-PWR
Controller version number: V200R019C00SPC500
Walled garden
Go to Configuration -> Security -> ACL.
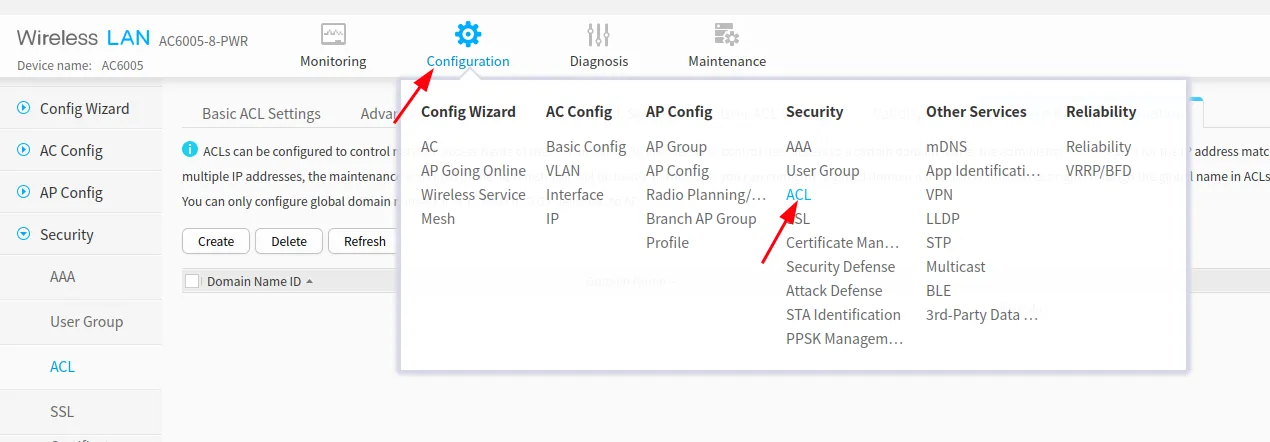
Now, from the tabs at the top select Domain Name Configuration and press Create.
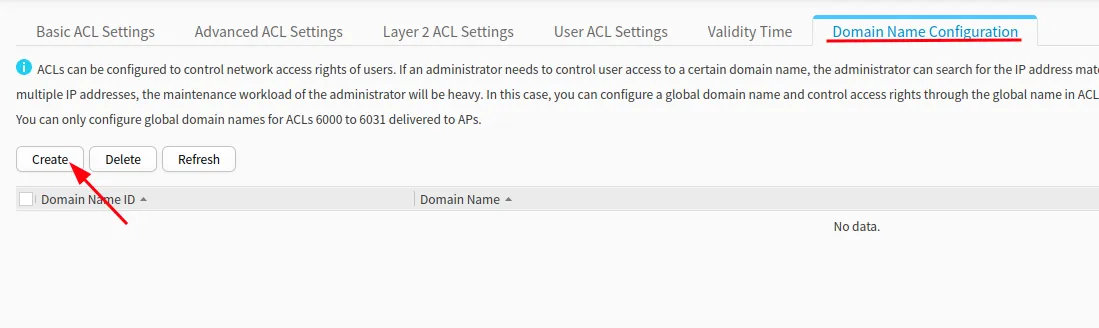
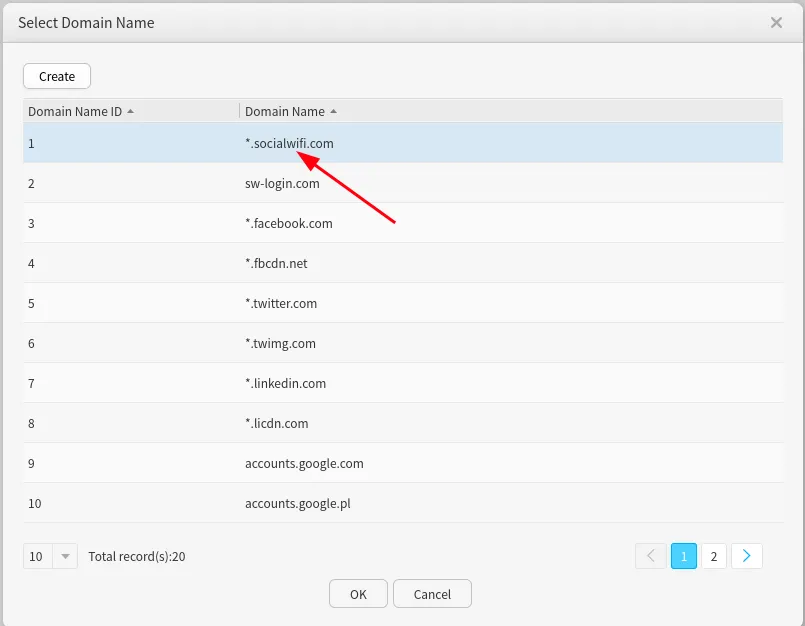
Add all of the domains below one at the time and set the Domain name ID respectively starting from 1.
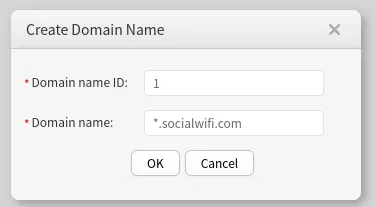
*.socialwifi.comsw-login.comfacebook.com*.facebook.com*.fbcdn.netlinkedin.com*.linkedin.com*.licdn.comtwitter.comapi.twitter.comx.comapi.x.com*.twimg.comwhatsapp.com*.whatsapp.net*.whatsapp.comconnect.facebook.netwww.facebook.comwww.googletagmanager.comwww.googleadservices.comgoogleads.g.doubleclick.net*.youtube.com*.ytimg.com*.googlevideo.comyt3.ggpht.com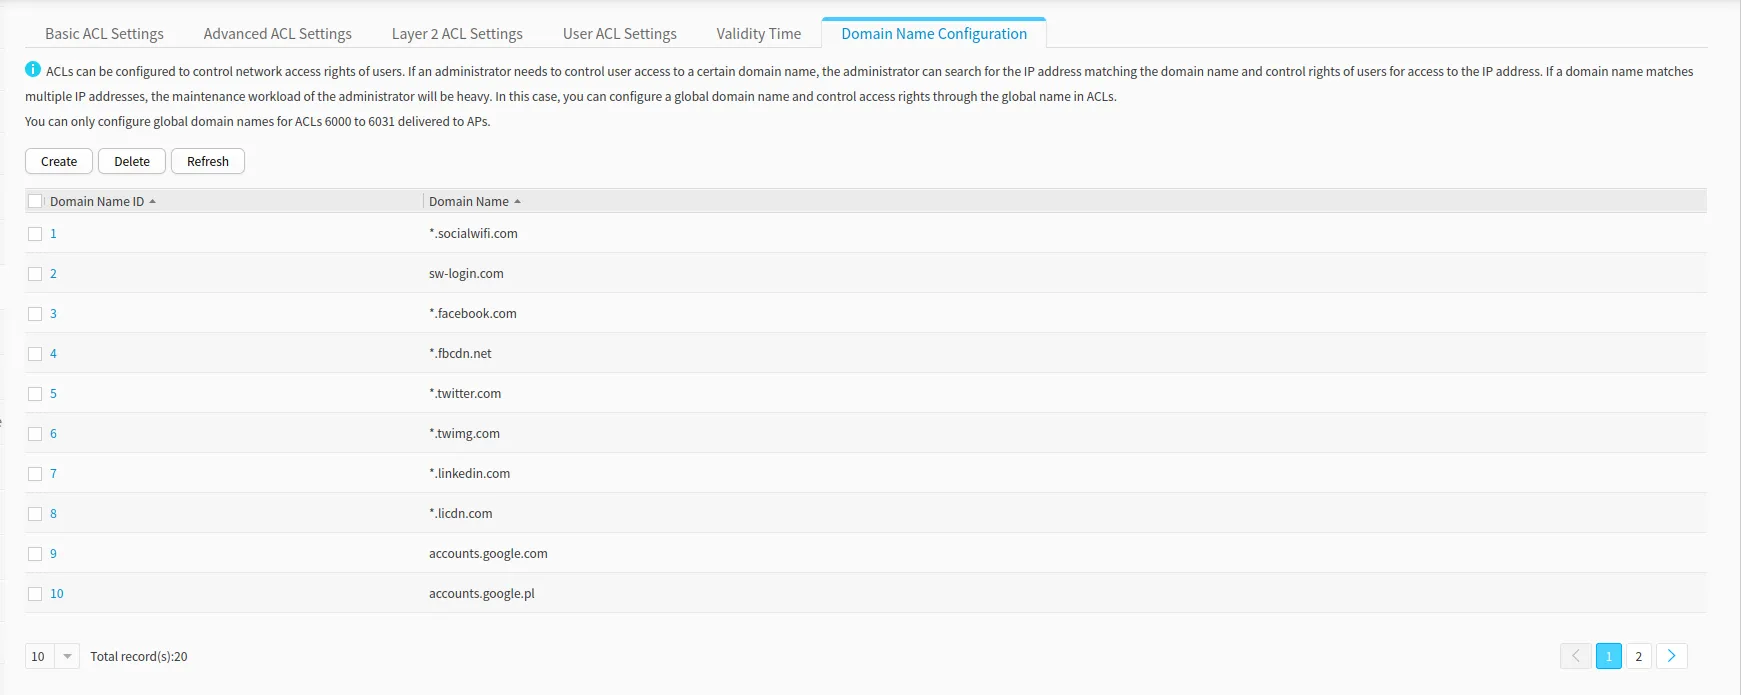
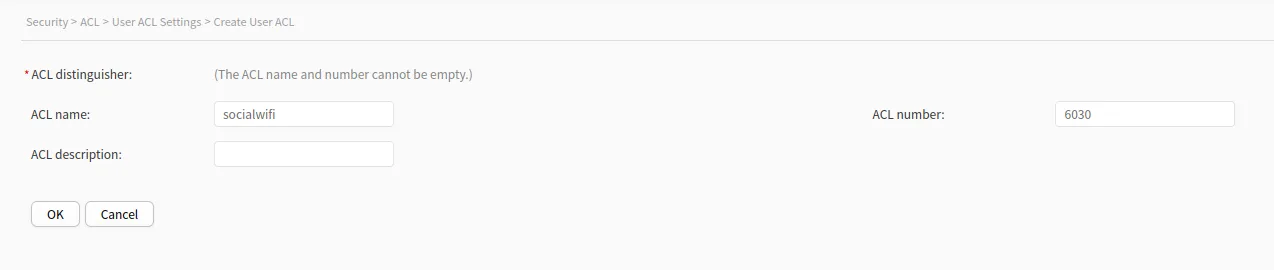
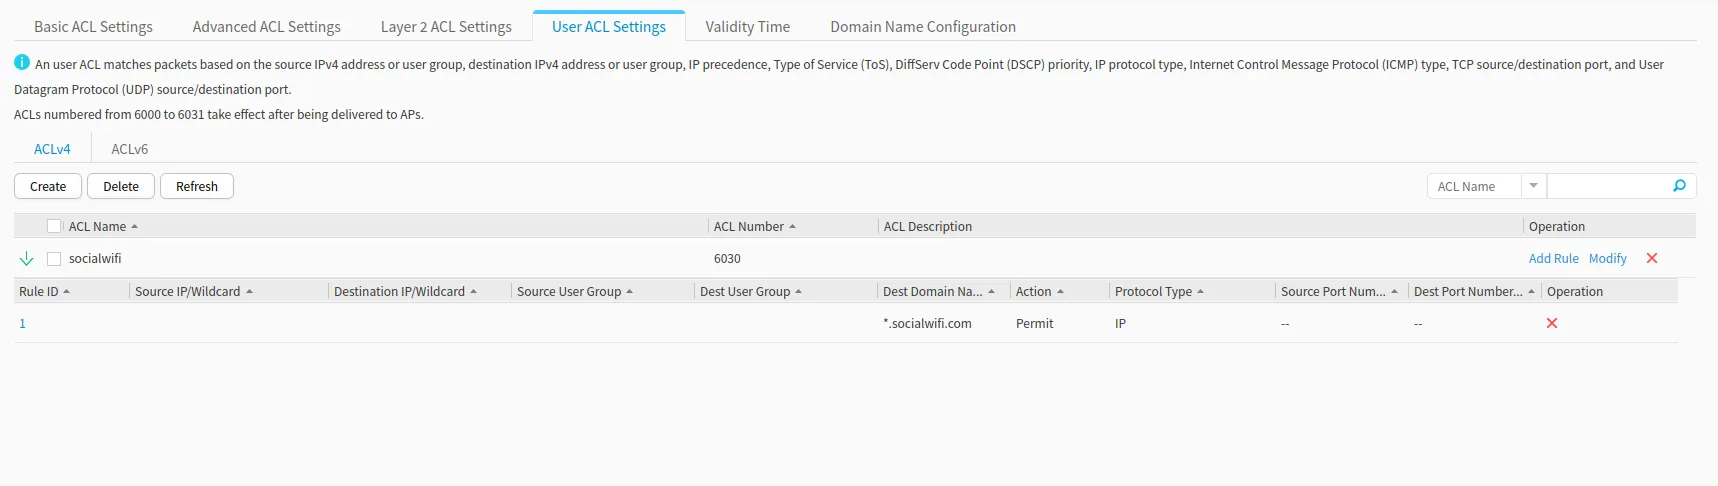
Next you need to switch to the User ACL Settings tab and click Create.

Configure as follows:
| ACL name | socialwifi |
|---|---|
| ACL number | 6030 |
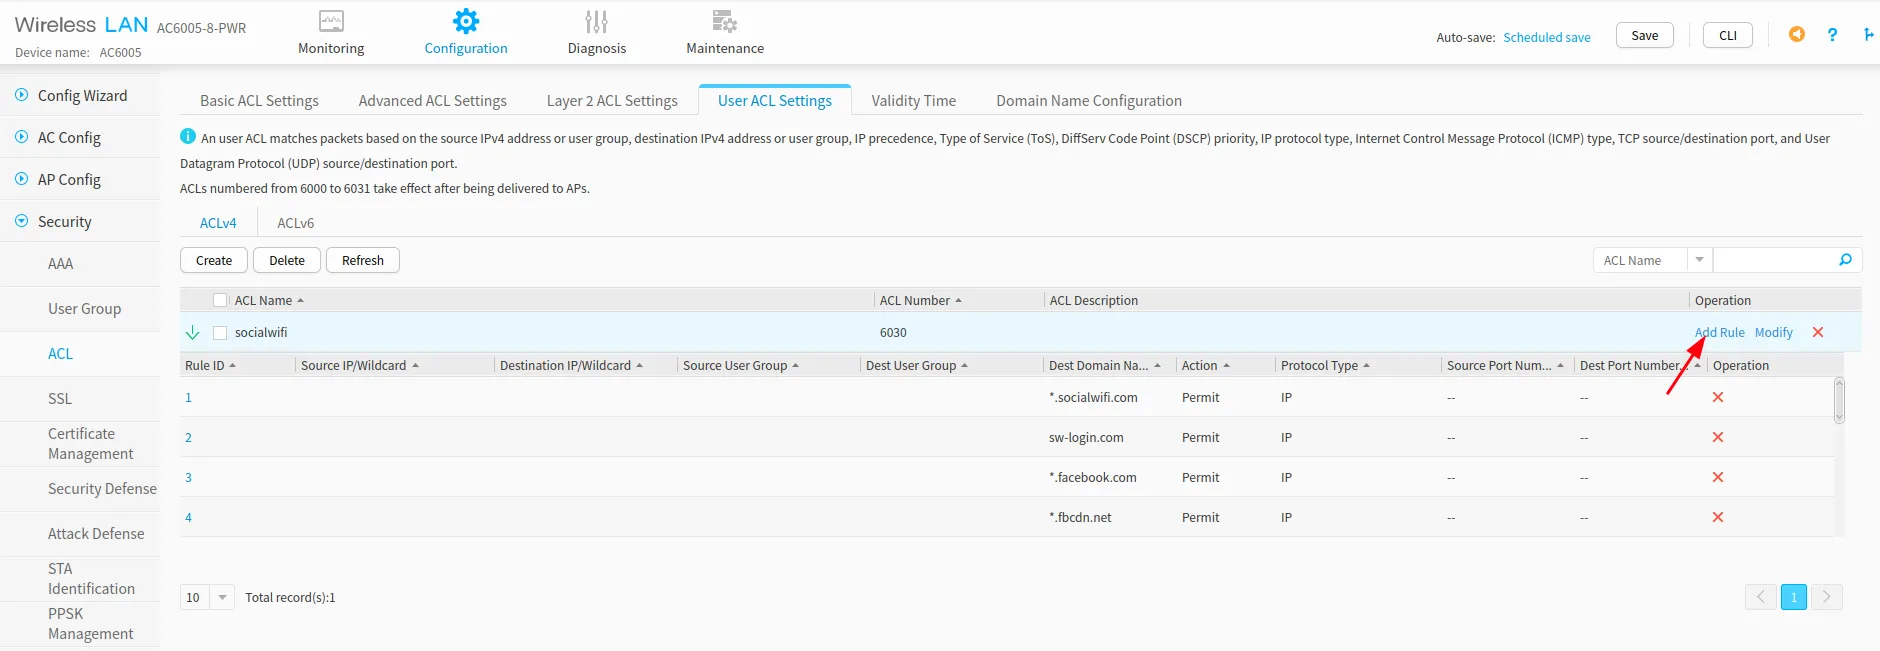
Now, proceed with adding all the rules added before in the “Domain Name Configuration” by clicking on Add Rule and adding one at the time and set the “Rule ID” respectively starting from 1.
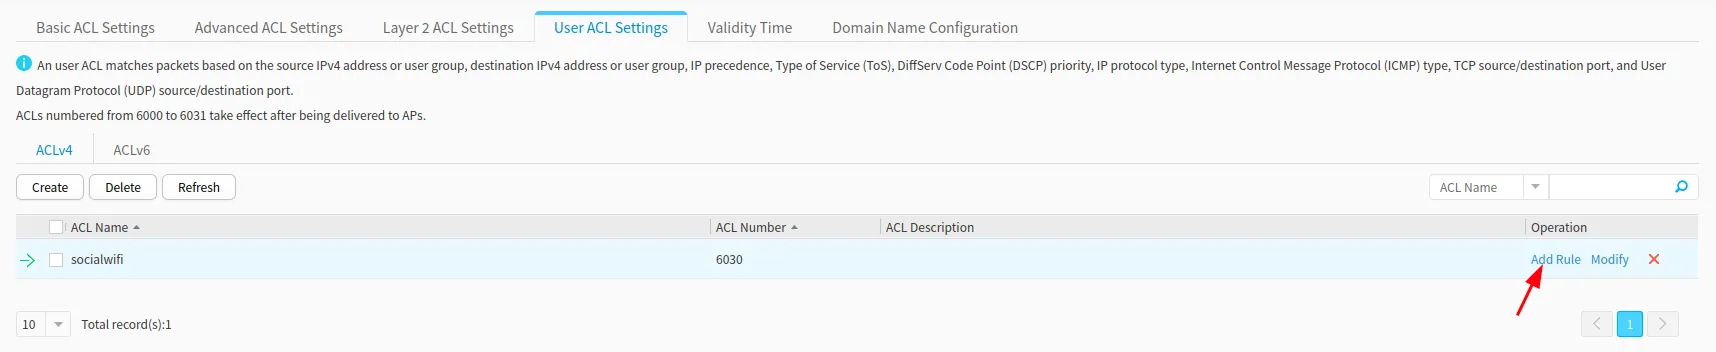
Add each rule as follows:
| Rule ID | *“Rule ID” starting from 1* |
|---|---|
| Protocol type | IP |
| Dest domain name | *Choose the domain from the drop down menu respectively* |
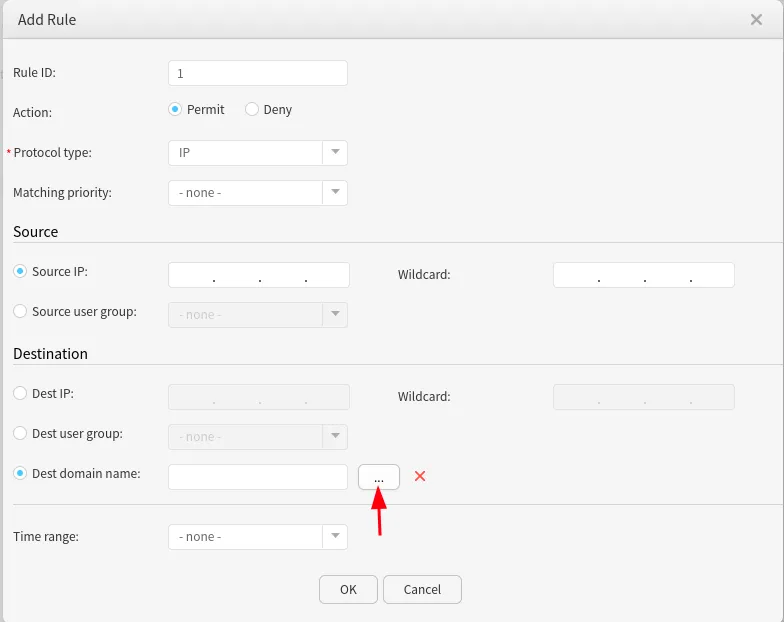
Add all the domains needed for your Social WiFi login page.
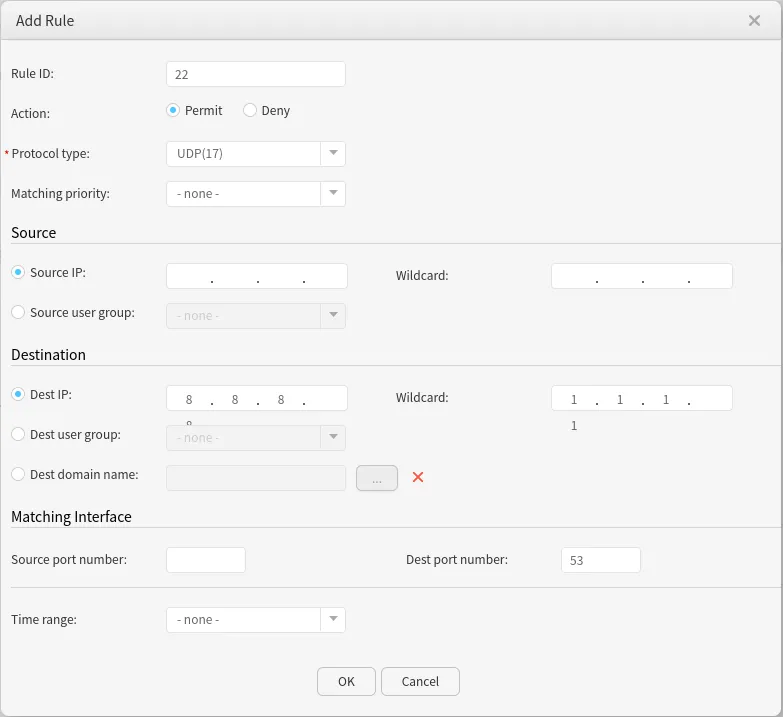
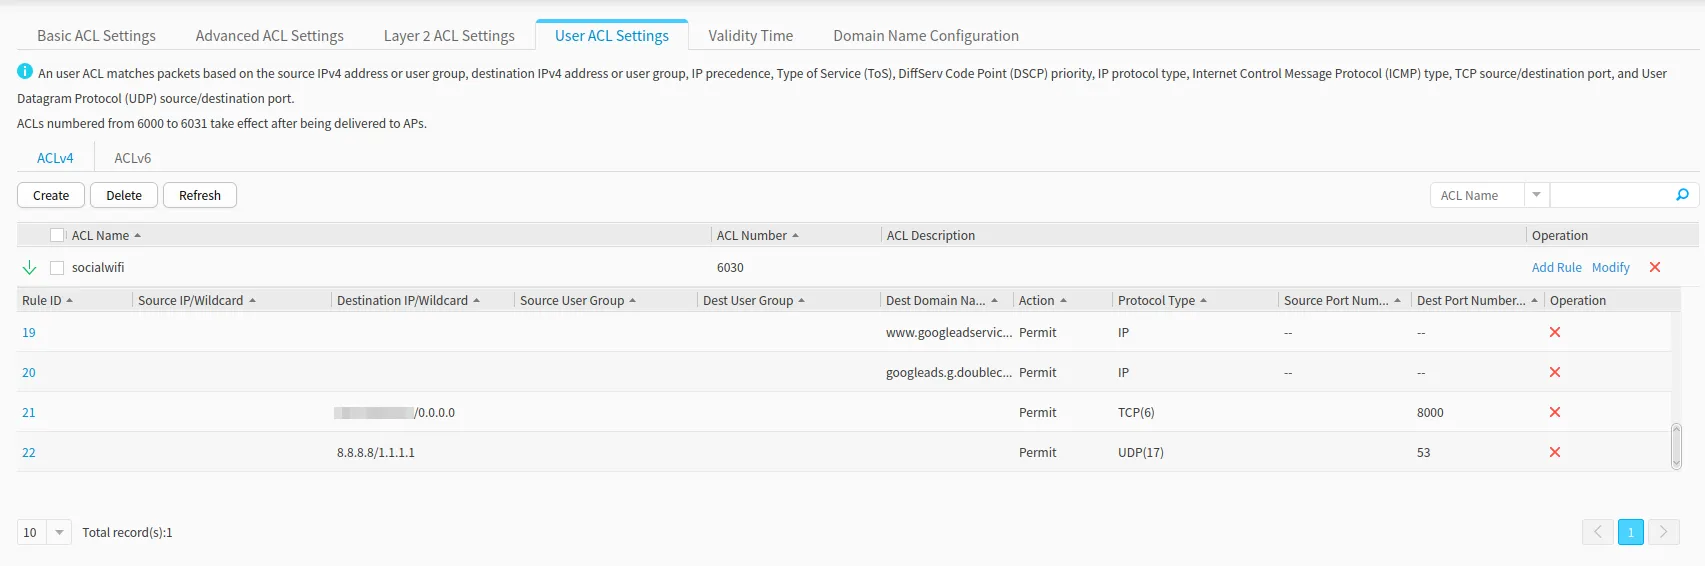
You also must add two additional rules in this step to make captive portal login possible, configure as follows:
| Rule ID | your last “Rule ID” + 1 |
| Action | Permit |
| Protocol type | TCP(6) |
| Dest IP | your controller IP address |
| Wildcard | 0.0.0.0 |
| Dest port number | 8000 |

| Rule ID | *your last “Rule ID” + 1* |
|---|---|
| Action | Permit |
| Protocol type | UDP(17) |
| Dest IP | 8.8.8.8 |
| Wildcard | 1.1.1.1 |
| Dest port number | 53 |
Captive Portal configuration
Now, switch tabs to Configuration -> Security -> AAA. From the menu at the top, select External Portal and configure as follows:
| HTTP Protocol | Enabled |
|---|---|
| HTTP interpretation mode | HTTP-based |
| Port number for listening to HTTP packets | 8000 (default) |
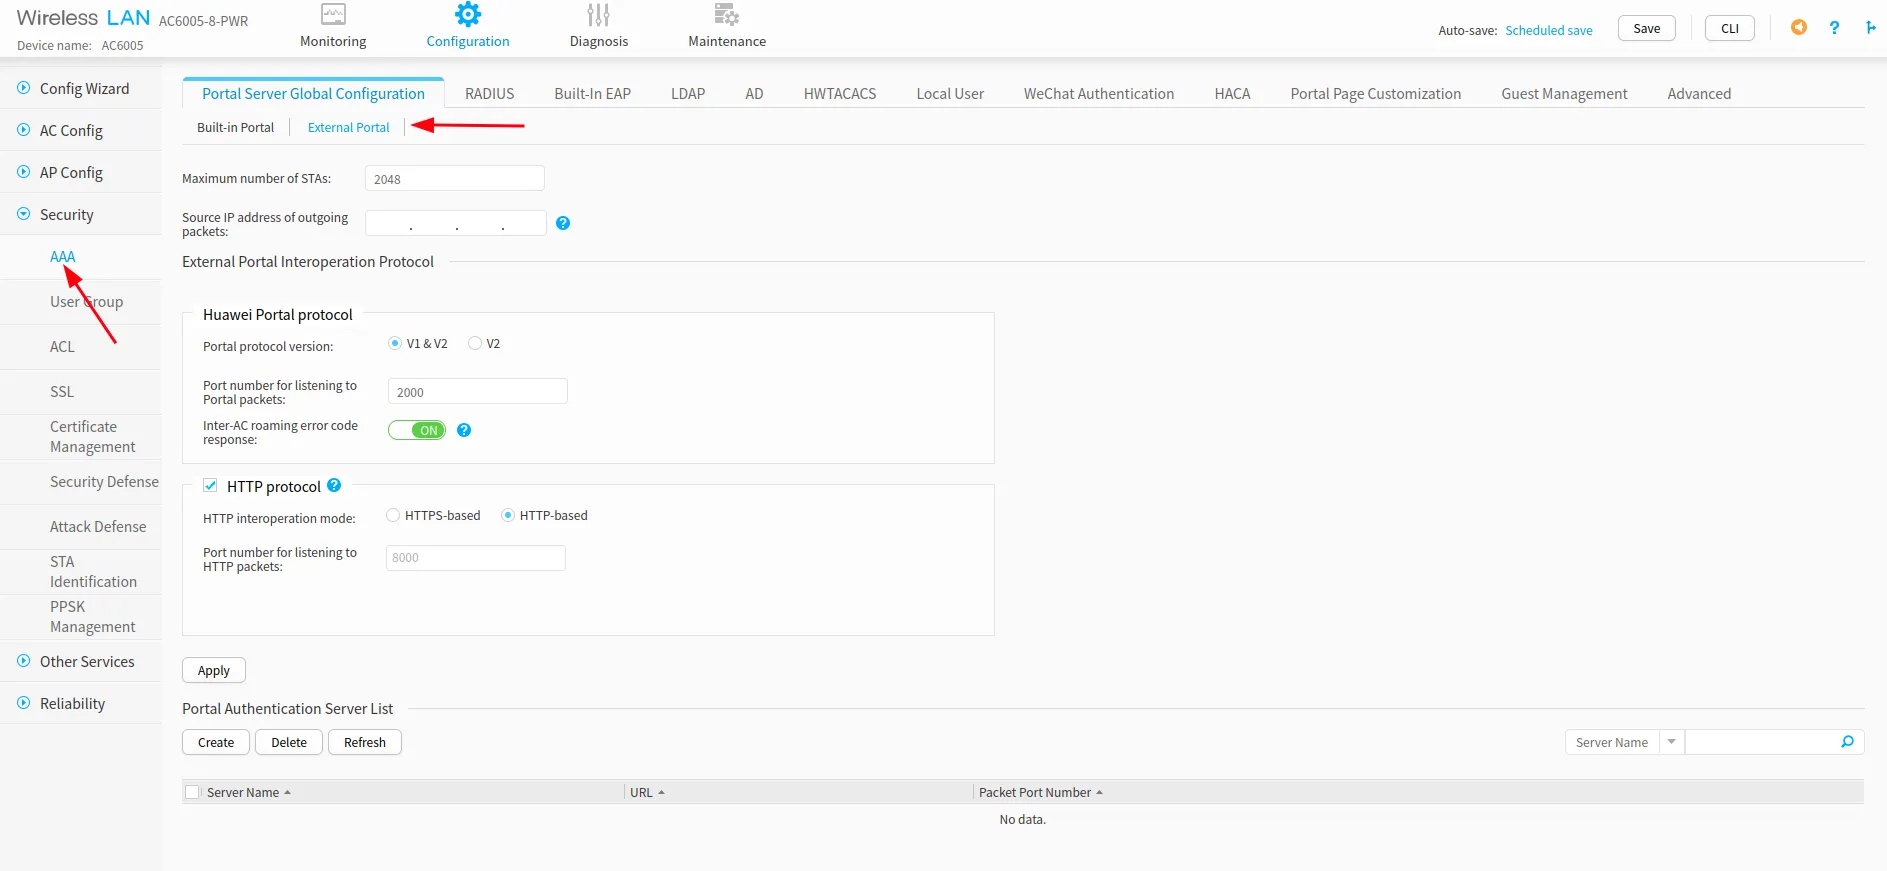
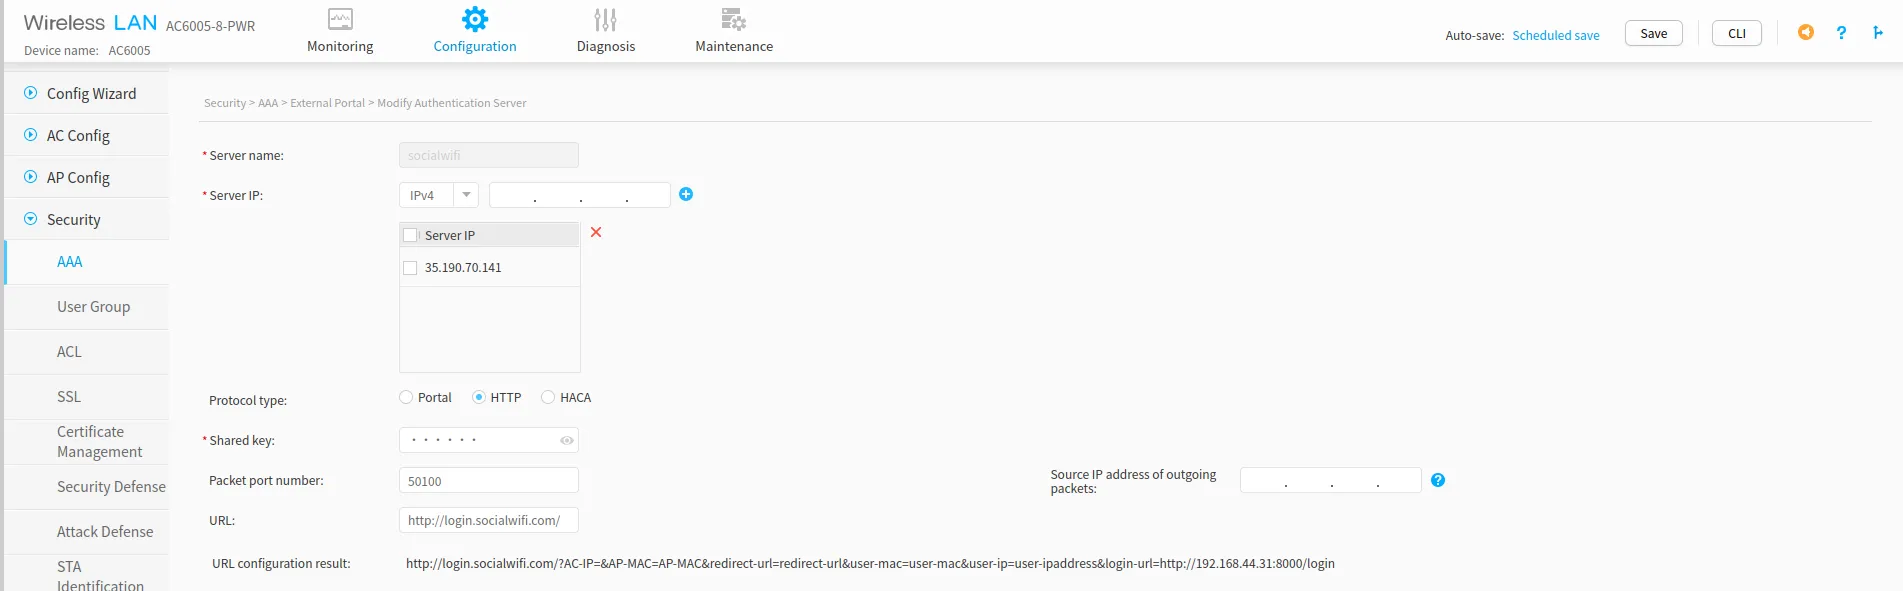
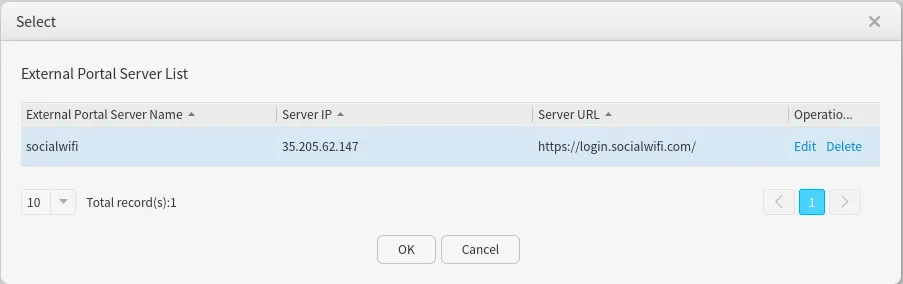
Next, under the Portal “Authentication Server” list, click Create. Configure as follows:
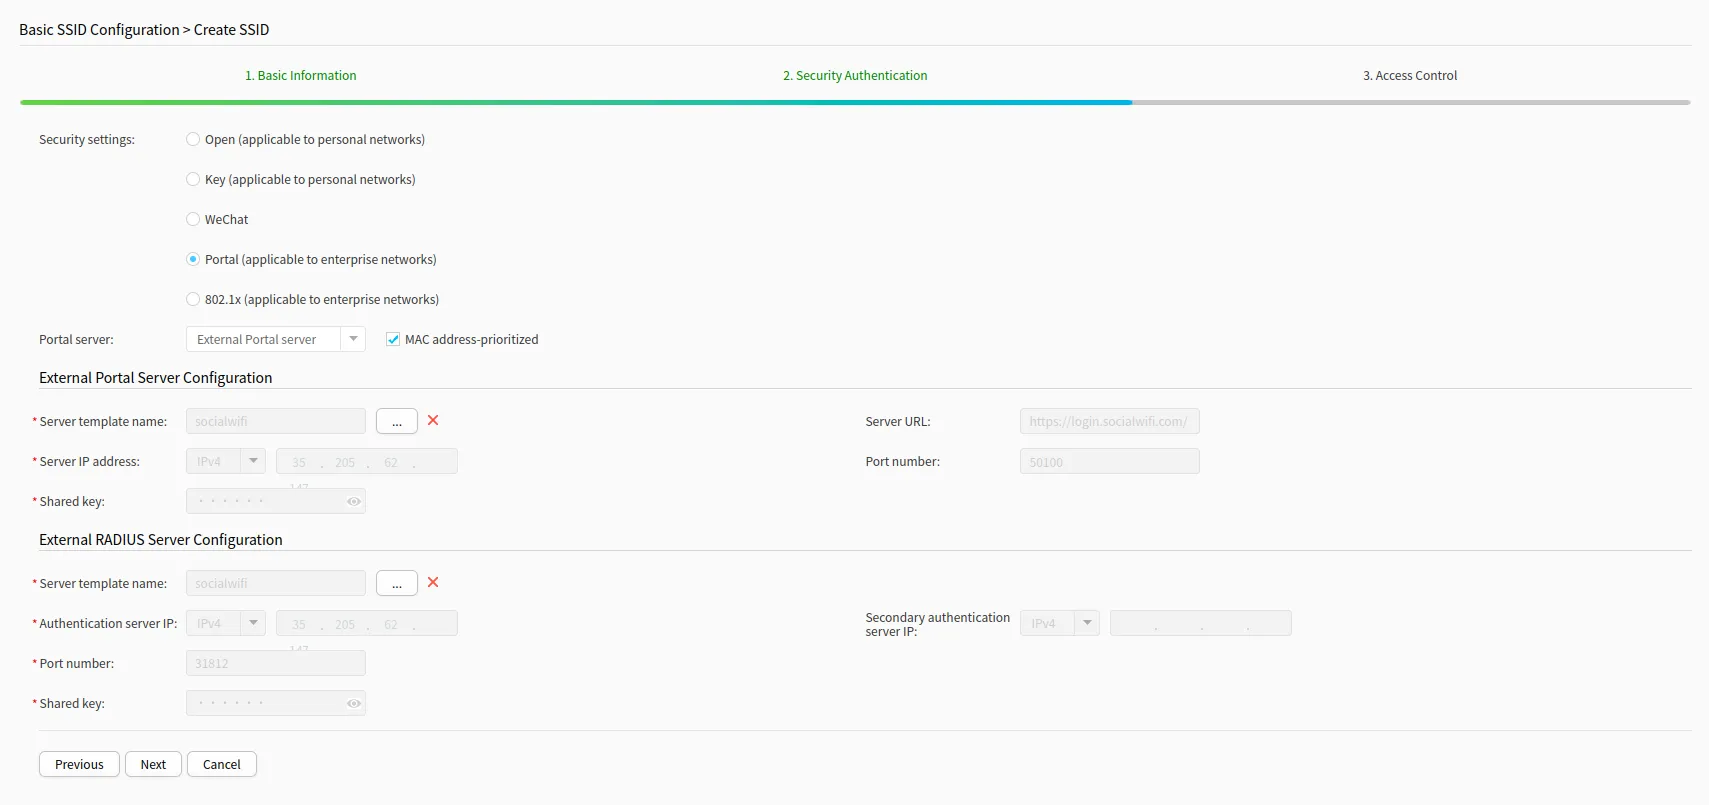
| Server name | socialwifi |
|---|---|
| Server IP | 35.205.62.147 (click ”+” to add the server) |
| Protocol type | HTTP |
| Shared key | Shared key is available in Access Points tab of the Social WiFi Panel |
| Packet port number | 50100 |
| URL | http://login.socialwifi.com |
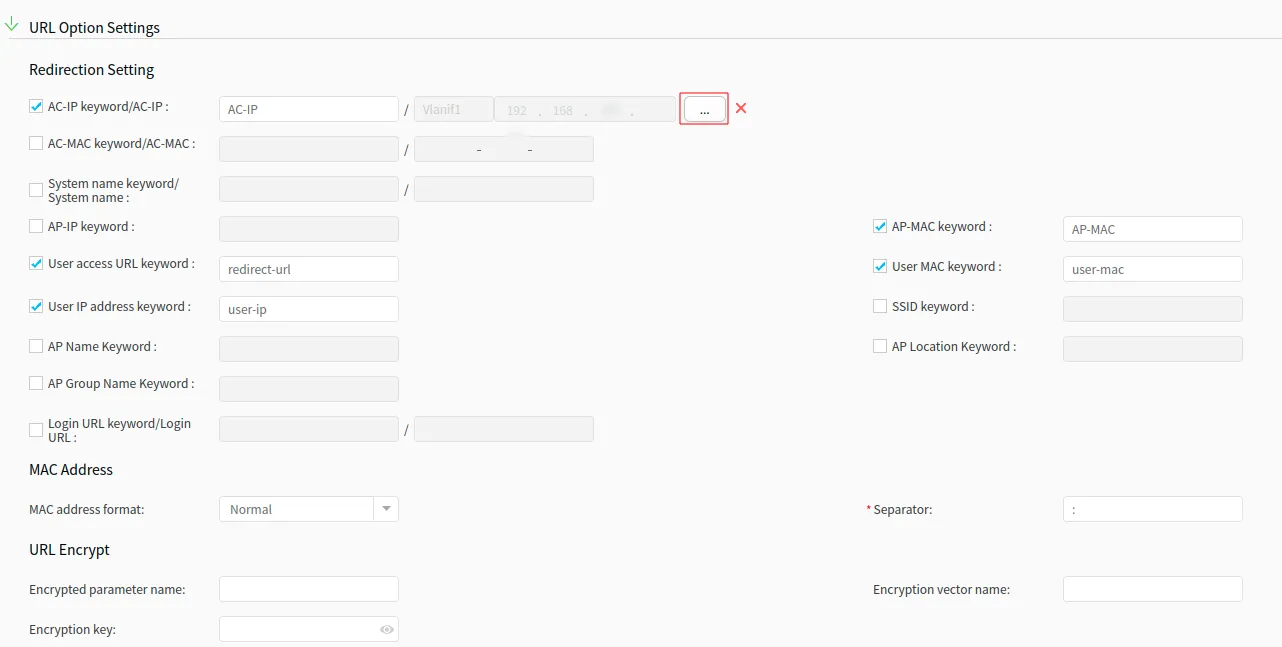
Scroll down to the “URL Option Settings” and configure as follows.
For the Huawei AC:
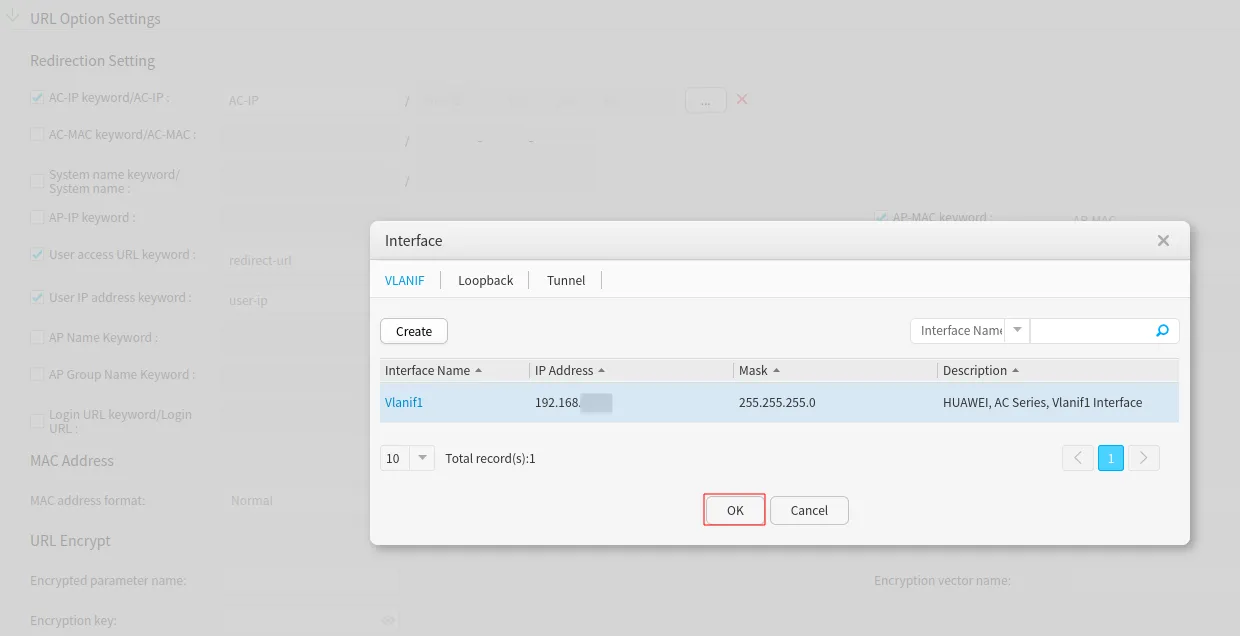
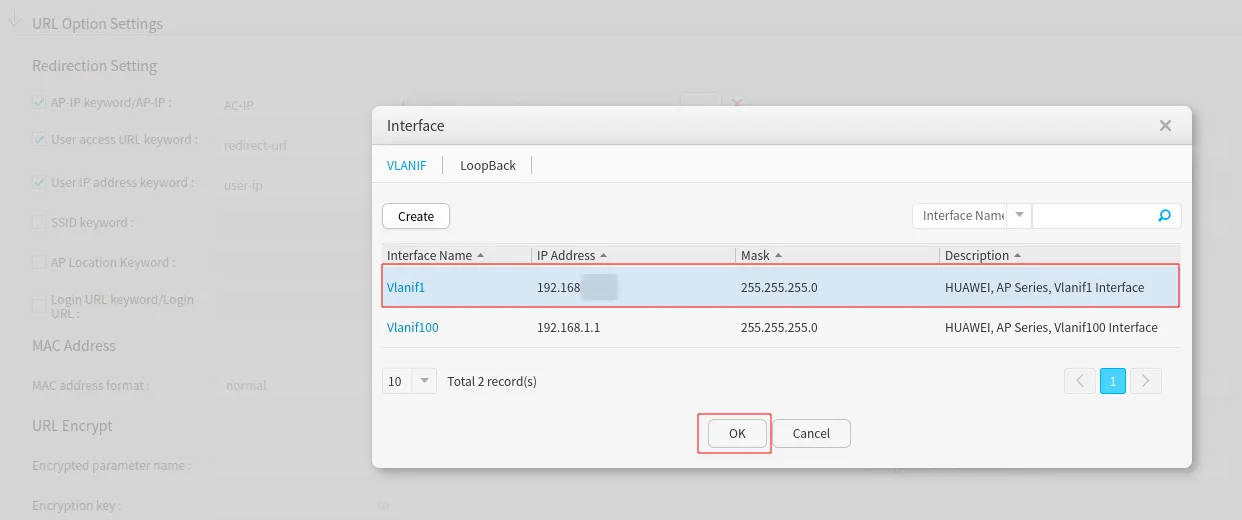
| AC-IP keyword/AC-IP | AC-IP / *see the screenshot below |
|---|---|
| User access URL keyword | redirect-url |
| User IP address keyword | user-ip |
| AP-MAC keyword | AP-MAC |
| User MAC keyword | user-mac |
| MAC address format | Normal |
| Separator | : |
For the FAT AP:
| AP-IP keyword/AC-IP | AC-IP / *see the screenshot below |
|---|---|
| User access URL keyword | redirect-url |
| User IP address keyword | user-ip |
| AP-MAC keyword | AP-MAC |
| User MAC keyword | user-mac |
| MAC address format | Normal |
| Separator | : |

Leave the “Parameter Parsing Configuration” config as default.
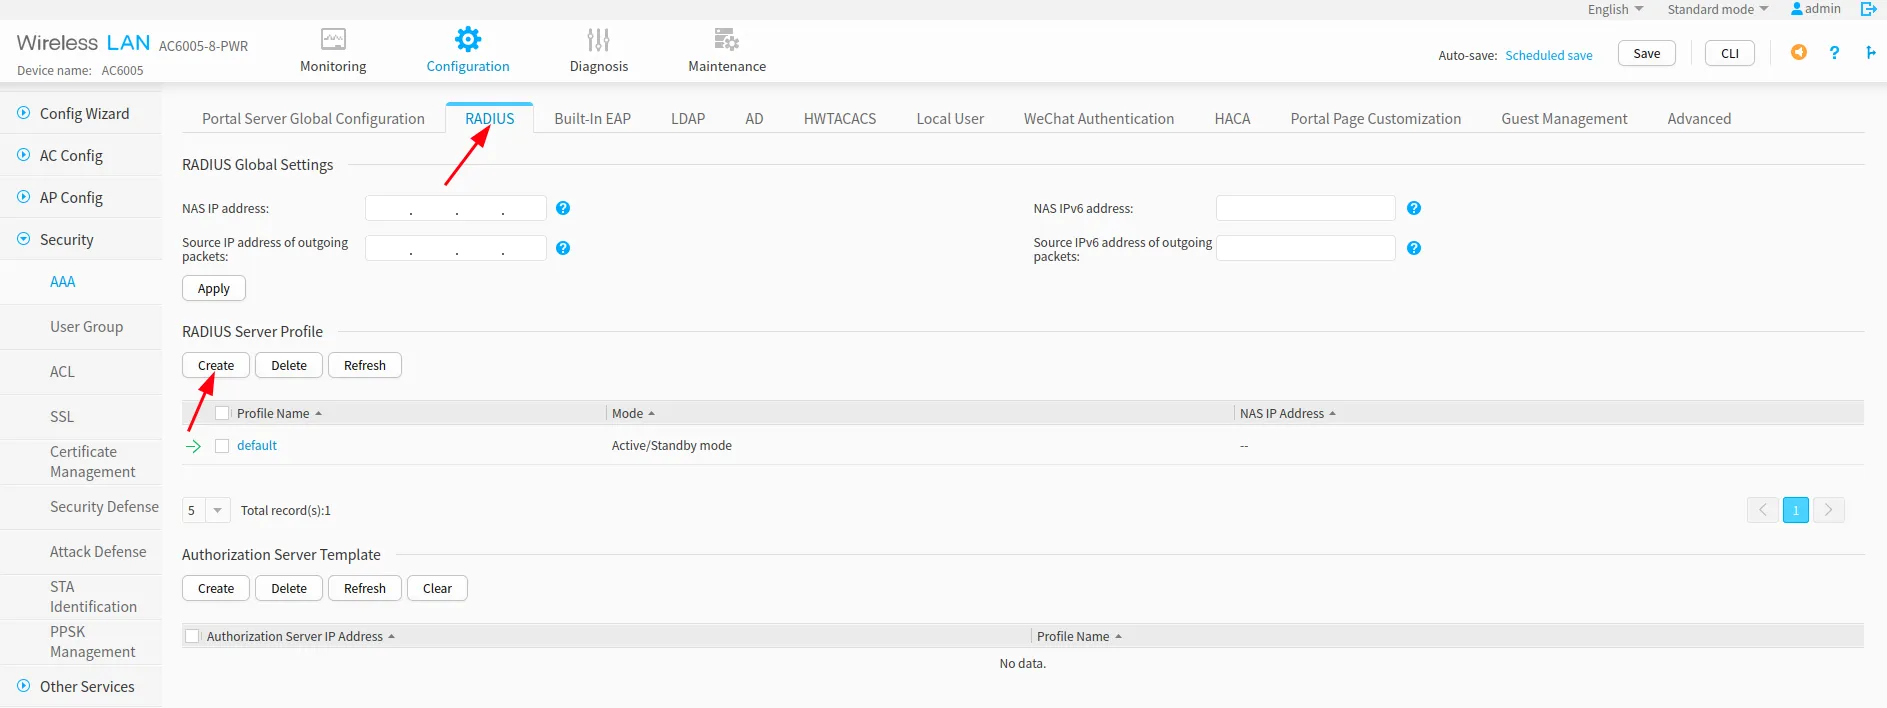
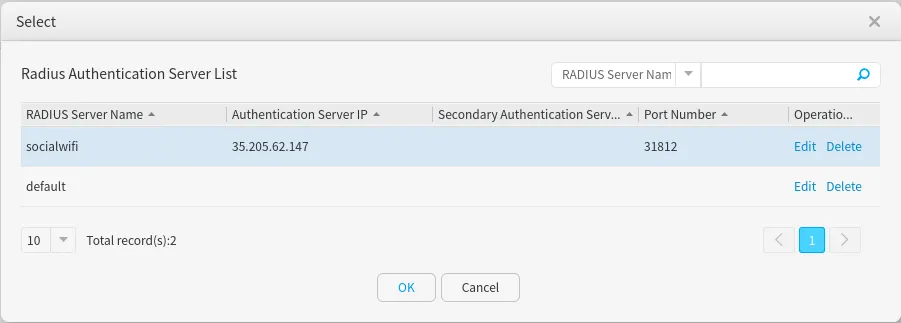
Now, go to the “RADIUS” tab and click on Create to add a new RADIUS server.
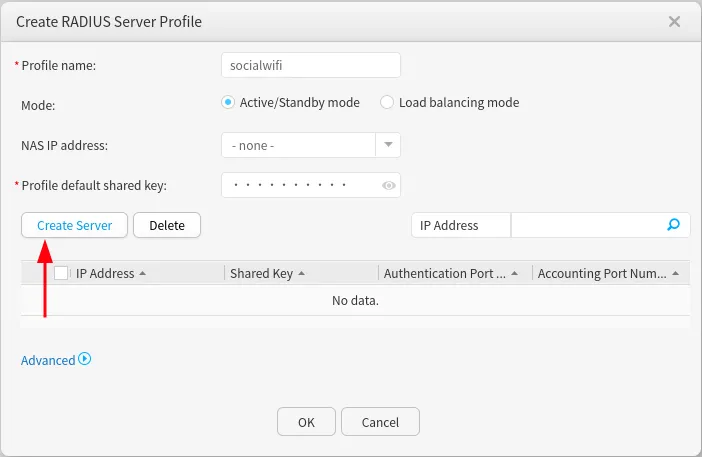
Configure like this:
| Profile name | socialwifi |
|---|---|
| Mode | Active/Standby mode |
| Profile default shared key | Shared key is available in Access Points tab of the Social WiFi Panel |
Then, click on Create Server.
| IP address | IPv4 | 35.205.62.147 |
|---|---|
| Shared key | Shared key is available in Access Points tab of the Social WiFi Panel |
| Authentication | Enabled |
| Port number | 31812 |
| Weight | 1 |
| Source IP address of outgoing packets | Loopback |
| Accounting | Enabled |
| Port number | 31813 |
| Weight | 1 |
| Source IP address of outgoing packets | Loopback |
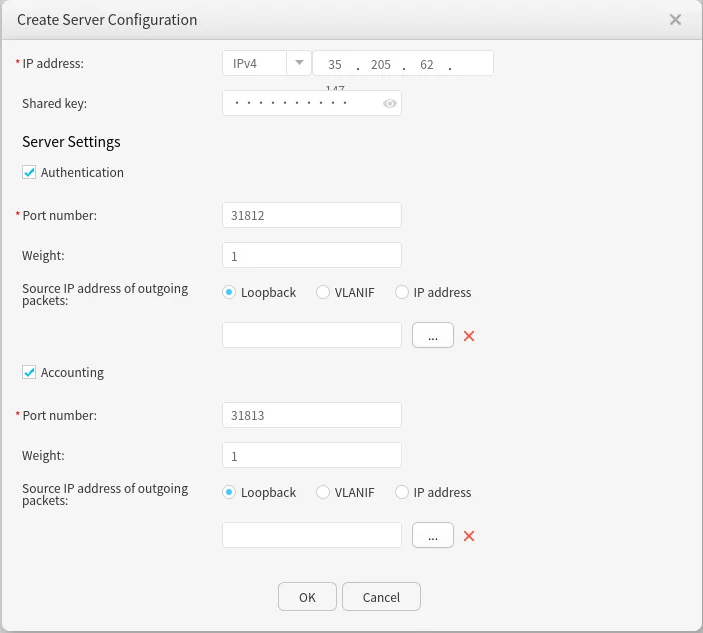
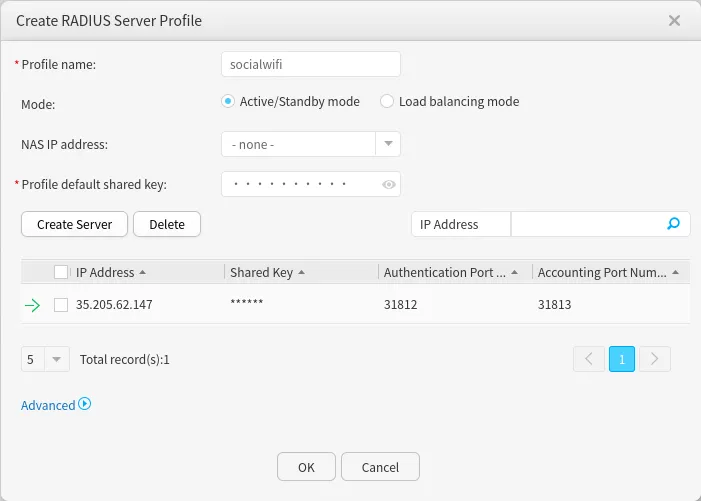
Click OK to confirm.
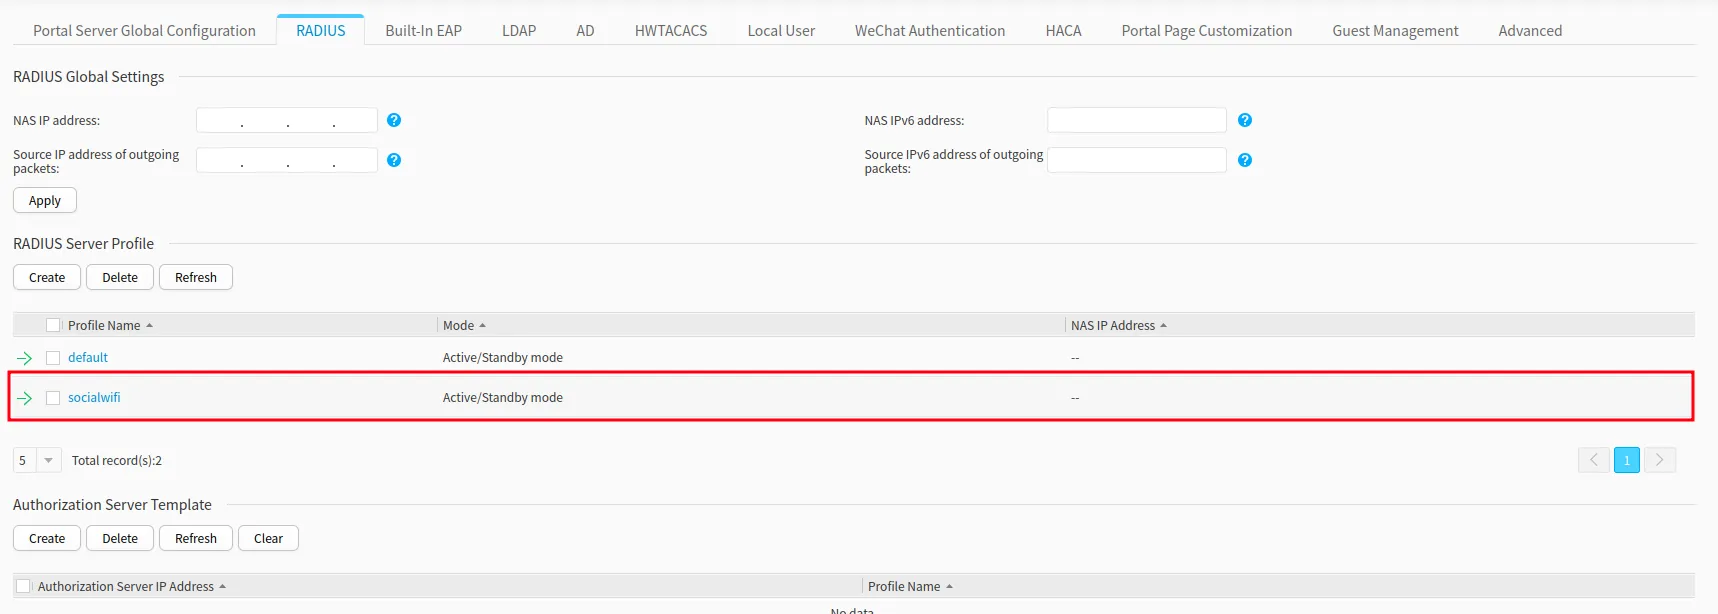
Make sure that the server you’ve created appears on the list:
SSID configuration
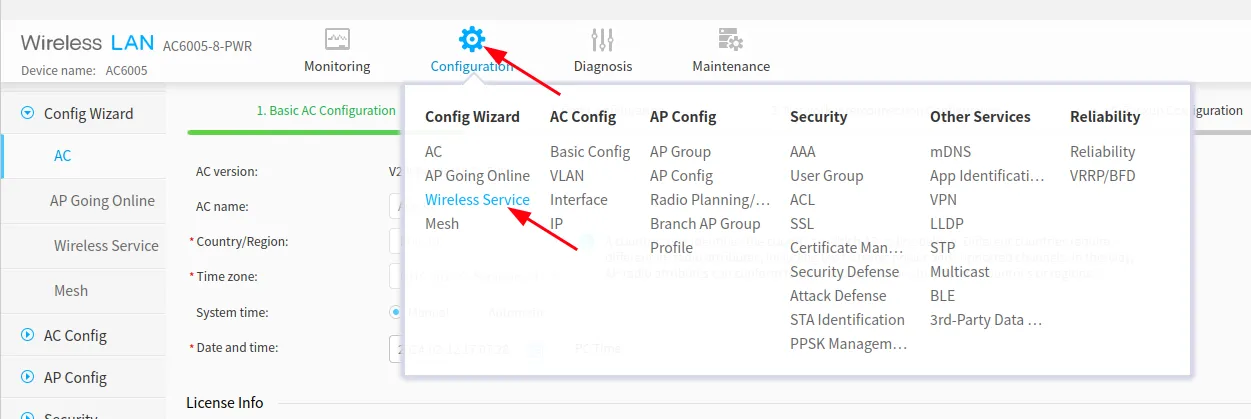
Go to Configuration -> Config Wizard -> Wireless Service.
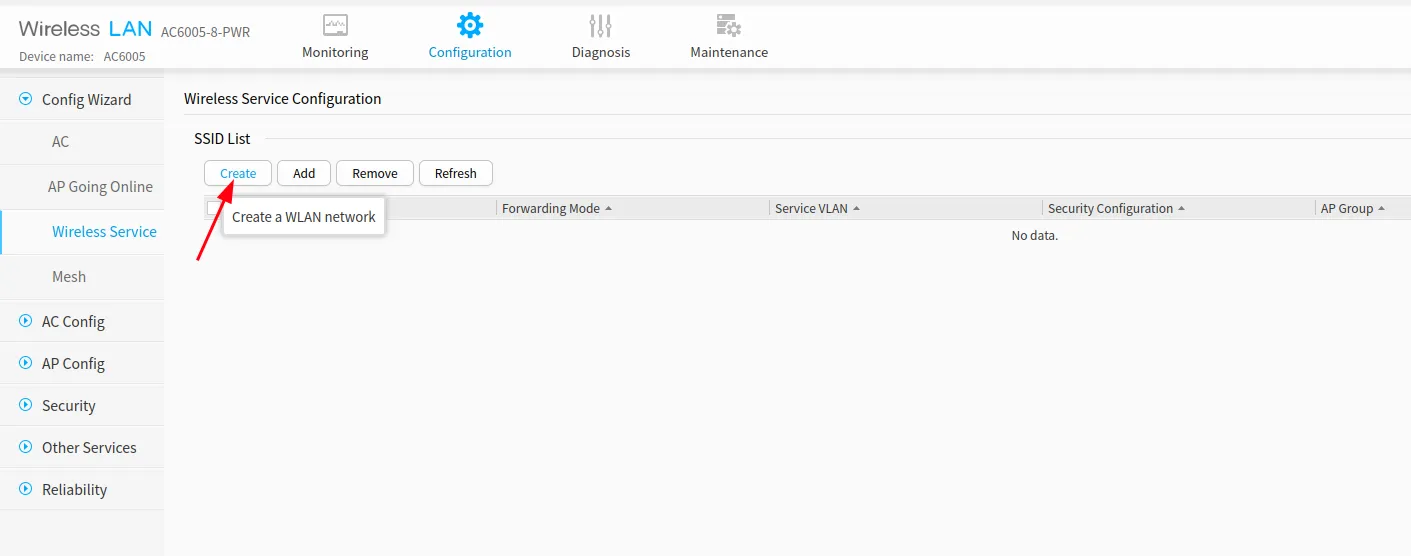
Click Create and go through the wizard, set the SSID name in the first step and click Next to access the second panel “2. Security Authentication”.
For “Security Settings” select Portal (applicable to enterprise networks).
In the “External Portal Server Configuration” and “External RADIUS Server Configuration” under “Server template name” select the previously created templates from the dropdown menu ”…” (refer to the images below).
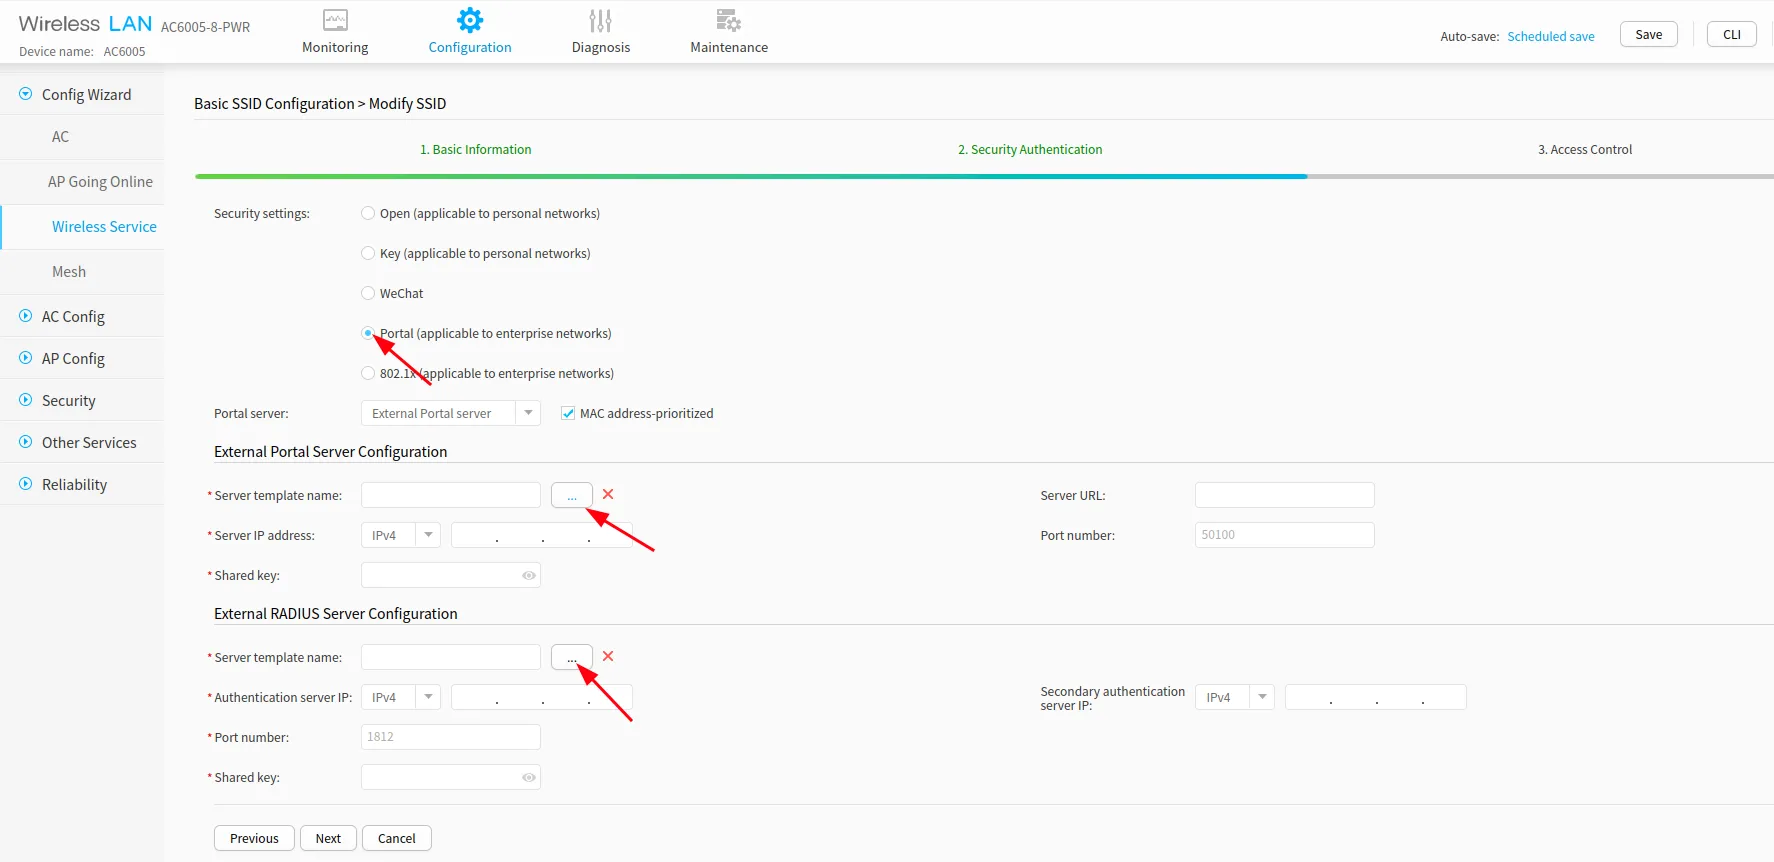
Click Next at the bottom of the screen.
Now, under the Binding the AP group, from the dropdown menu ”…” select your AP group (this example uses “default” group.
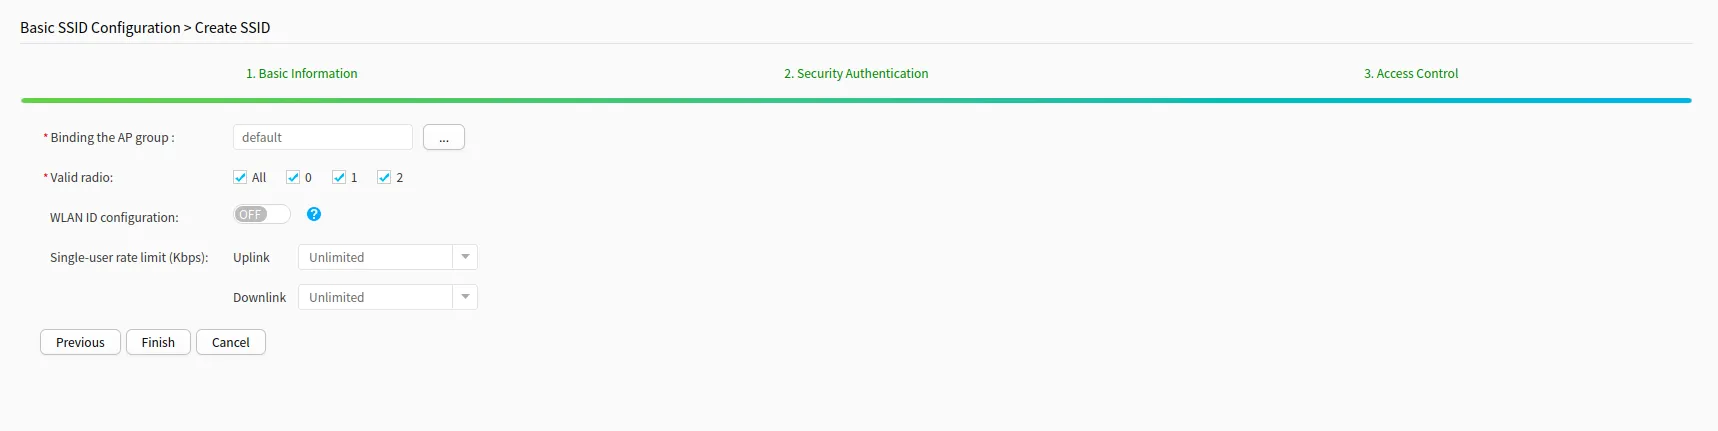
Click Finish to save the configuration.
Next, go to Configuration -> AP Config -> Profile.
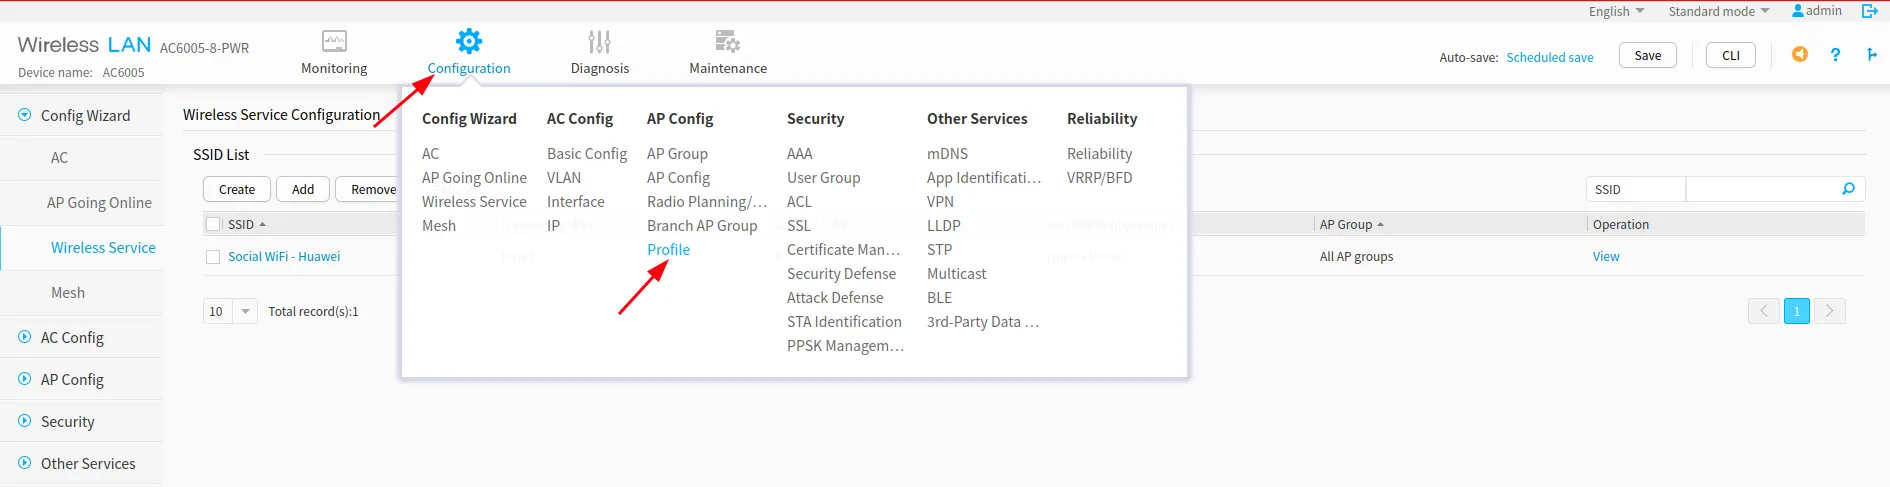
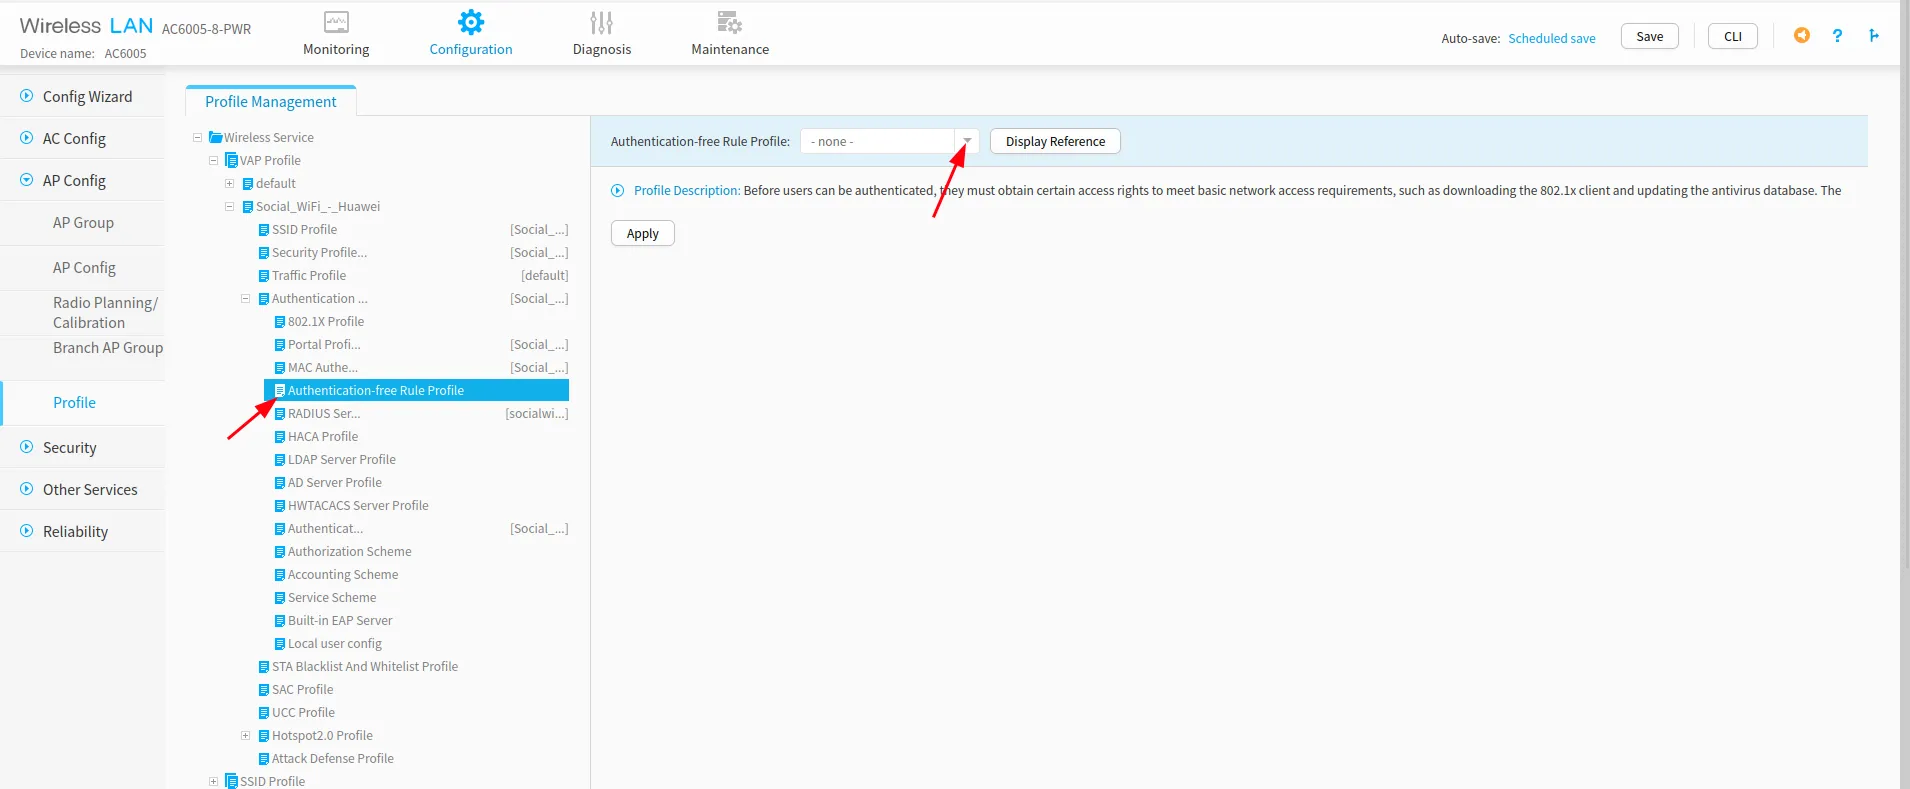
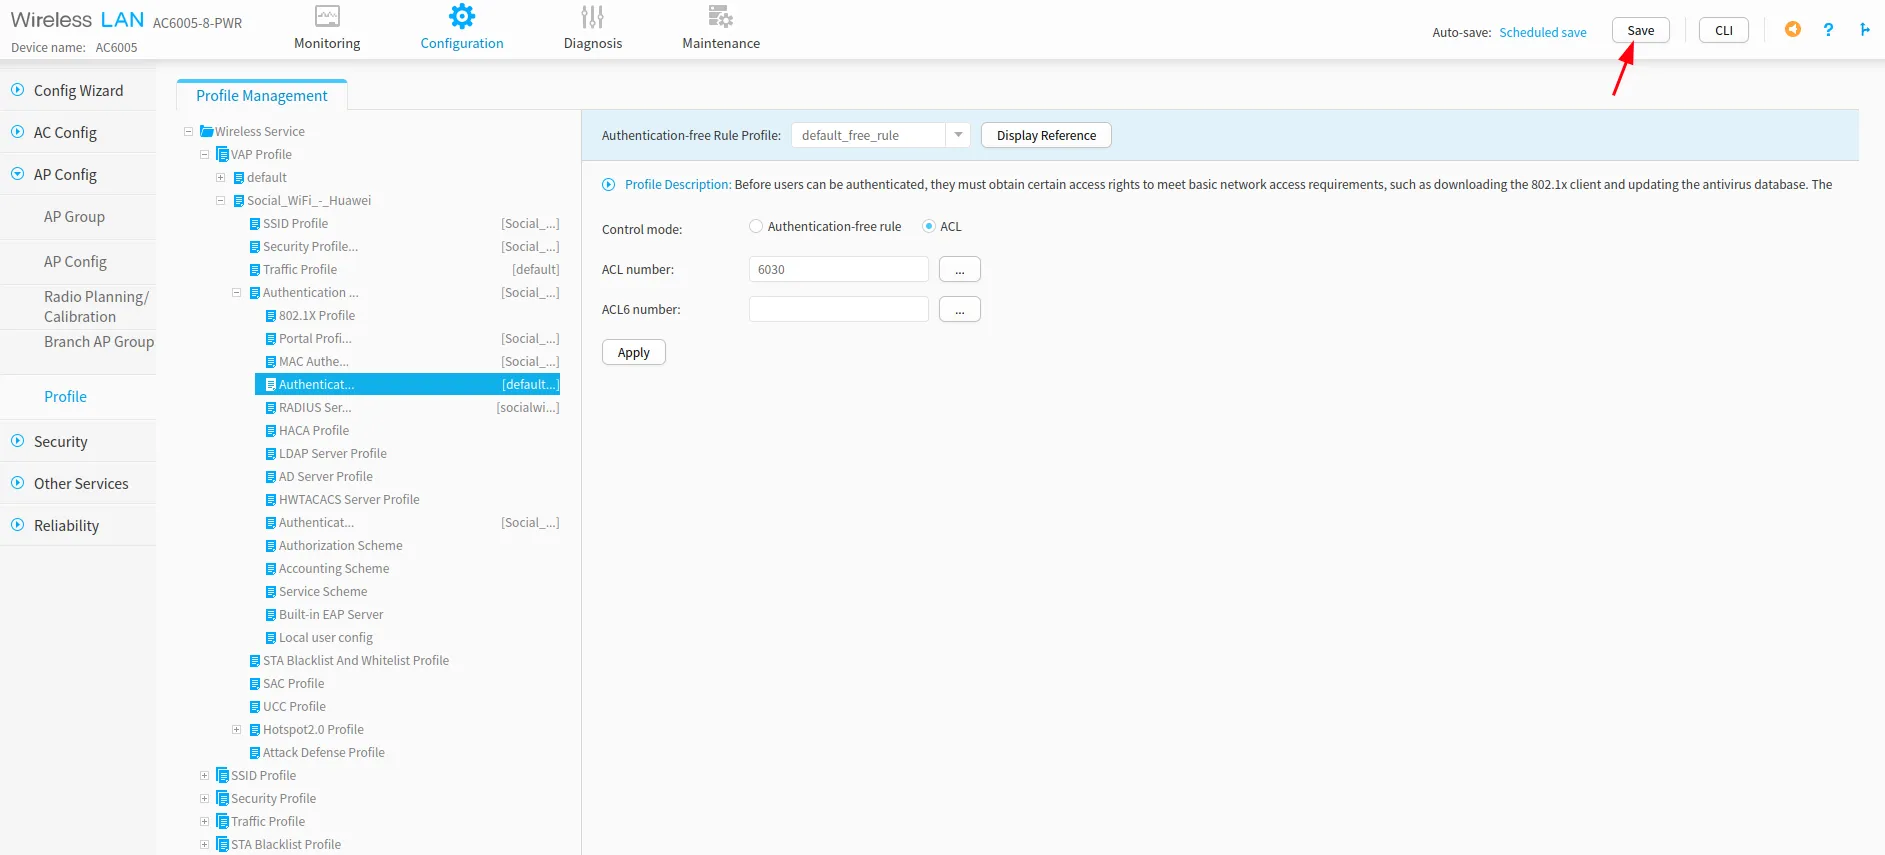
From the menu on the left, go to Wireless Service -> VAP Profile -> *your SSID name* -> Authentication Profile -> Authentication-free Rule Profile.
From “Authentication-free Rule Profile” dropdown menu, select the “default_free_rule” profile.
Configure as follows:
| Control mode | ACL |
|---|---|
| ACL number | 6030 |
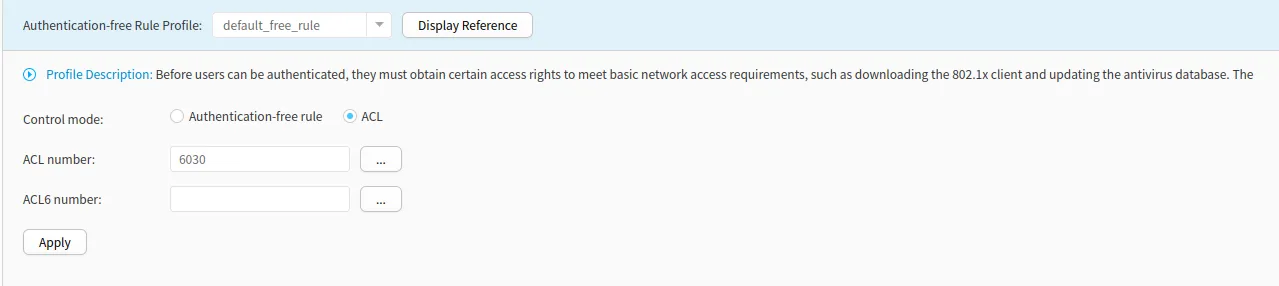
Click Apply.
Add the access points to Social WiFi panel
The setup of the controller is now finished. The last step is to add all access points to the Social WiFi platform.
Go to Ap Config -> AP Config -> AP Info -> AP List in the menu on the left.
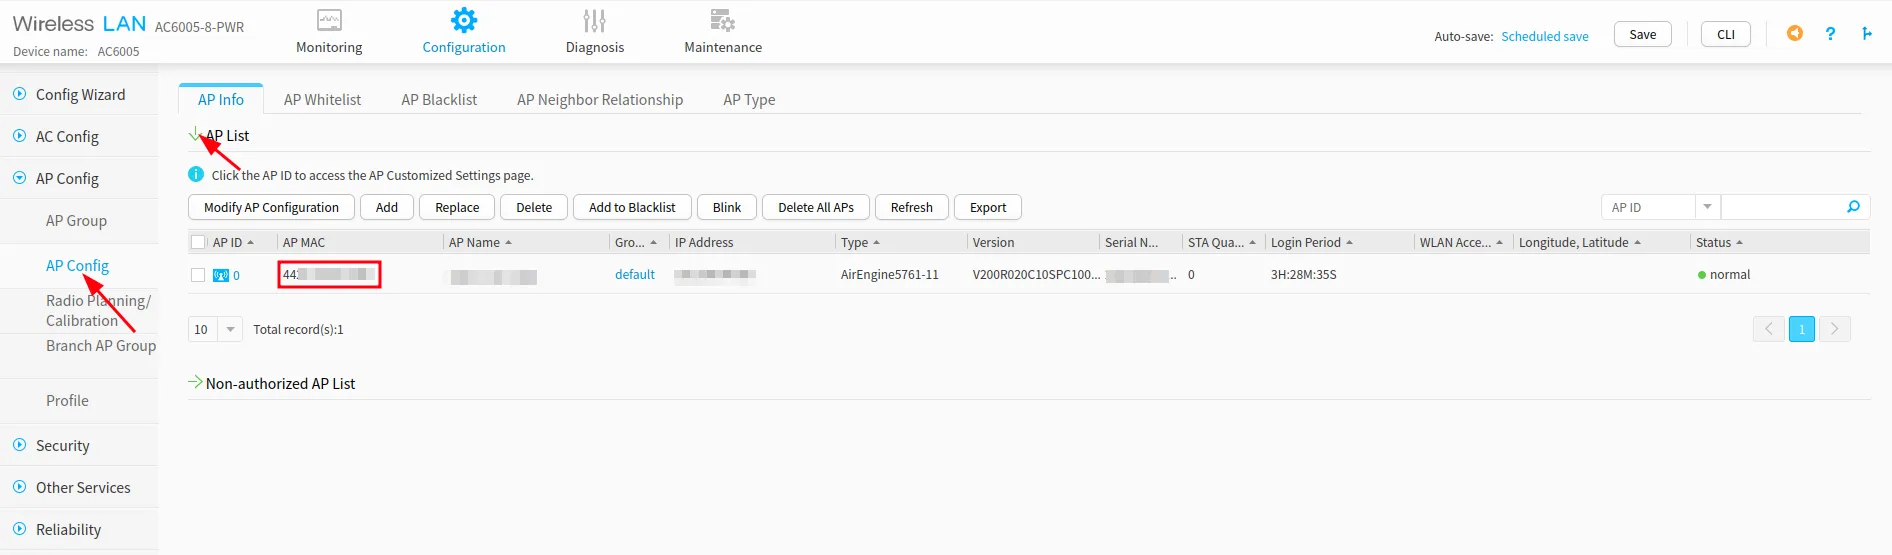
Now, switch to Social WiFi Panel, go to Access Points tab, click the Add button and paste the MAC addresses of all of your Access Points controller by the Huawei AC. Click Create.
Test the solution
Connect with the WiFi network. You should see a login page. Go through the login process and, once finished, you should have internet access. You should see first connections and authorizations in the Social WiFi Panel’s statistics section.